Activity › Forums › Astrotechniek › Methoden en Technieken › Data calibration workflow and processing in APP
Tagged: APP
- This topic has 25 replies, 4 voices, and was last updated 9 years, 3 months ago by
 Musquetier.
-
AuthorPosts
-
March 18, 2017 at 22:34 #12944
 HaverkampParticipant
Thank you Vincent, you’re welcome ;-)
Let me proceed with your calirbated frames.
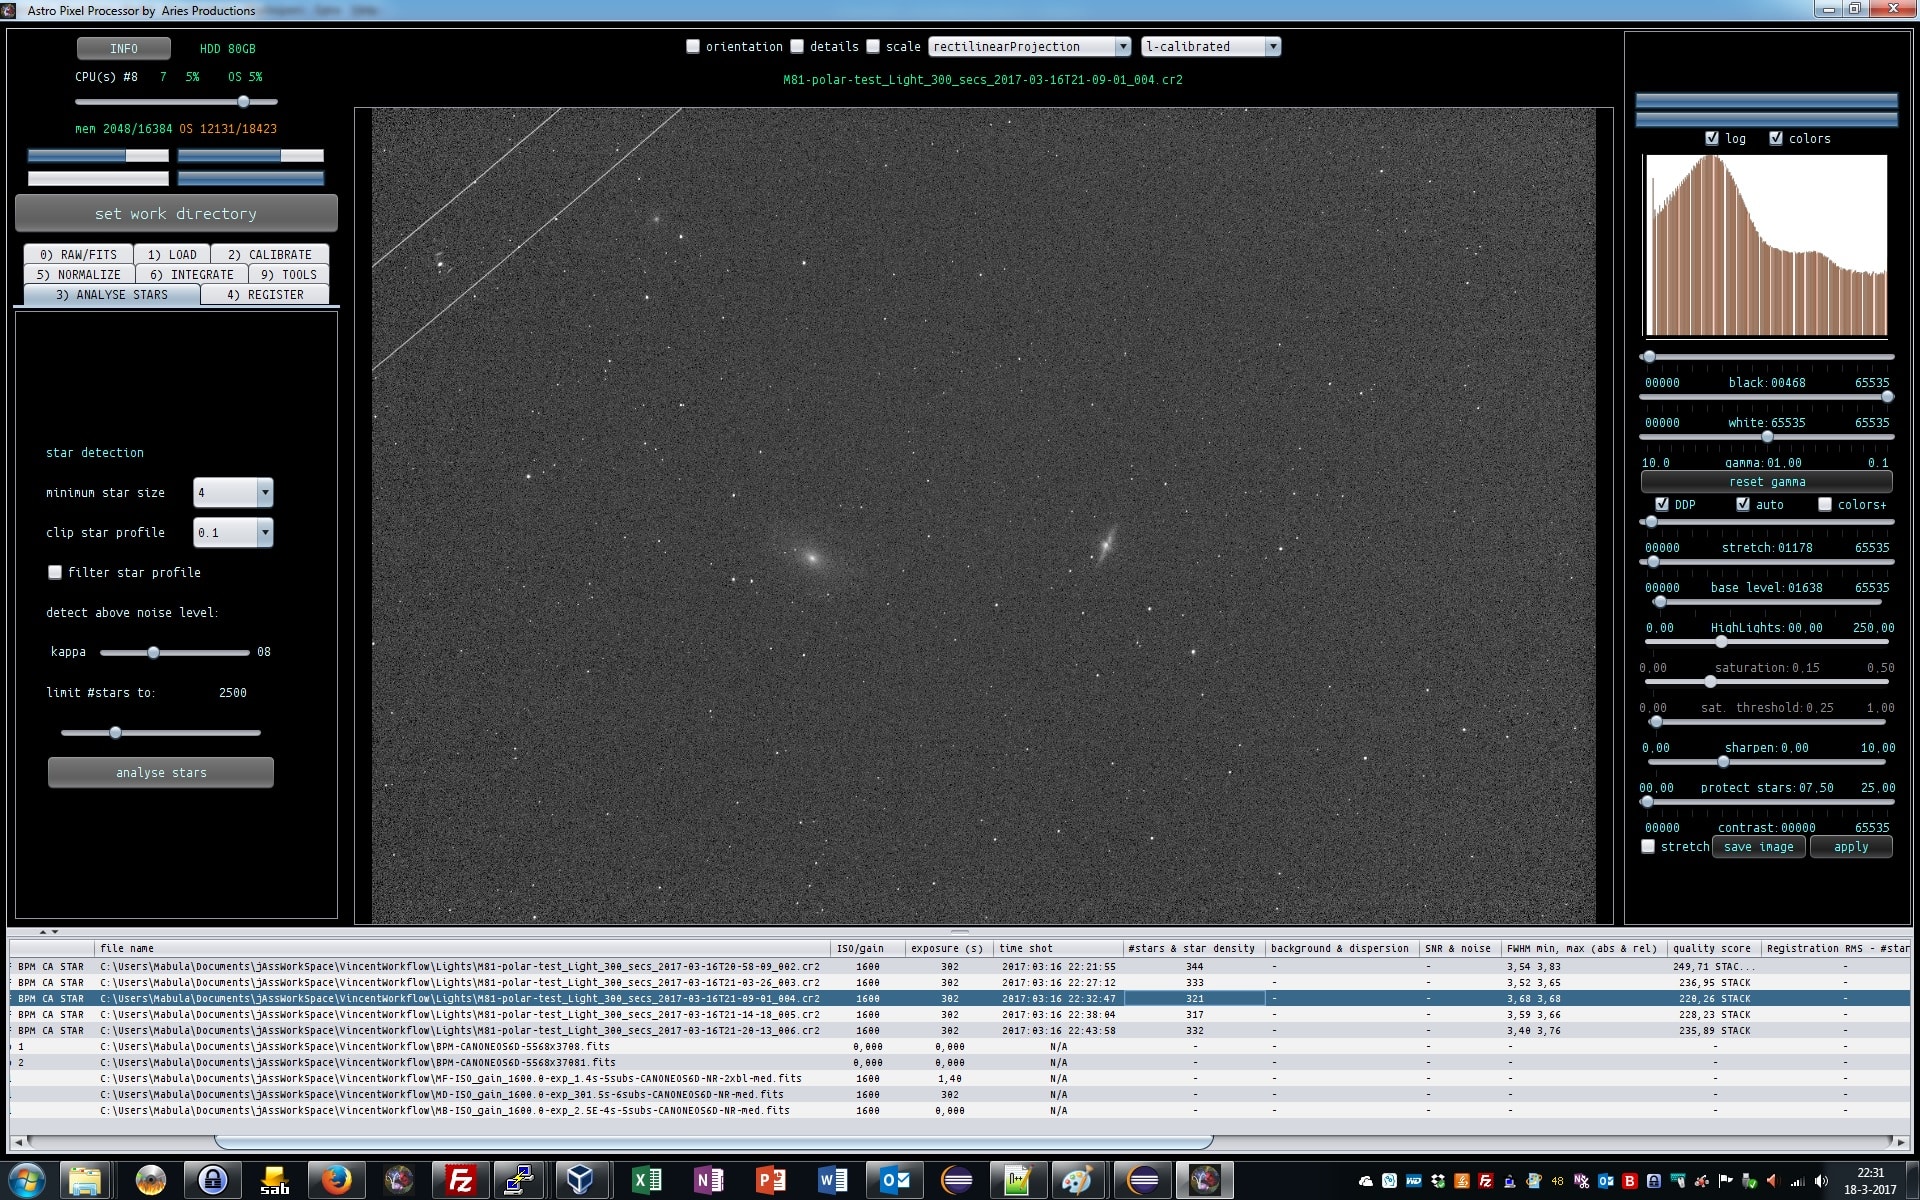
3) ANALYSE STARS, we can keep all settings at default ;-)
After star analysis, APP reports the amount of stars found with the supplied settings and also mininimum and maximum FWHM of your stars in the light frames. The more the minimum and maximum FWHM deviate the less round your stars are. APP will use these values in quality calculation of your frames.
 March 18, 2017 at 22:48 #12947HaverkampParticipant
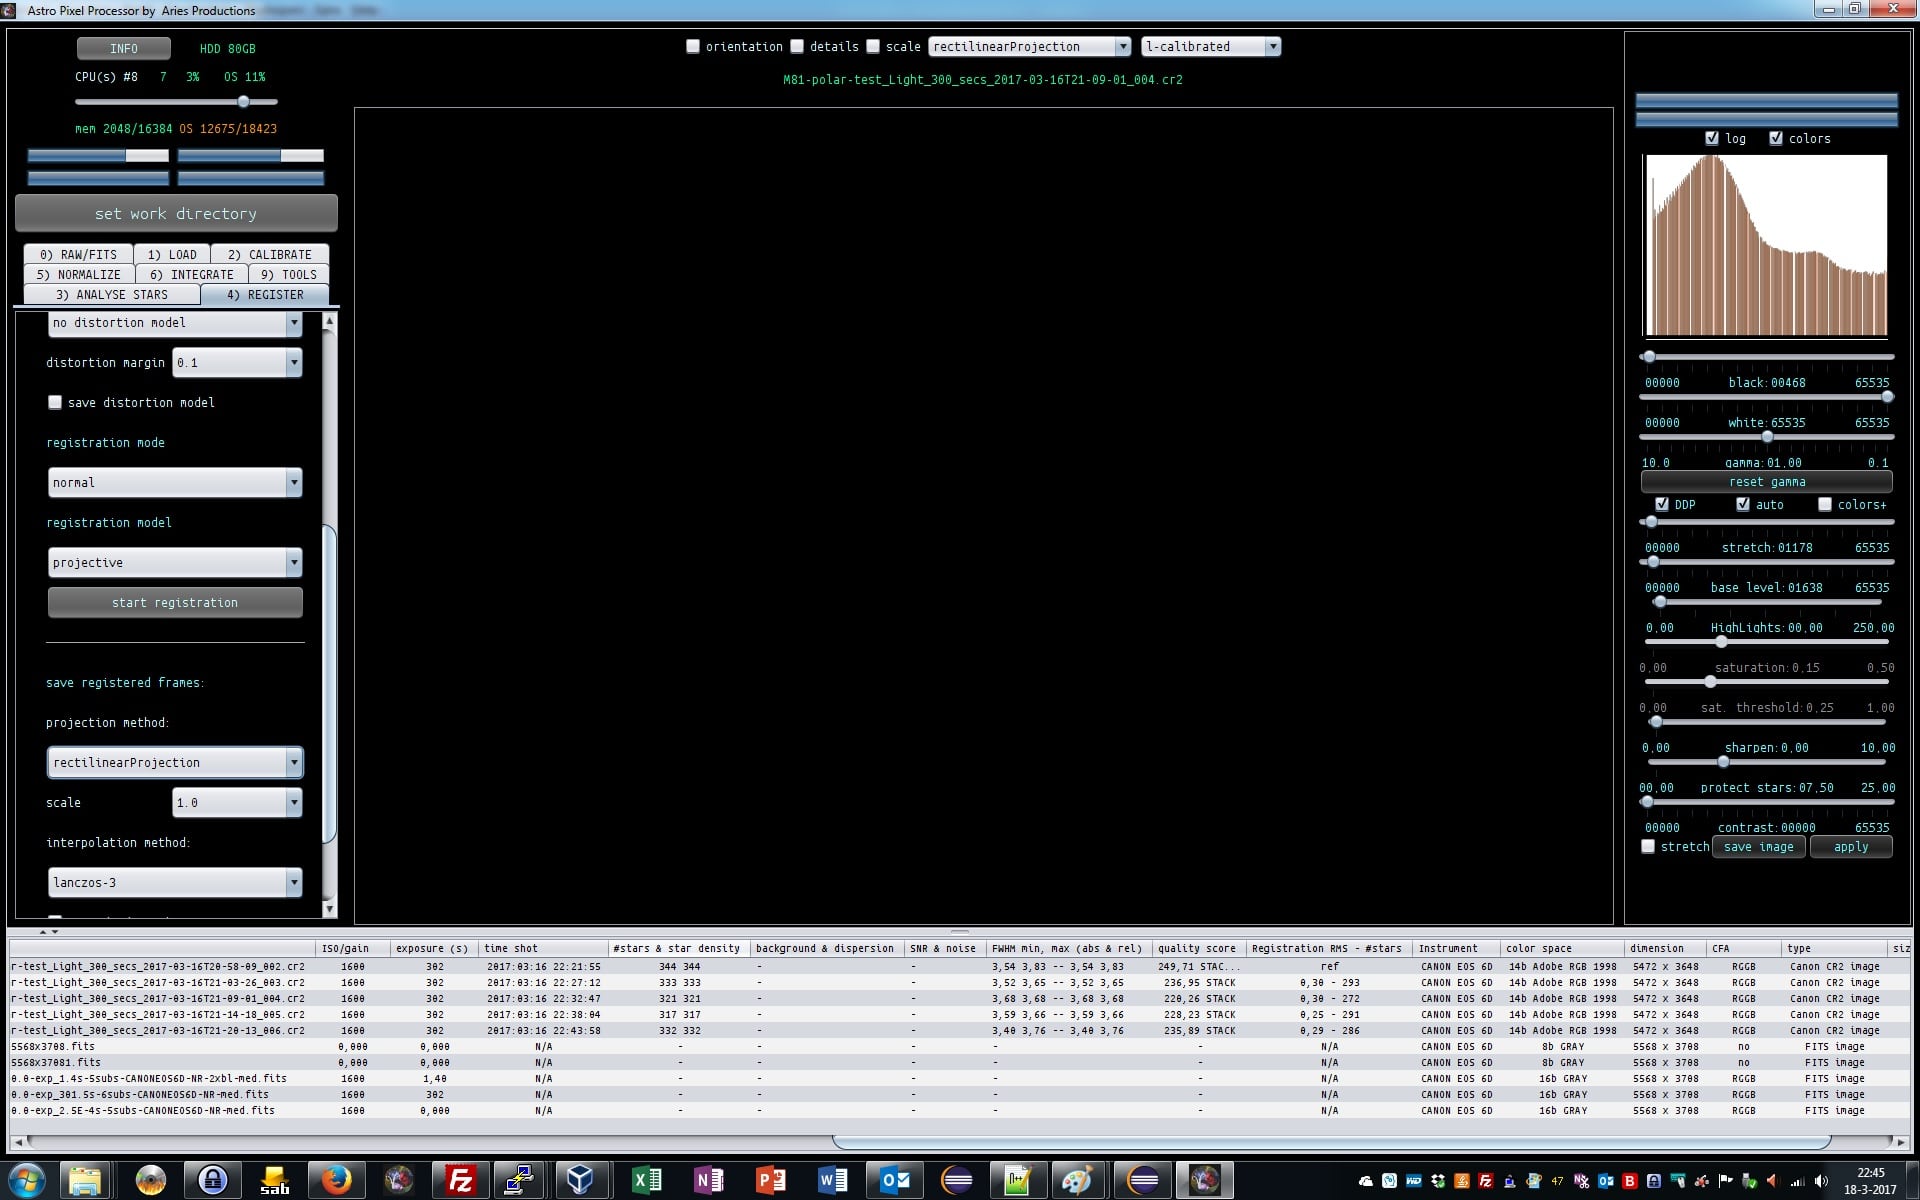
4) registration,
we turn distortion correction on, the rest stays at default.
APP will report the results again in the file list:
1) the registration error in pixels is shown together with the amount of stars that were used in registering the frames to the chosen reference frame. The reference frame waschosen automatically after star analysis. And it chose the frame with the most stars combined with the star roundness and size as quality parameters. More stars are very important for the registration process, so it has a high weight in the calculation.
You’ll notice, that APP also reports star density and a relative FWHM measure of the stars in your frames. In this case they are identical since, your frames have all equal scale and image dimensions. If you were to combine frames of different scale and/or dimensions, the star density and relative FWHM will actually give a fair quality comparison between the frames.
So these quality parameters are reported independently for scale and Field Of View (FOV) between your frames. This enables APP to do a good quality assessment of your frames when you combine frames of different camera’s and/or telescopes.
 March 18, 2017 at 22:56 #12949HaverkampParticipant
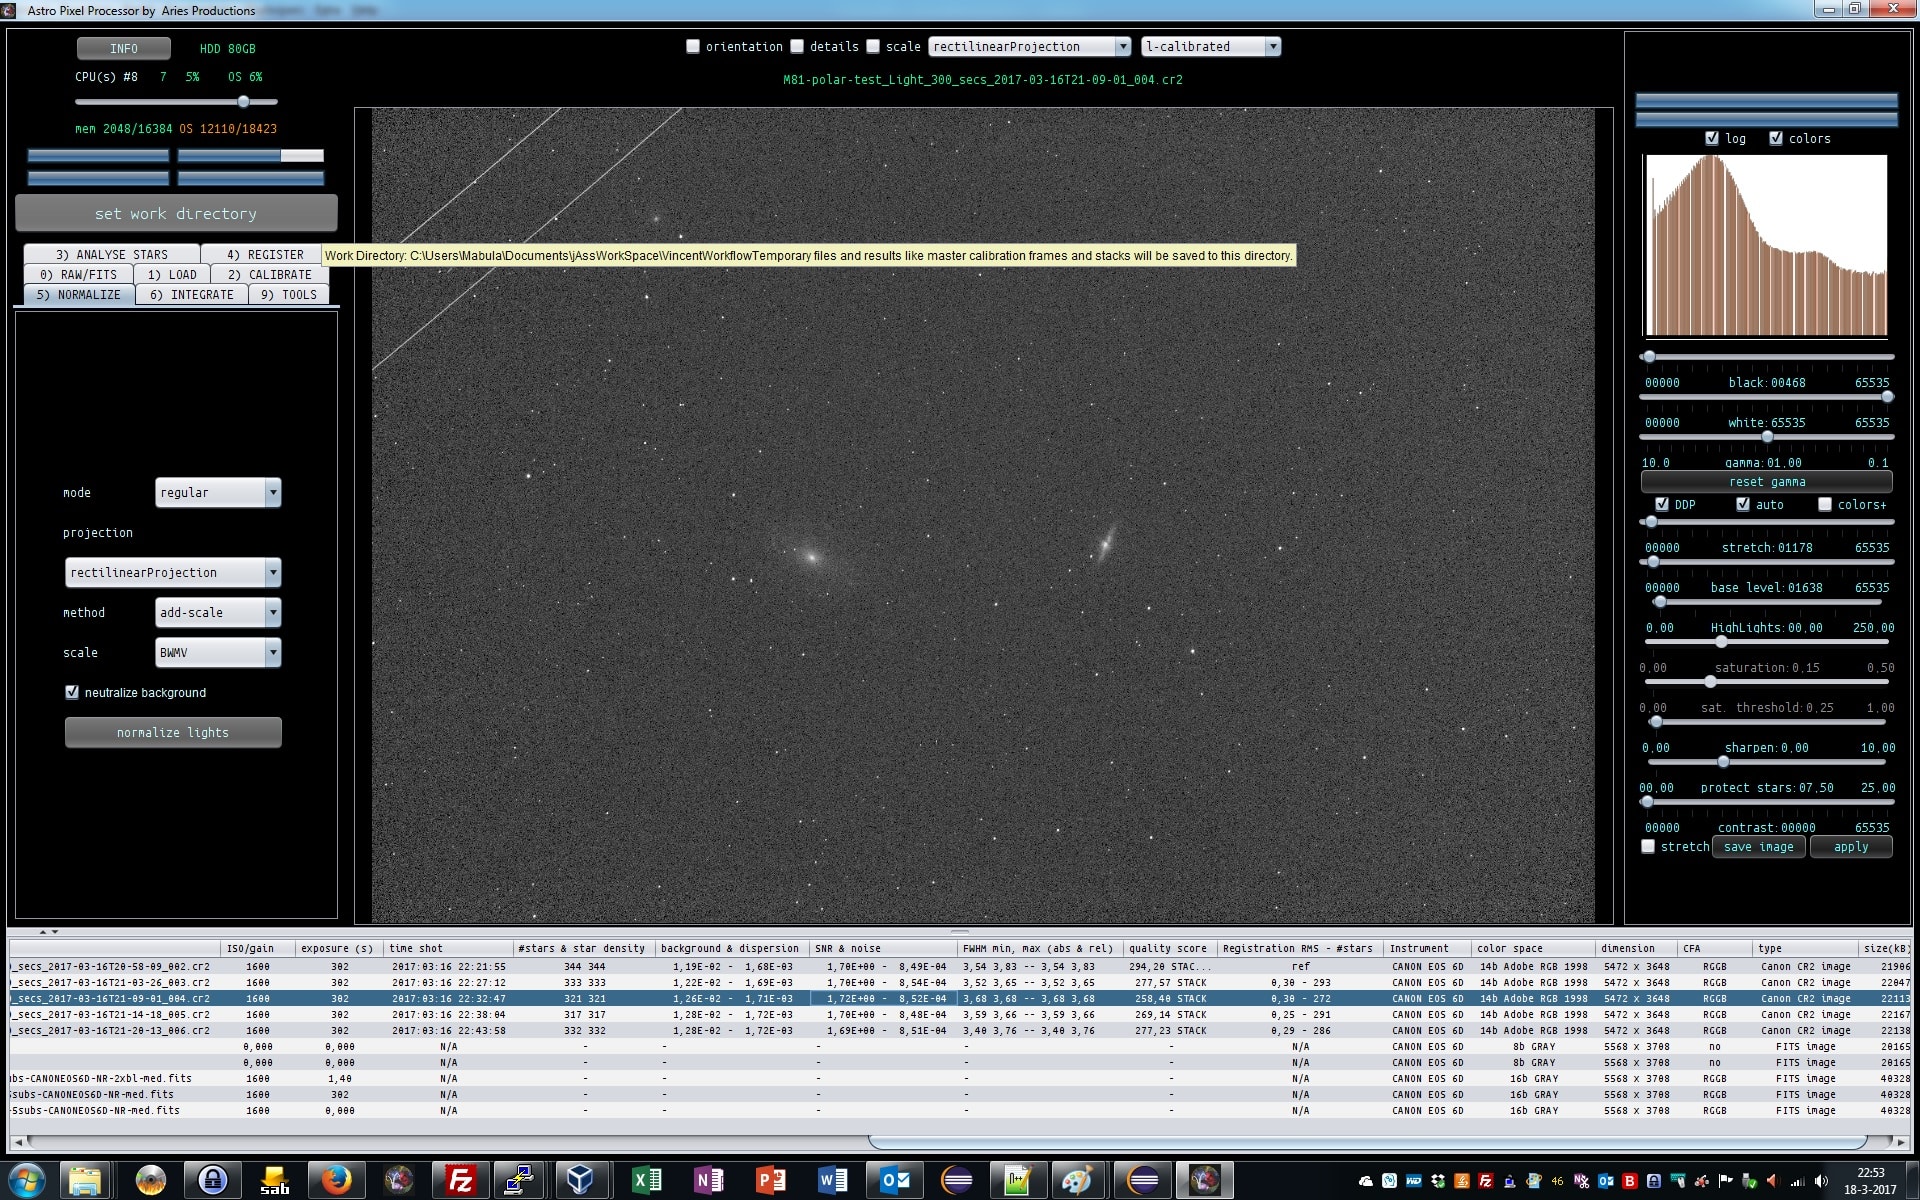
5) Normalize
Data normalization is performed.
We keep everything at default settings.
All your light frames will be normalized for lokation and dispersion relative to your reference frame. Which is the top frame in the file list.
APP wil
1) calculate normalization parameters,
2) then perform normalization and
3) then perform noise and SNR calculation on the normalized data.
Reported back by APP are the lokation (background) and dispersion values of your frames, and noise and SNR. You’ll see that your lights are very equal in illumination. If your lights would have somewhat different lokations and possible changing gradients, the reported values would deviate much more.
APP always normalizes the data range of your lights from 0 – 1 in 32bits floats. This enables APP to process, without problems, data of different data types. So 16bit and 32bit light frames, can be stacked without problems. They will all be normalised to the same data range.
 March 18, 2017 at 23:29 #12953HaverkampParticipant
and lastly we make the stack at
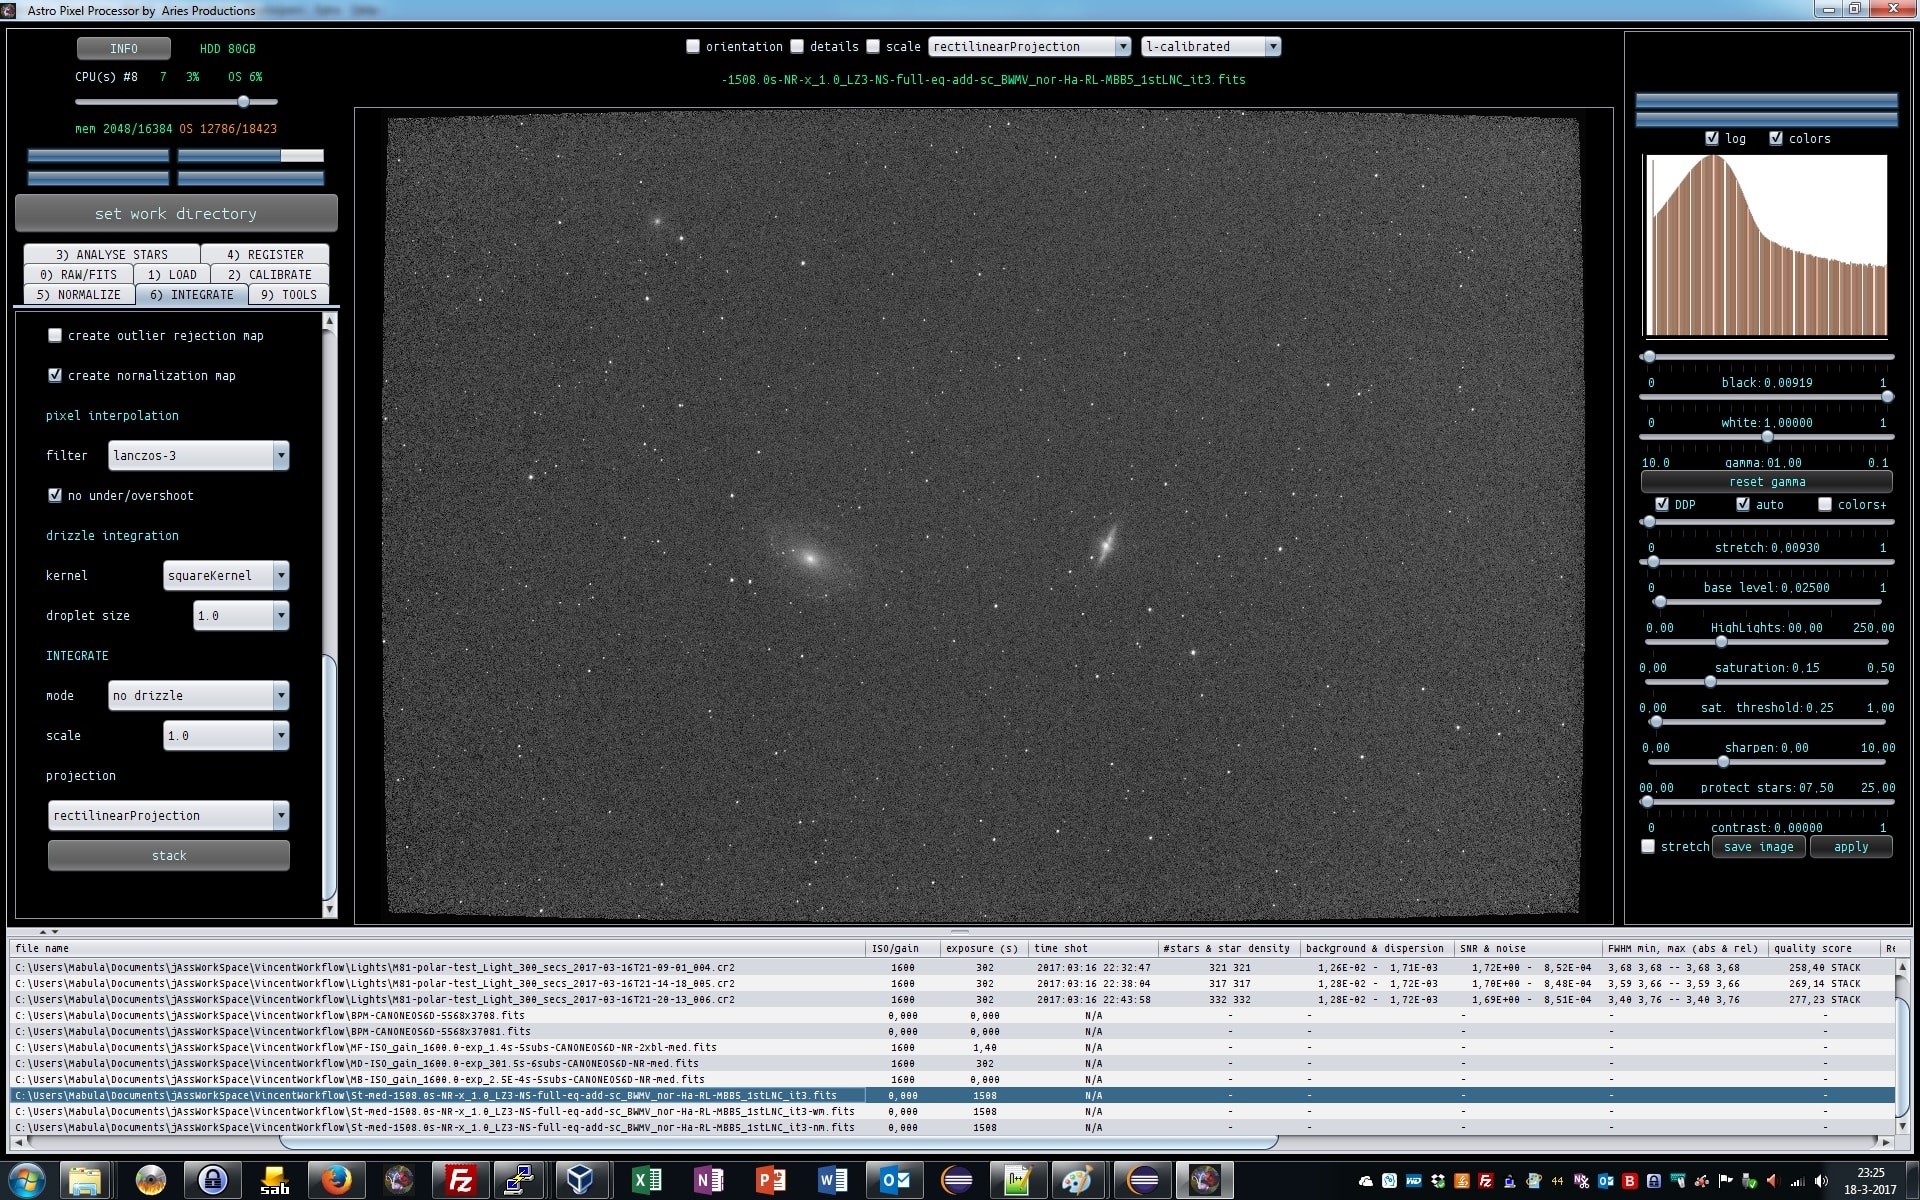
6) INTEGRATE
Since I am only working on 5 frames to illustrate a workflow, I now use the following settings
– I stack all 5 out of 5 frames, is you choose less, based on the quality value of each frame, the frame with the least value is rejected from the stack list. In the column of the quality score is indicated which frames will be stacked by the STACK keyword.
– median integration instead of average, with more than 10 frames, you should always use average. It will be superior in almost all cases.
– no outlier rejection, because we only have 5 frames.
– composition mode: full, all pixels of all frames will be in the stack.
A reference composition will be just the Field of VIew of the reference.
You can also crop a part of the reference, and just stack that part.
– we apply first degree LNC with 3 iterations. This will remove linear gradients from your data if there are any, usually there are. And will help in removing stack artefacts ar the borders of your stack.
– enable multi band blending with 5%. to further remove possible stack artefacts at the borders of your stack.
– I use lanczos-3 interpolation with No under/over shoot to prevent ringing of stars due to the lanczos algorithm.
– And chose to output weight and normalization maps, to check multiband blending, and the effect of LNC.
– Finally I choose equal weights in the stack for all frames. You have several options to chose for weights, like noise, star density, star shape, SNR.
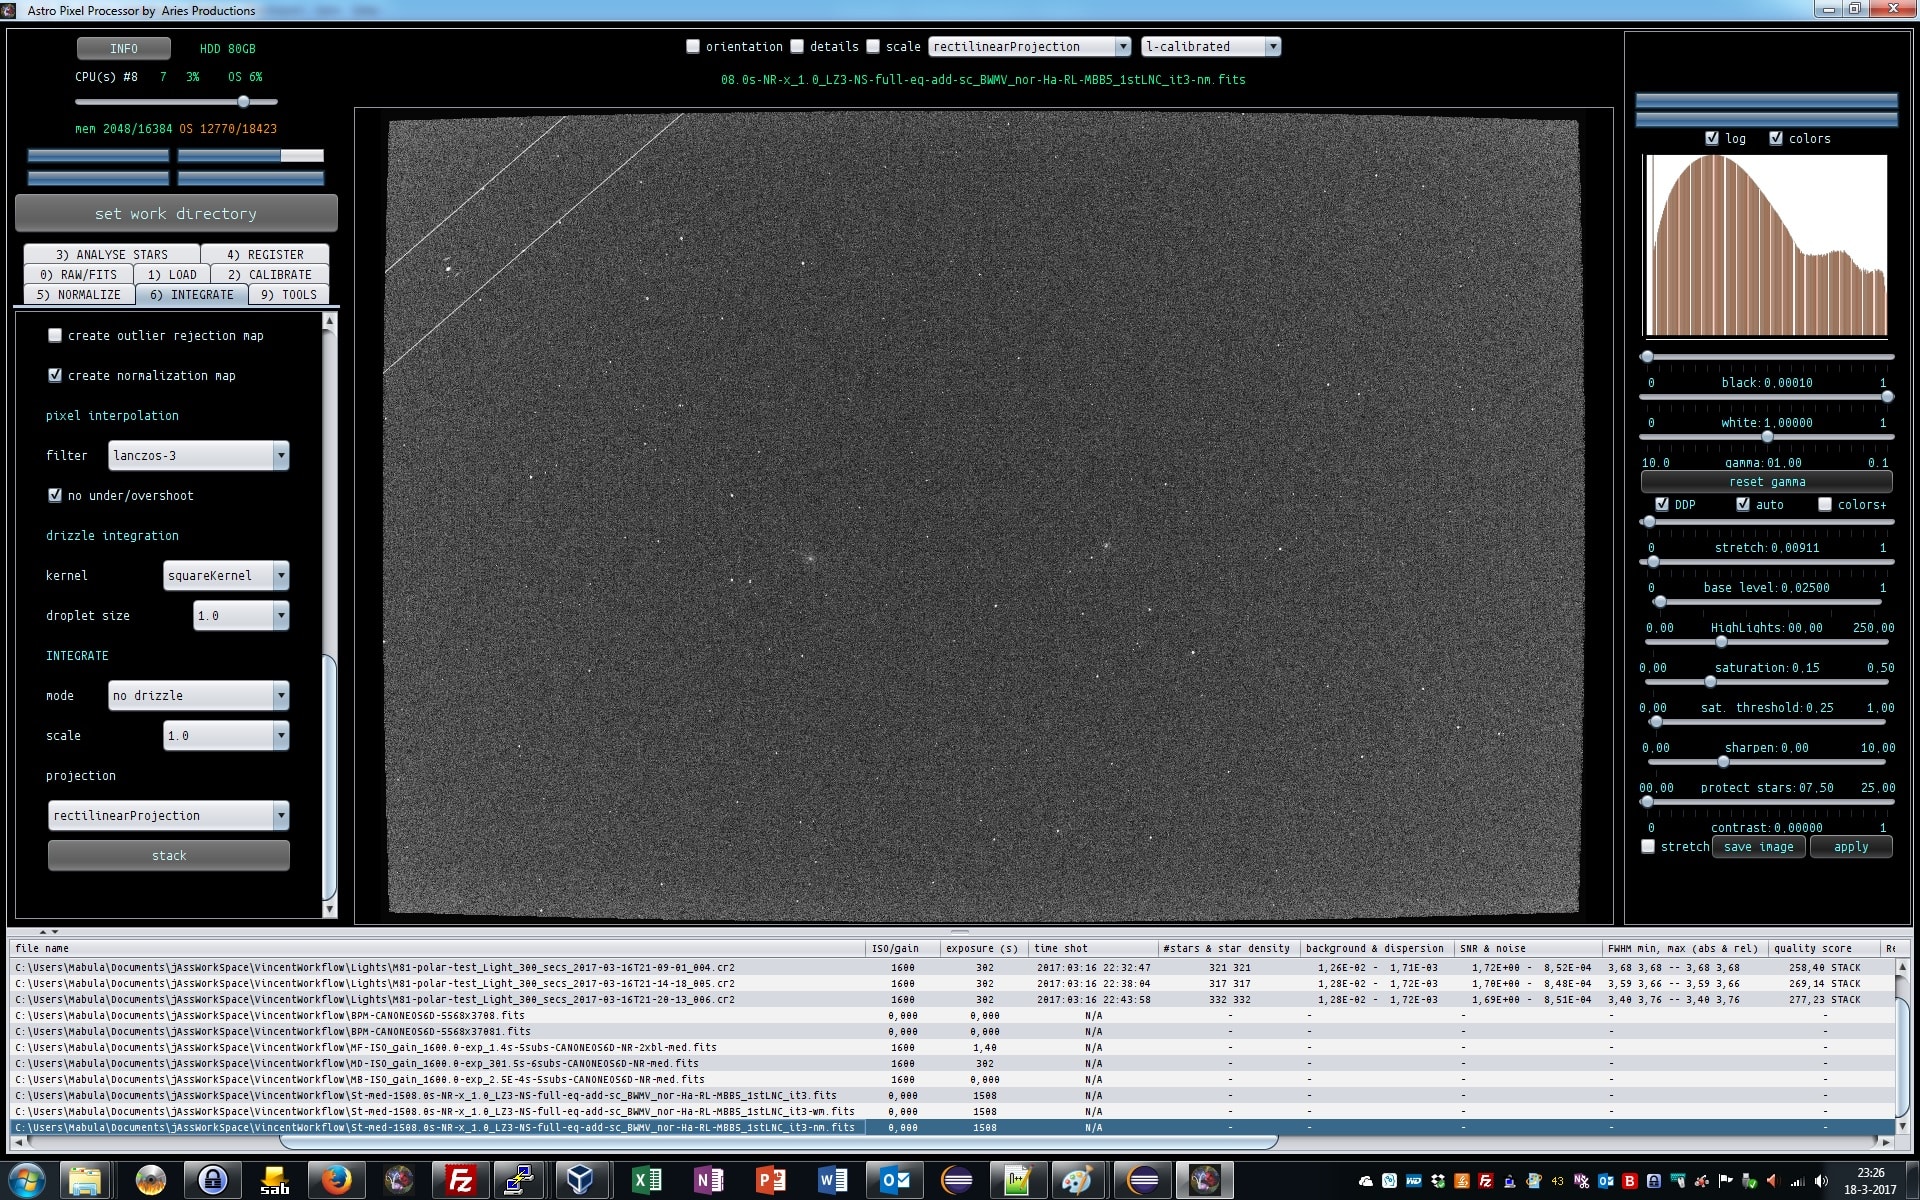
APP will output the stack, the weight map, showing MBB working at 5%, and the normalization map which shows the quality of normalization. The FITS headers have statistics from the results which you can check.
Please notice the shape of you stack, it’s not square anymore, this is real dynamic distortion correction unlike any other program out there ;-)
Finally I show the stack, weight (MBB) map and normalization map.
The concept of a normalization map is new for most astrophotographers I think. That will be for another day ;-)
 March 19, 2017 at 00:36 #12971
 GroenewoldParticipant
Excellent! I made a final stack and the results remain rather similar, it’s clear I need to take way longer subs I think with H-alpha (as shown by @chrisvdberge on his site). What I do notice in my data is the regular background pattern in the final stack, do you notice that? Diagonal from top left to bottom right, it’s in my data but I wonder what that would be.
Thanks again for the great step-by-step guide, it really helps.
March 19, 2017 at 00:45 #12974HaverkampParticipantIt was a pleasure to make this workflow, I hope it will help with your data processing ;-)
Yes, I think you need to increase the exposure time of your subs to get better quality. The lokation (background) of your data is at 0.01 or 1 % of the data range. This is very low. You can easily make 15 minute subs. The read noise will be less of a problem then I think.
It’s good to realize that this is narrowband data, so read noise has a much larger influence than with regular RGB data, where the read noise is more easily swamped bij the shot noise of the sky background.
March 19, 2017 at 08:19 #12975Theunissen
ParticipantCould you expand the workflow with a “how to” use the right panel (black, white, gamma, stretch etc?, including the threshold sliders?).
March 19, 2017 at 09:46 #12977HaverkampParticipantHi Marc,
There are some RFCs to change the preview filters sliders and I am planning to acccelate this using GPUs, so possible the looks and feel will soon change. Maybe it’s best to wait for the improvement before we make instructions on how to use this? I realise this need some explanation. For instance the black, white, gamma sliders can alwasy be used. And the DDP settings below gamma are applied on the Black, White, Gamma adjusted values.
March 19, 2017 at 12:11 #12995 MusquetierParticipant
Great thread!
It would be nice to have the workflow explained for working with monochrome camera’s as well (registering, stacking and combining the multiple color layers (L, R, G, B, Ha, OIII and SII). Maybe in less detail but at least layout the order of steps to process all the color layers and combining them to a single image. This to prevent a lot of similar questions when APP is released to a larger number of users…
March 19, 2017 at 12:29 #12998HaverkampParticipantThank you @musquetier,
Excellent idea, shall I do it on one of your data sets? (otherwise I’ll use the Rosette Astroforum power data? )
I realise, I need to create much more of these workflows , since APP simply works differently than most other programs out there. And it will help me in my documentation/manual that I need to prepare ;-
March 21, 2017 at 06:26 #13077MusquetierParticipantFeel free to use my dataset, I would be honored ;-)
-
AuthorPosts
- You must be logged in to reply to this topic.