@bula
active 4 years, 6 months ago
Astro Pixel Processor review by Sara Wager in
Sky at Night magazine, January 2018
Released today ;-) !
http://www.skyatnightmagazine.com/issue/january-2018 View
- Load More
Hoi Kees,
Voor wat betreft de Bad Pixel Map en de bad column die je nog ziet in je light.
Dit is duidelijk lastiger te corrigeren. Dit kunnen we denk ik alleen oplossen met meerdere opnames per paneel en ditheren en dan median integration of average integration met sigma clippen afhankelijk van aantal lights.
De reden,
ik zie de bad column inderdaad duidelijk in de light, maar zeker niet in je darks, dan wel masterdark. Deze column gaat mogelijk pas niet-linear gedrag vertonen vanaf een bepaalde ADU waarde, getriggerd door het signaal van de hemel, lijkt het. Om dat te corrigeren in een enkele light is een speciale bad column detectie nodig in je lights lijkt me (wat ik op de RFC lijst zal zetten).
Omdat de bad colom niet toont op een dark, zal de hot pixel kappa waarde hier ook geen enkele invloed op hebben.
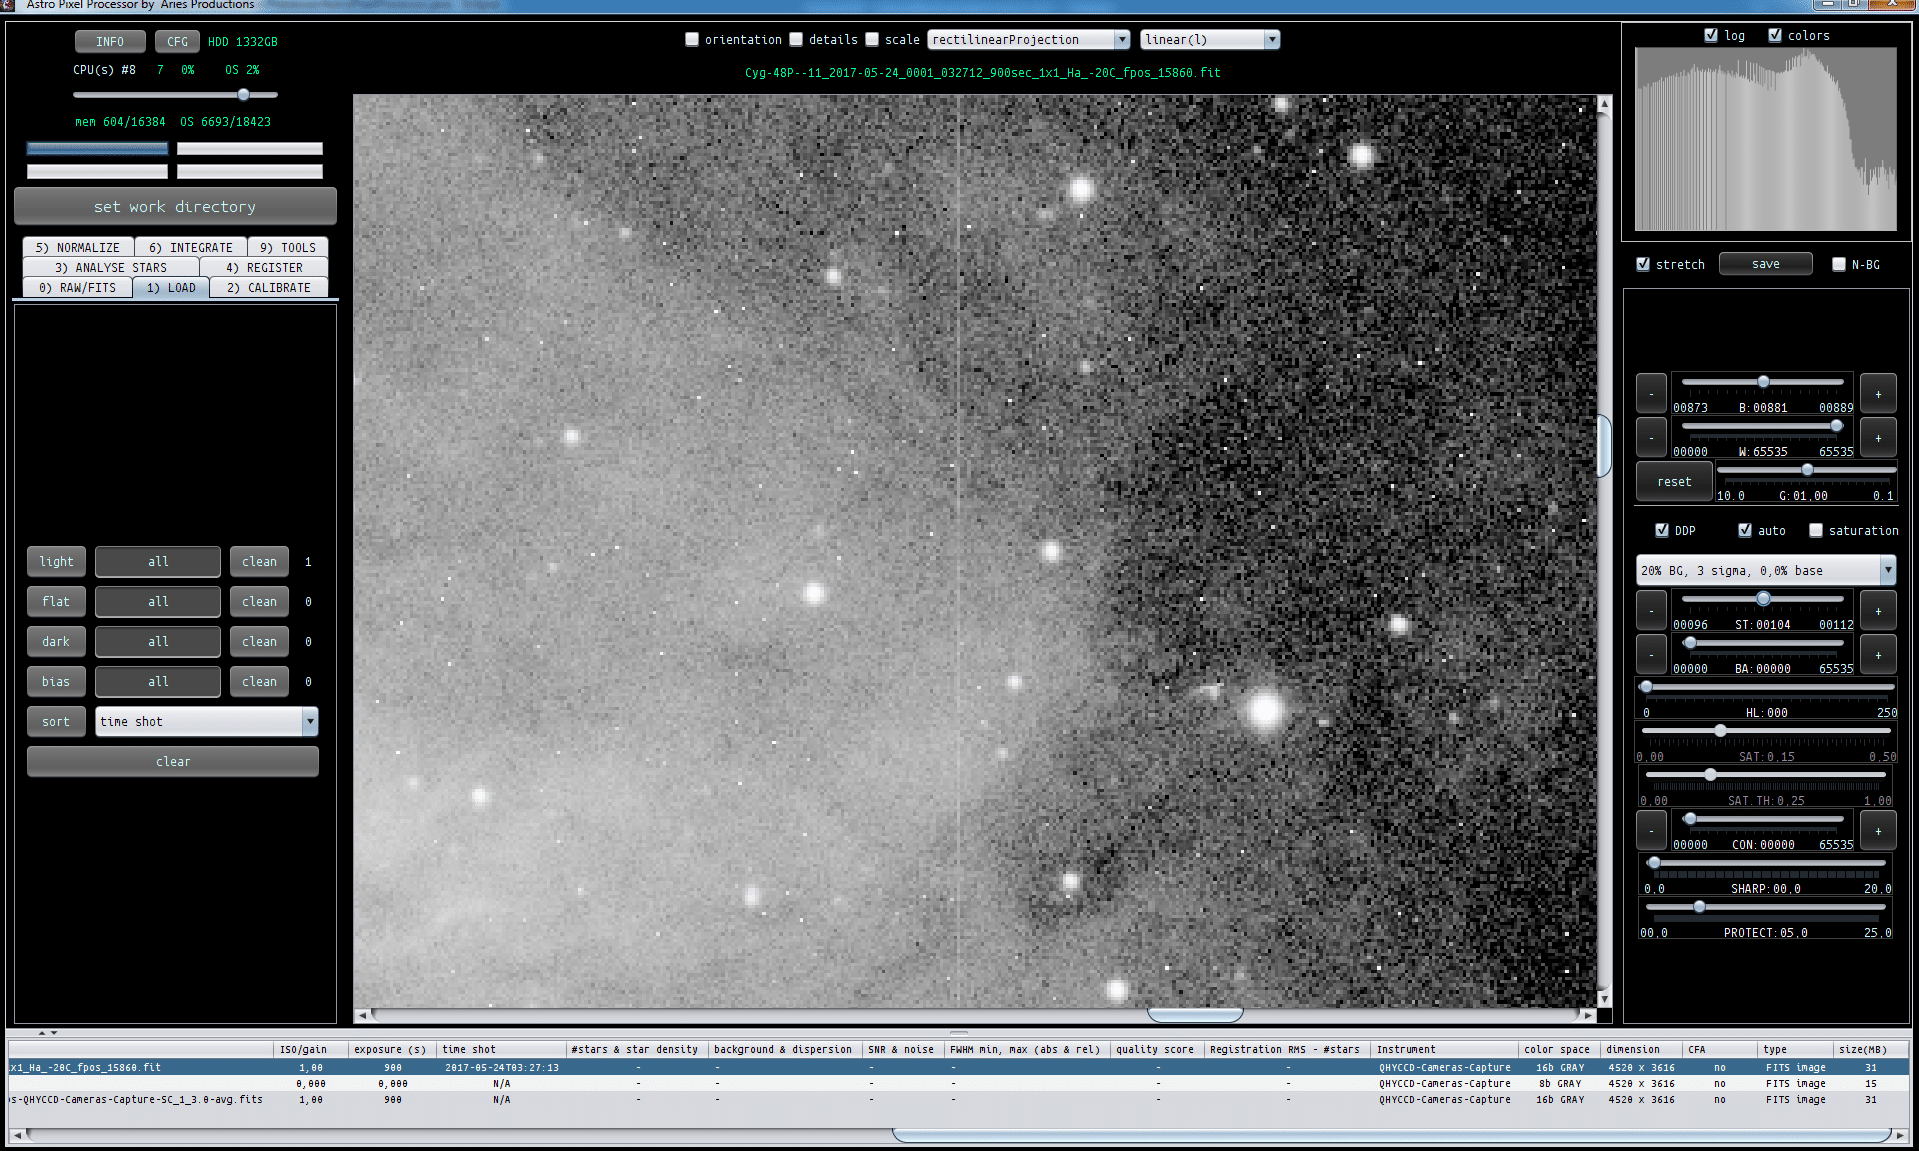
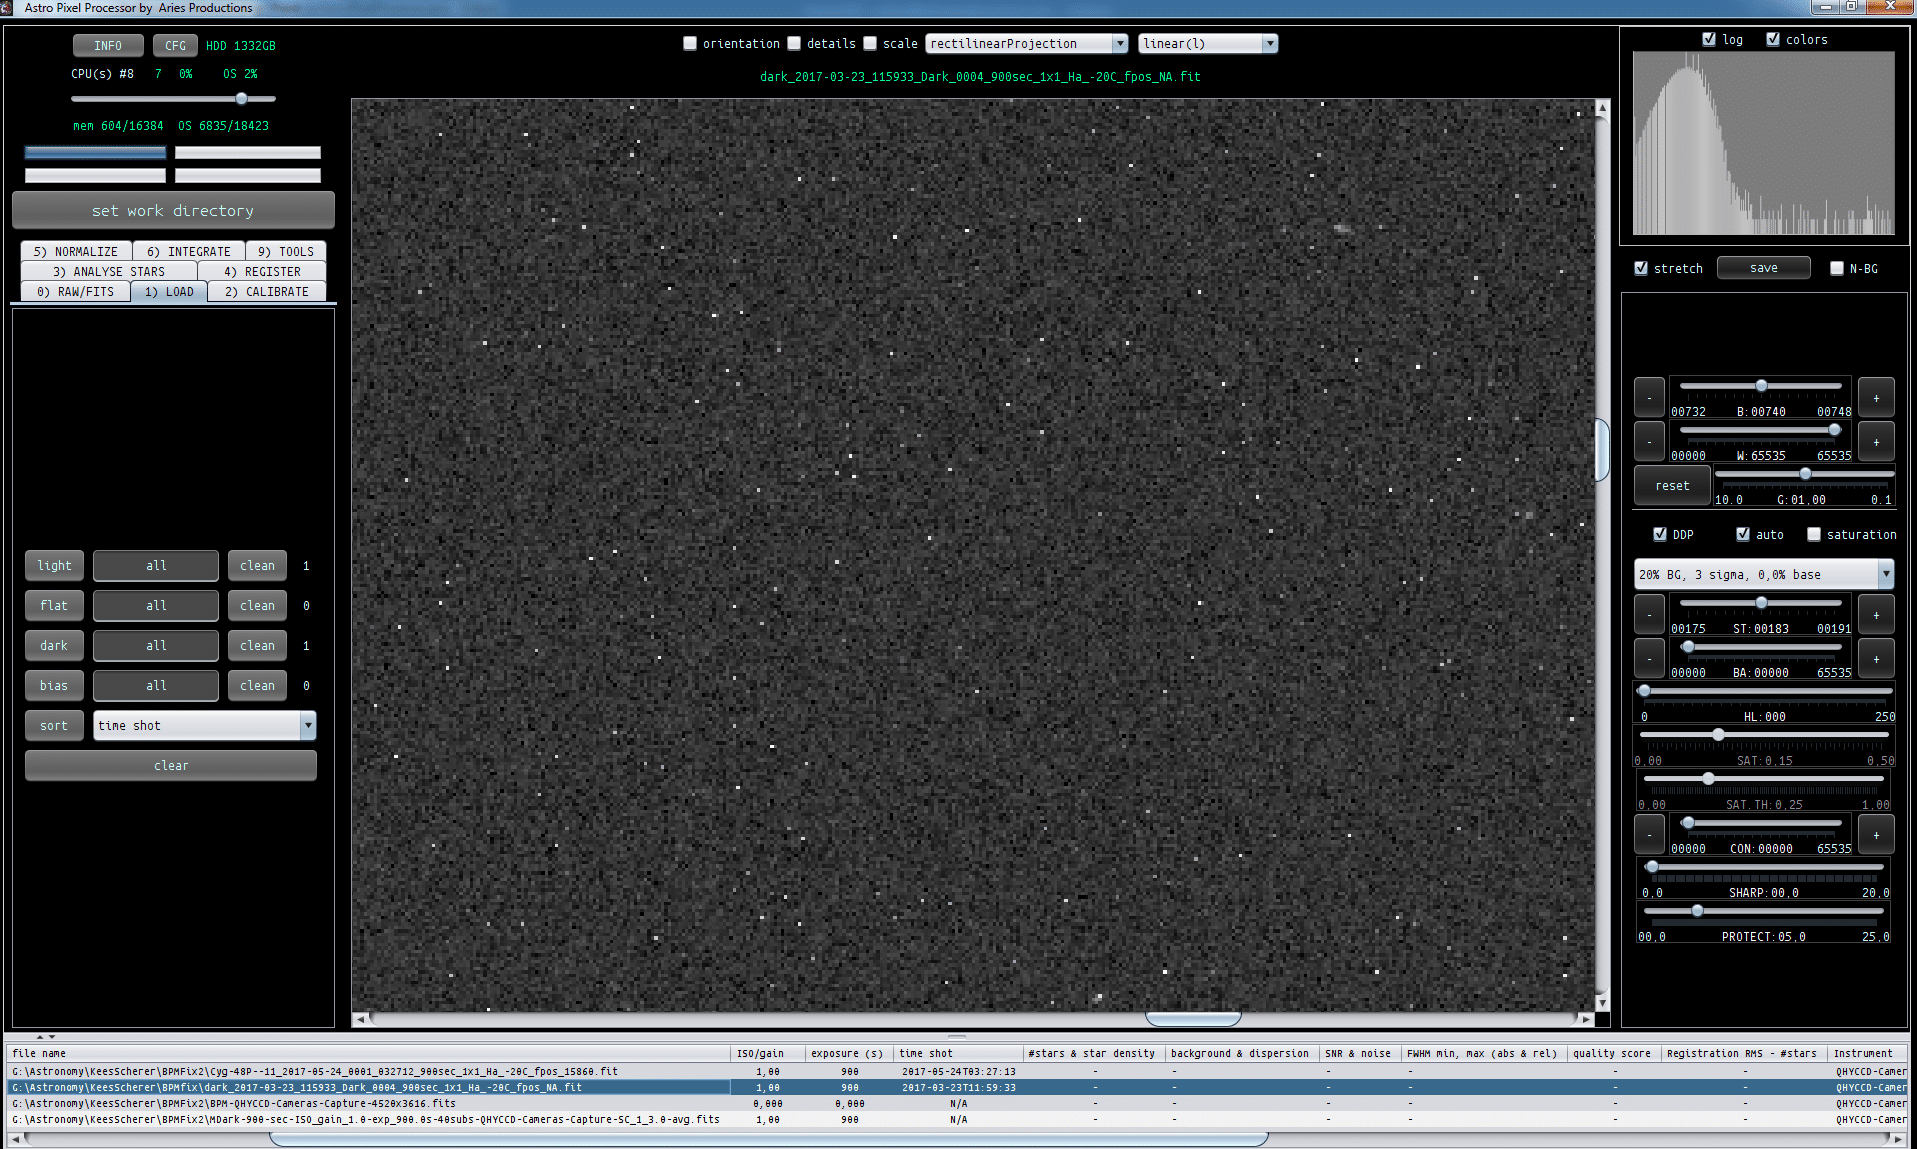
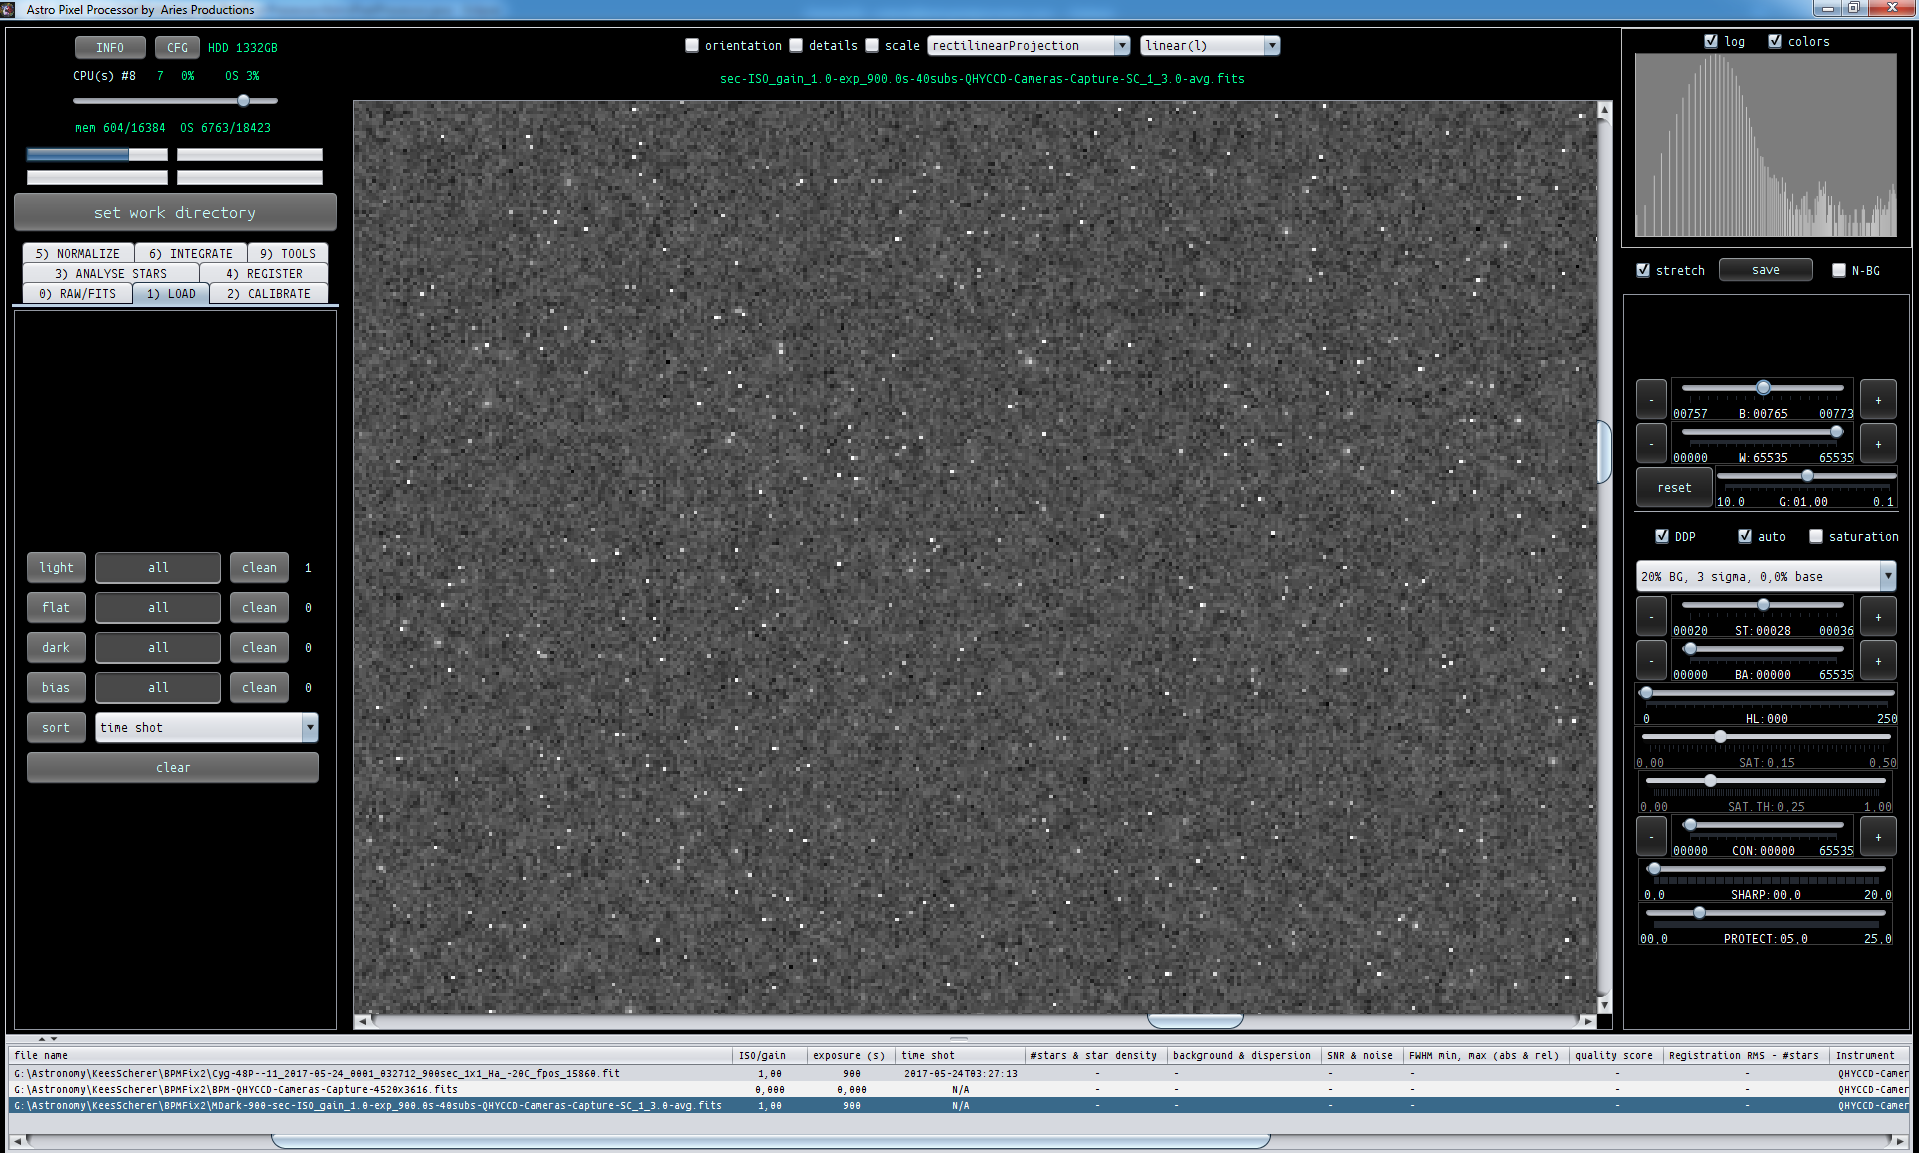
Screenshots ingezoomd op de bad column, eerst de light, dan een enkele dark, dan je masterdark uit 40 darks, ik kan hem niet zien in de darks ;-(HotColumnHotColumnNotInSingleDarkHotColumnNotInMasterDark40subs
Hoi Kees,
Voor wat betreft de Bad Pixel Map en de bad column die je nog ziet in je light.
Dit is duidelijk lastiger te corrigeren. Dit kunnen we denk ik alleen oplossen met meerdere opnames per paneel en ditheren en dan median integration of average integration met sigma clippen afhankelijk van aantal lights.
De reden,
ik zie de bad column inderdaad duidelijk in de light, maar zeker niet in je darks, dan wel masterdark. Deze column gaat mogelijk pas niet-linear gedrag vertonen vanaf een bepaalde ADU waarde, getriggerd door het signaal van de hemel, lijkt het. Om dat te corrigeren in een enkele light is een speciale bad column detectie nodig in je lights lijkt me (wat ik op de RFC lijst zal zetten).
Omdat de bad colom niet toont op een dark, zal de hot pixel kappa waarde hier ook geen enkele invloed op hebben.
Screenshots ingezoomd op de bad column, eerst de light, dan een enkele dark, dan je masterdark uit 40 darks, ik kan hem niet zien in de darks ;-(HotColumnHotColumnNotInSingleDarkHotColumnNotInMasterDark40subs
Haverkamp wrote: Dank je Kees, Ben er mee bezig Er gaat inderaad iets niet goed met de Bad Pixel Map,Ah mooi. Intussen staat de Toughbook te werken aan de 35-paneels versie met de nieuwe APP 1.040 . Vreemd genoeg ging het vrijwel meteen mis op “could not register any frame” dus ik heb de “clip profile” aangepast van 0.4 naar 0.1. Toen ging het verder tot 2 Java errors. Hierna verder op status 48%. Nu al een tijd bezig met “calculating multiple view….” maar met maar 25% processorbelasting (cpu’s 3 van 4) en nog geen 0.9 Gb van de toegewezen 14 Gb?


 Hoi Kees,
Dit is ook opgelost, er was nog een extra aanpassing nodig in de filter van het ster profiel. Ik gebruikte een te groot filter wat de kleinste sterren vrijwel verwijderd. Dat willen we natuurlijk niet ;-(
Als je nu het filter aanzet dan blijft het aantal sterren vrijwel hetzelfde, maar in opnames (geen stacks van meerdere opnames bedoel ik dan) zal het helpen om wat meer precisie te hebben in de star lokatie bepaling. (door een klein filter te gebruiken, haal je de invloed van de shotnoise in je signaal er iets uit en krijg je een iets betere ster loaktie bepaling).
Ik heb dit nu getest op de enkele opname van panel 41 die ik van je heb
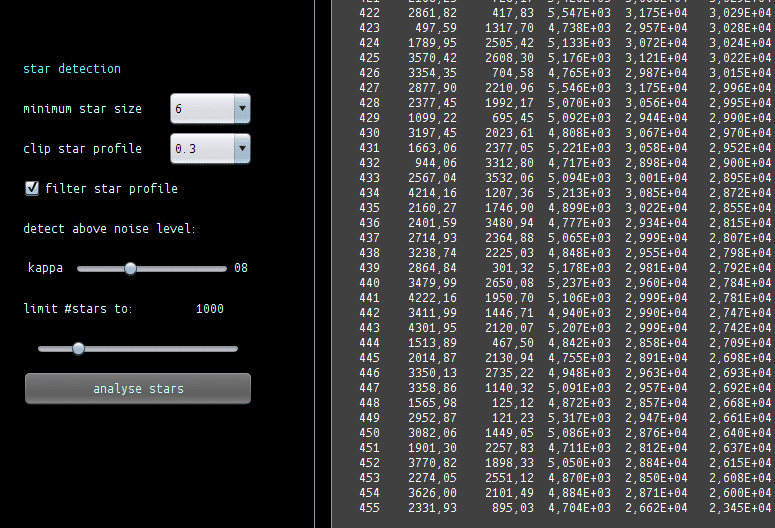
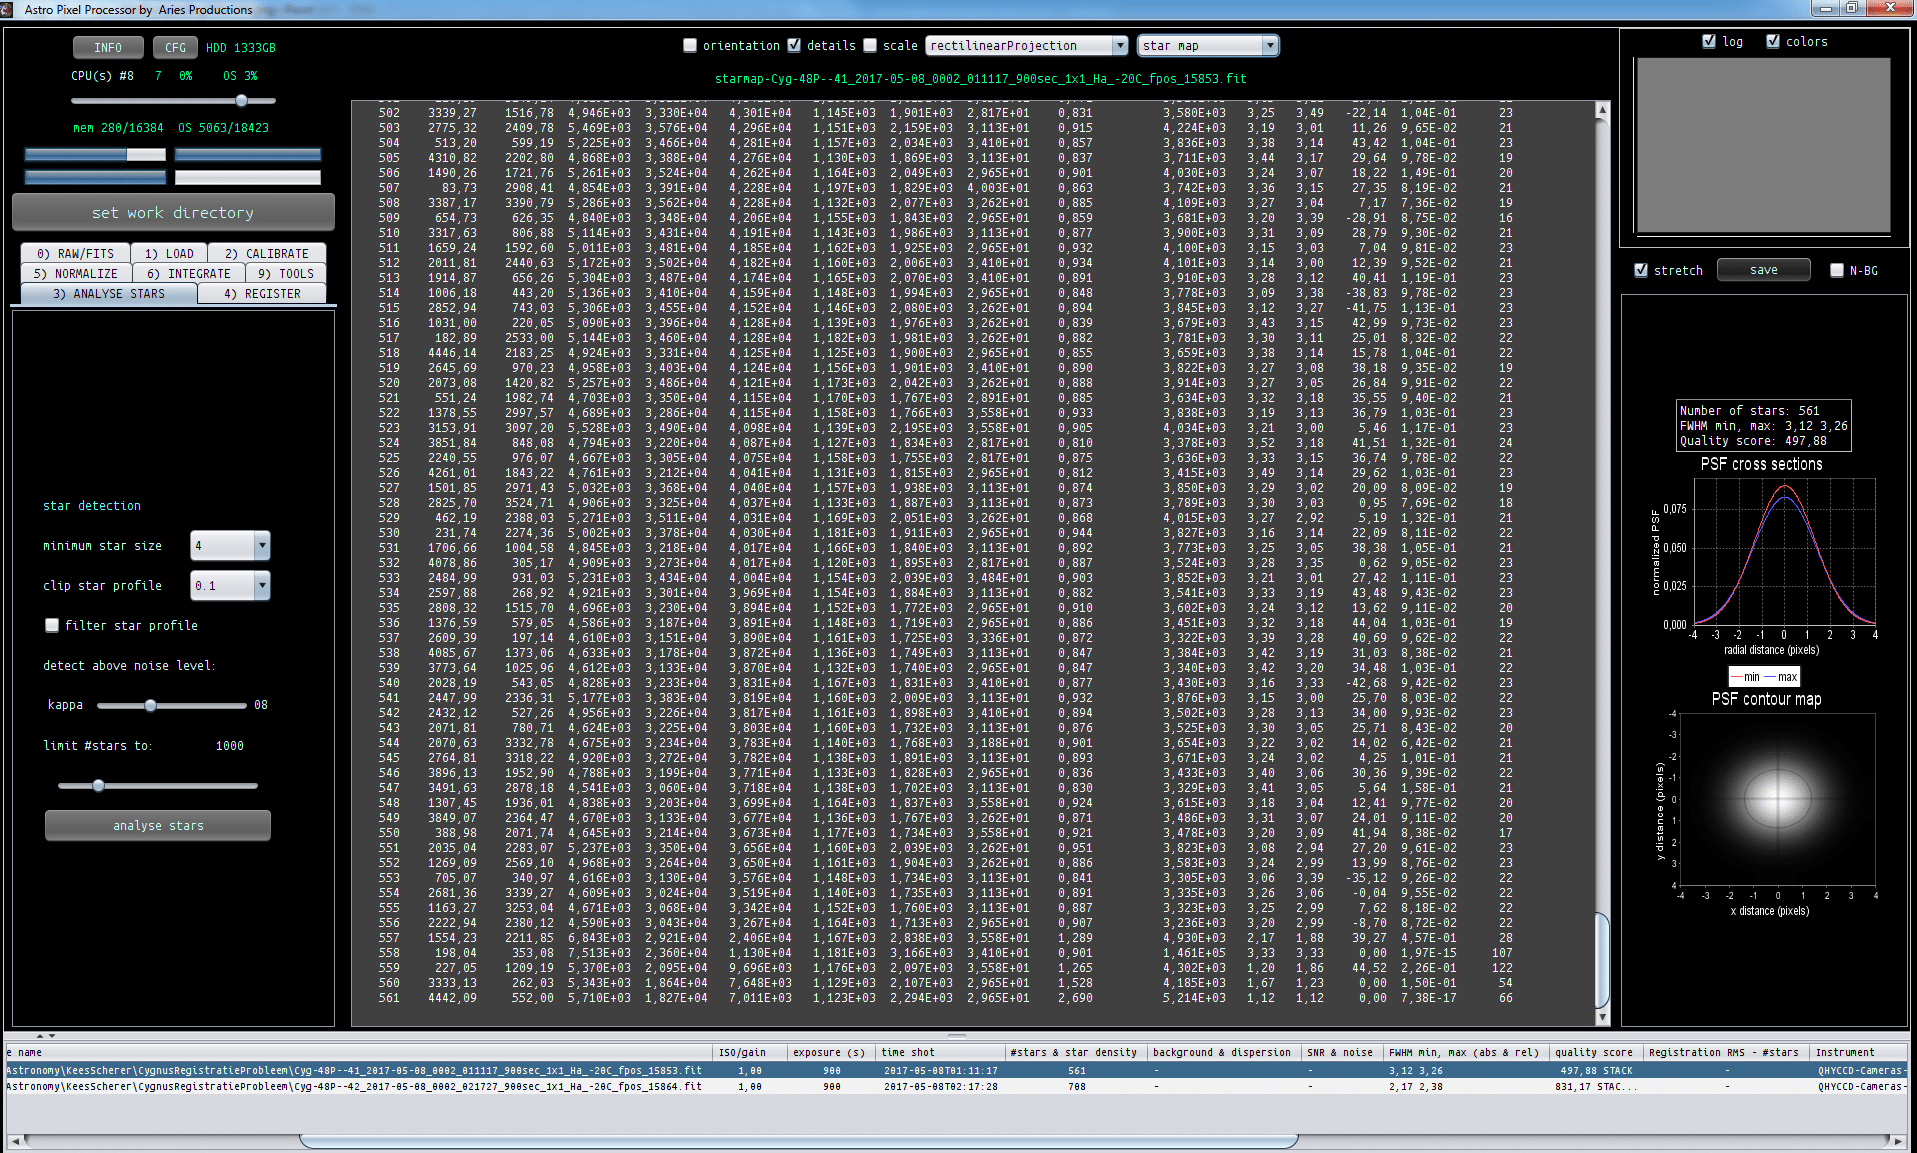
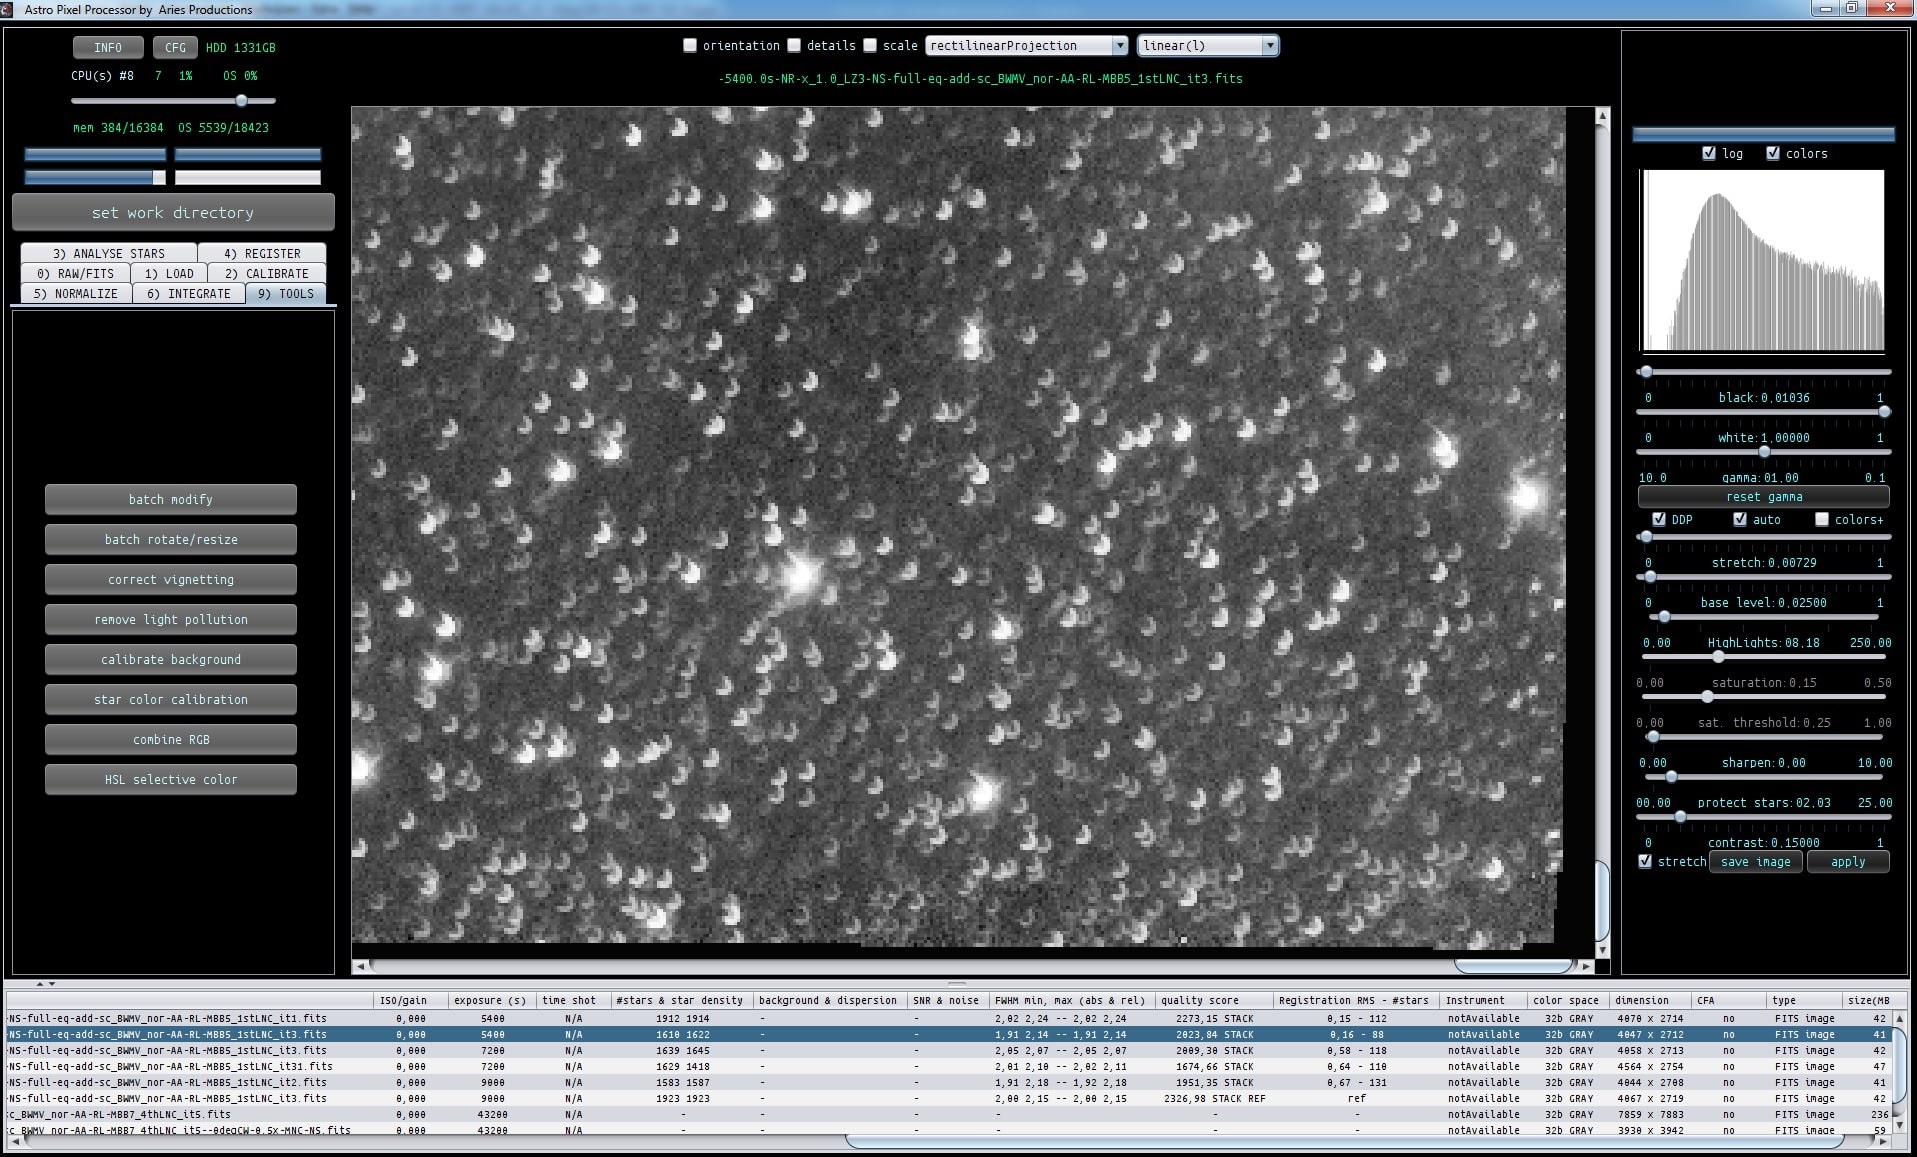
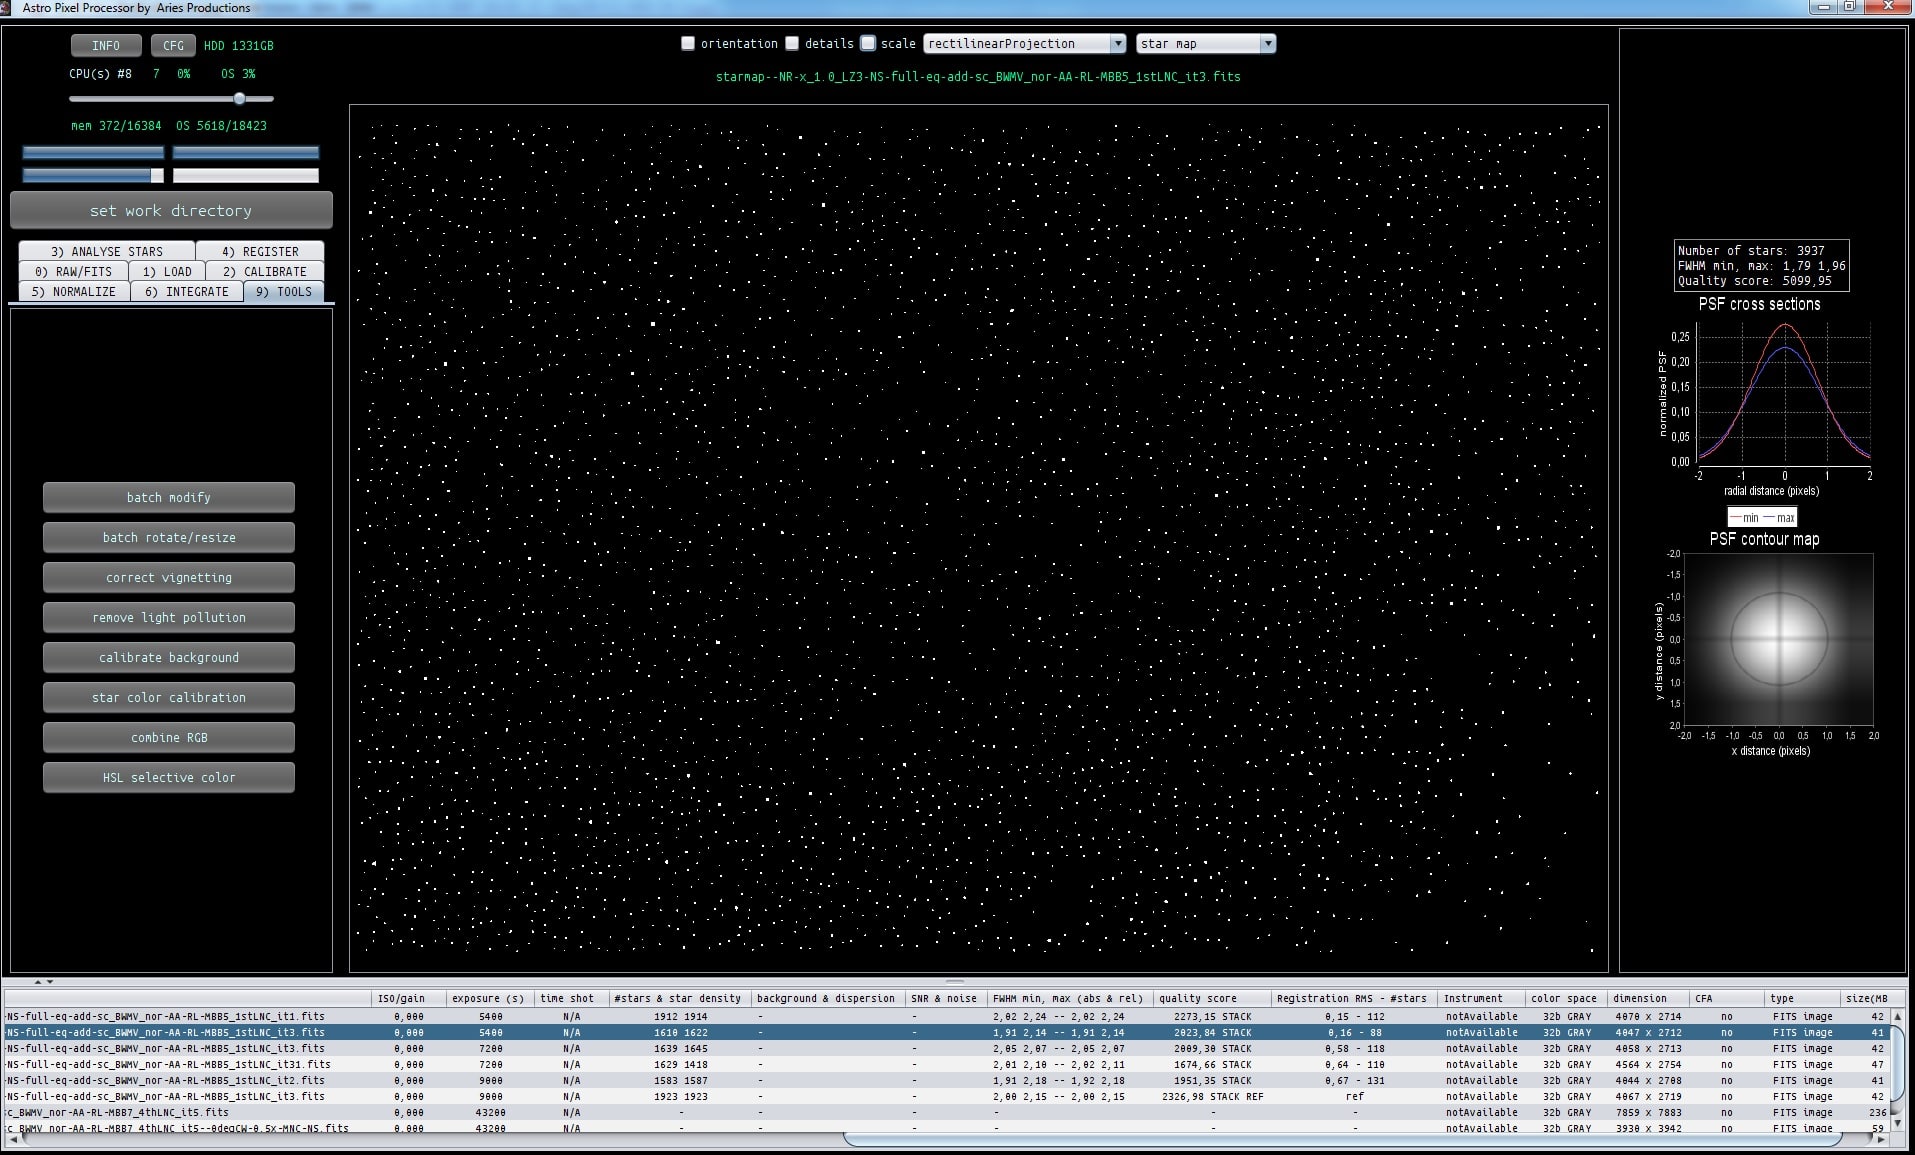
Eerste plaatje star analyse middels de image viewer starmap en dan de details bekijken.
Minimum star size 6
clip profile 0.3
zonder filter
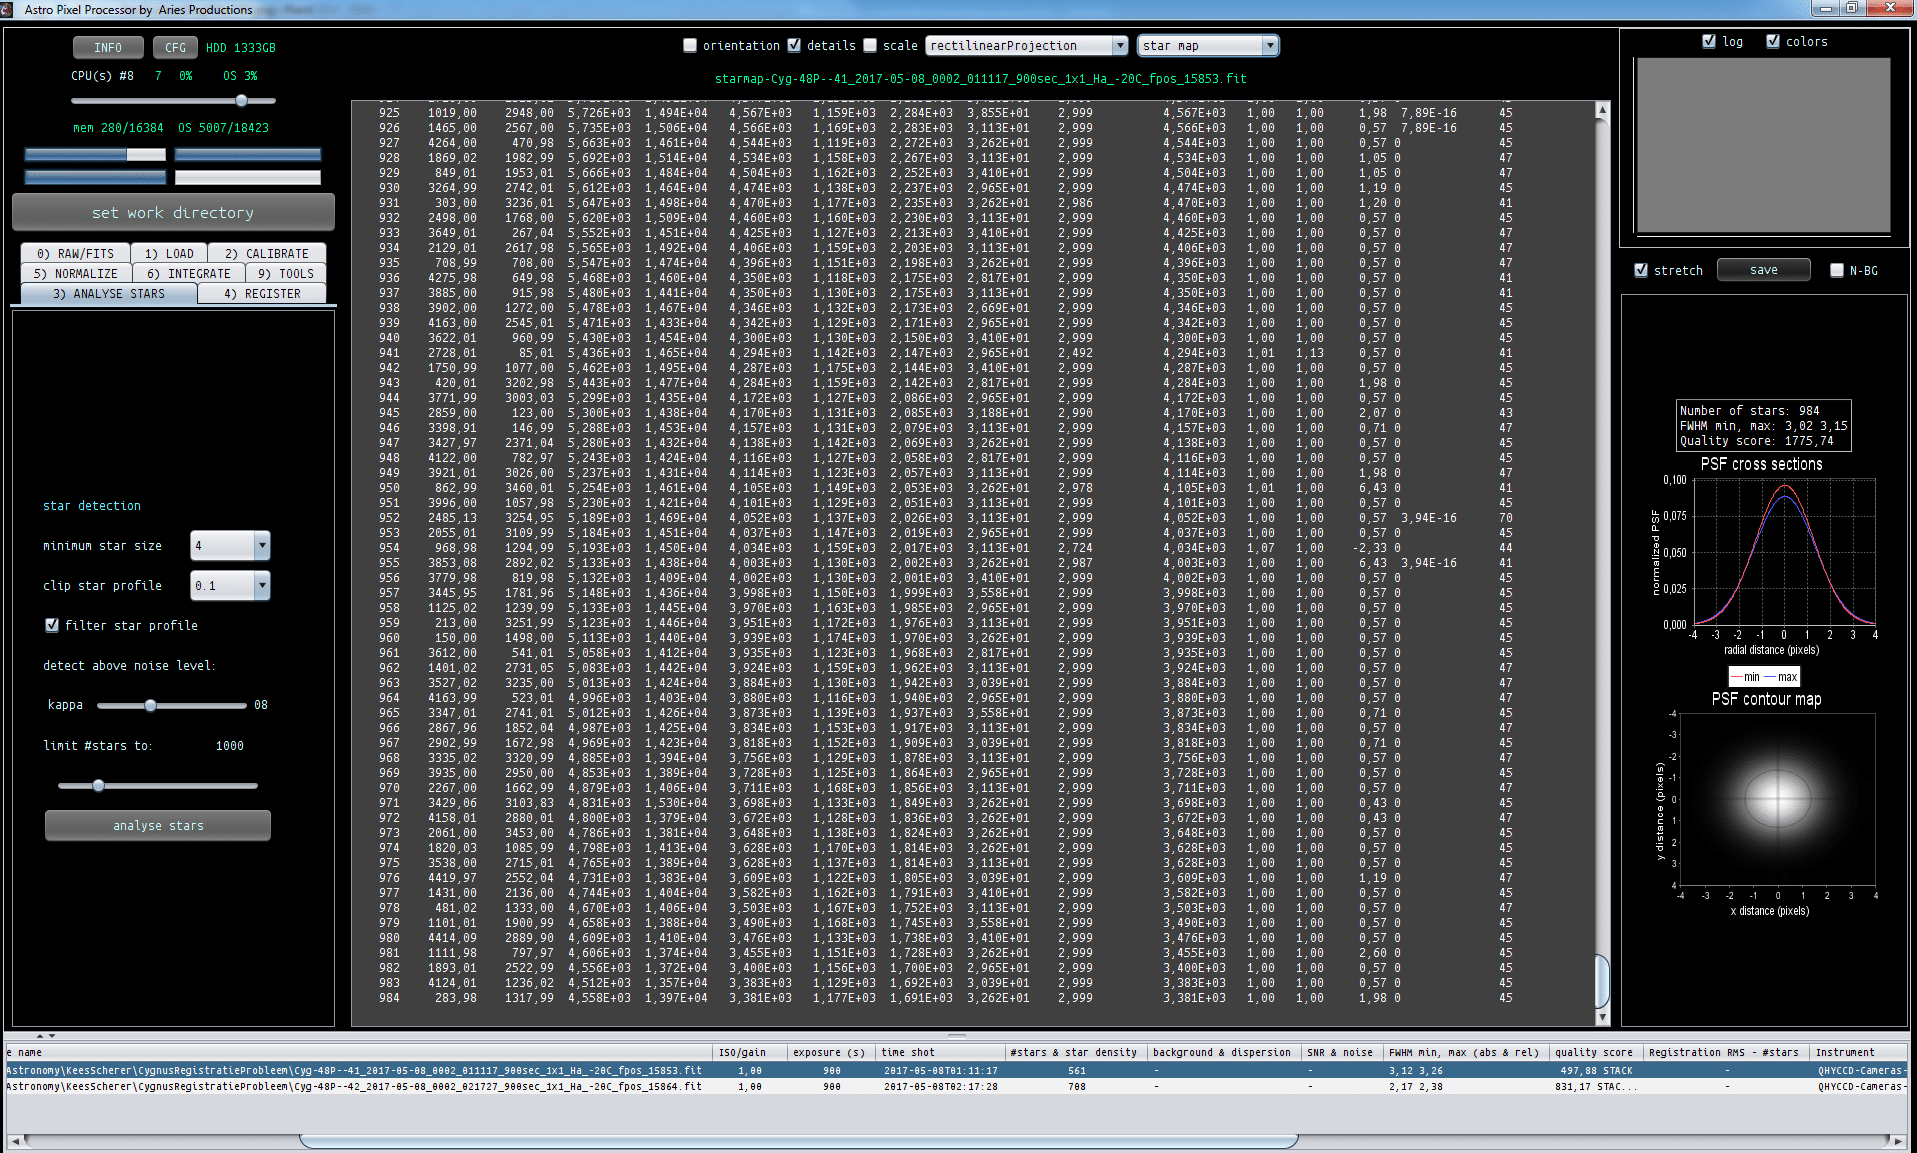
Tweede plaatje, zelfde instelling, met filter aan.
Je ziet dat dezelfde sterren worden gedetecteerd, maar dat de ster lokatie bepaling iets naders is achter de komma.
De eerste kolom is het nummer van de gedetecteerde ster
2de kolom, is de ster x-coordinaat op je sensor
3 de kolom, is de ster y-coordinaat op je sensor
Bij sommige sterren maakt het niet veel uit, maar bij andere scheelt in totaal meer dan 0.1 pixel. Dat is dan significant. (de meet onzekerheid ligt ongeveer op 0,05-0,1 pixel bij monochrome data)
Voor je mosaic, zou ik de volgende instelling proberen:
minimum star size : 4
clip star profile: 0.1
filter star profile: aan
detect above noise kappa: 3
limit stars to 2500
Ga nu nieuwe versie compileren en uploaden ;-)starAnaNoFilterstarAnaFilter
Hoi Kees,
Dit is ook opgelost, er was nog een extra aanpassing nodig in de filter van het ster profiel. Ik gebruikte een te groot filter wat de kleinste sterren vrijwel verwijderd. Dat willen we natuurlijk niet ;-(
Als je nu het filter aanzet dan blijft het aantal sterren vrijwel hetzelfde, maar in opnames (geen stacks van meerdere opnames bedoel ik dan) zal het helpen om wat meer precisie te hebben in de star lokatie bepaling. (door een klein filter te gebruiken, haal je de invloed van de shotnoise in je signaal er iets uit en krijg je een iets betere ster loaktie bepaling).
Ik heb dit nu getest op de enkele opname van panel 41 die ik van je heb
Eerste plaatje star analyse middels de image viewer starmap en dan de details bekijken.
Minimum star size 6
clip profile 0.3
zonder filter
Tweede plaatje, zelfde instelling, met filter aan.
Je ziet dat dezelfde sterren worden gedetecteerd, maar dat de ster lokatie bepaling iets naders is achter de komma.
De eerste kolom is het nummer van de gedetecteerde ster
2de kolom, is de ster x-coordinaat op je sensor
3 de kolom, is de ster y-coordinaat op je sensor
Bij sommige sterren maakt het niet veel uit, maar bij andere scheelt in totaal meer dan 0.1 pixel. Dat is dan significant. (de meet onzekerheid ligt ongeveer op 0,05-0,1 pixel bij monochrome data)
Voor je mosaic, zou ik de volgende instelling proberen:
minimum star size : 4
clip star profile: 0.1
filter star profile: aan
detect above noise kappa: 3
limit stars to 2500
Ga nu nieuwe versie compileren en uploaden ;-)starAnaNoFilterstarAnaFilter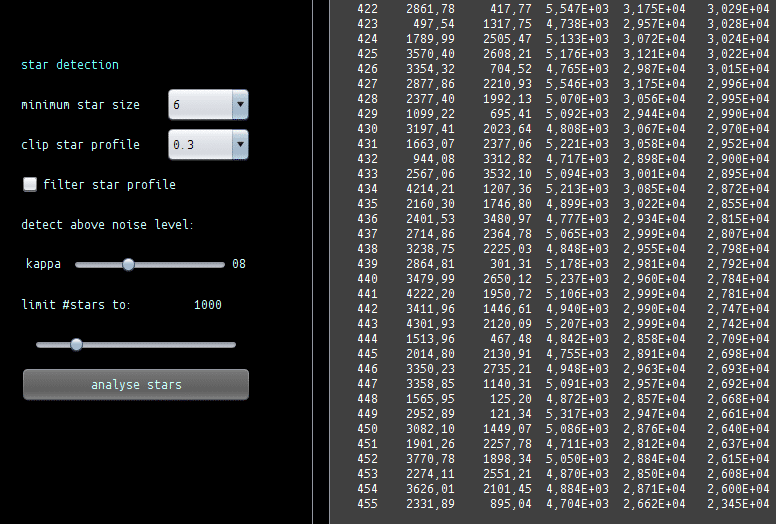
Haverkamp wrote: Dank je Kees, Ben er mee bezig Er gaat inderaad iets niet goed met de Bad Pixel Map,Ah mooi. Intussen staat de Toughbook te werken aan de 35-paneels versie met de nieuwe APP 1.040 . Vreemd genoeg ging het vrijwel meteen mis op “could not register any frame” dus ik heb de “clip profile” aangepast van 0.4 naar 0.1. Toen ging het verder tot 2 Java errors. Hierna verder op status 48%. Nu al een tijd bezig met “calculating multiple view….” maar met maar 25% processorbelasting (cpu’s 3 van 4) en nog geen 0.9 Gb van de toegewezen 14 Gb?
Hoi Kees,
Dit is ook opgelost, er was nog een extra aanpassing nodig in de filter van het ster profiel. Ik gebruikte een te groot filter wat de kleinste sterren vrijwel verwijderd. Dat willen we natuurlijk niet ;-(
Als je nu het filter aanzet dan blijft het aantal sterren vrijwel hetzelfde, maar in opnames (geen stacks van meerdere opnames bedoel ik dan) zal het helpen om wat meer precisie te hebben in de star lokatie bepaling. (door een klein filter te gebruiken, haal je de invloed van de shotnoise in je signaal er iets uit en krijg je een iets betere ster loaktie bepaling).
Ik heb dit nu getest op de enkele opname van panel 41 die ik van je heb
Eerste plaatje star analyse middels de image viewer starmap en dan de details bekijken.
Minimum star size 6
clip profile 0.3
zonder filter
Tweede plaatje, zelfde instelling, met filter aan.
Je ziet dat dezelfde sterren worden gedetecteerd, maar dat de ster lokatie bepaling iets naders is achter de komma.
De eerste kolom is het nummer van de gedetecteerde ster
2de kolom, is de ster x-coordinaat op je sensor
3 de kolom, is de ster y-coordinaat op je sensor
Bij sommige sterren maakt het niet veel uit, maar bij andere scheelt in totaal meer dan 0.1 pixel. Dat is dan significant. (de meet onzekerheid ligt ongeveer op 0,05-0,1 pixel bij monochrome data)
Voor je mosaic, zou ik de volgende instelling proberen:
minimum star size : 4
clip star profile: 0.1
filter star profile: aan
detect above noise kappa: 3
limit stars to 2500
Ga nu nieuwe versie compileren en uploaden ;-)starAnaNoFilterstarAnaFilterHoi allen,
De data van Kees heeft me op het spoor gebracht van een onvolkomenheid in de Bad Pixel Map creatie bij bepaling van de hot pixels. De cold pixel detectie gaat uitstekend.
Deze is nu aangepast voor zowel monochrome als wel kleur (CFA,OSC) data. Vandaag maak ik een nieuwe APP met deze update.
Voor sensoren met bad columns, duidelijke amp glow en/of sterke banding, moet deze nieuwe methodiek veel beter werken.FrameFrameBPMCFAFrameCFAFrameBPM
Hoi allen,
De data van Kees heeft me op het spoor gebracht van een onvolkomenheid in de Bad Pixel Map creatie bij bepaling van de hot pixels. De cold pixel detectie gaat uitstekend.
Deze is nu aangepast voor zowel monochrome als wel kleur (CFA,OSC) data. Vandaag maak ik een nieuwe APP met deze update.
Voor sensoren met bad columns, duidelijke amp glow en/of sterke banding, moet deze nieuwe methodiek veel beter werken.FrameFrameBPMCFAFrameCFAFrameBPM
Hi @keesscherer,
Thank you, I have found the bug. It happened in
-mosaic mode
- not same camera and optics
- dynamic distortion correction
- projective model
The bug caused to start the regression calculation with wrong initial parameters, in this case the "wrong" parameters couldn't be found. So a very good bug to solve 😉
Furthermore, I see another and even more serious bug in the star analyser when "filter star profile" is enabled with your data (first time I encounter this.. but must have affected other data processing as well):
minimum star size 4
clip profile 0.1
filter on
kappa 8
limit stars to : doesn't matter, screenshots with 1000 stars
It's a serious bug, so very happy to have found it. 2 screenshots:
first with "filter star profile" off, the other with "filter star profile" on. The screenshots show the "details" of "star map image viewer mode" on panel 41.
Notice that with filter on, there are stars found with FWHM max, min of 1,00 & 1,00. These are bogus results, the star locations are rubbish as well... This must seriously affect registration in a bad way.StarAnalyserBugFilterOFFStarAnalyserBugFilterON
Haverkamp started the topic A new APP version (1.039) is coming soon in the forum Astro Pixel Processor
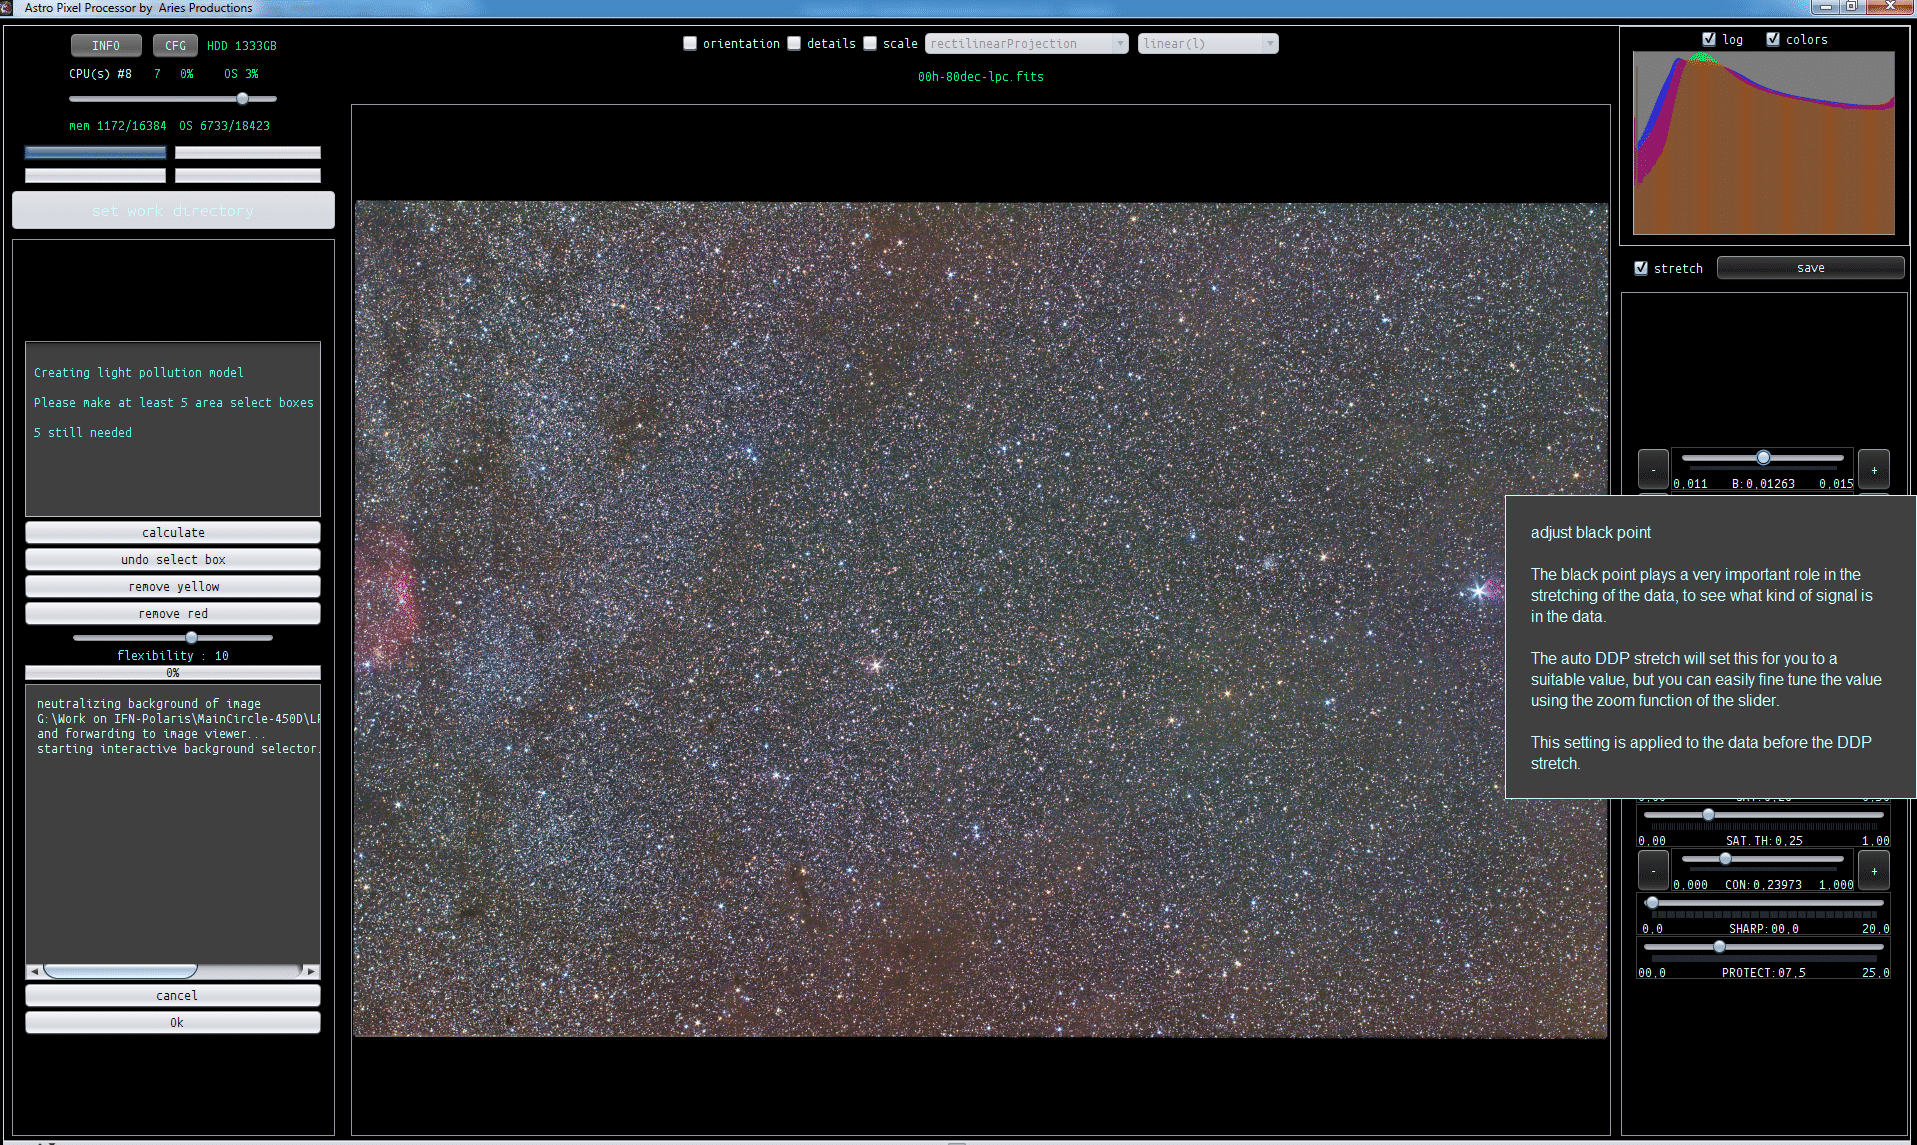
A new APP version (1.039) is coming soon, with much improved preview filter functions and histogram. All with tooltips 😉 I am also adding the option to directly apply background neutralization. This is a much preferred option ( and much better for your star/nebula colours compared to an unlinked stretch seen in other programs).
Image in screenshot is courtesy of Scott Rosen (@srosenfraz).NewSlidersAndHistogram-1
Haverkamp replied to the topic Oops... a sphere after integrating lights in the forum Astro Pixel Processor Beta
@mauricetoet,
After extensive testing on your data, I have some conclusions now.
First of all, the best workflow would be to make a camera profile using single subs of each panel. To do this we can register with:
3) star analyis
star count limit around 5000
kappa above noise at 3
4) register
"same camera and optics" on
"calibrated projective" registration model
"mosaic" mode
and save distortion model.
During registration, you'll be asked for focal length and pixel size, I used 500mm and 5 micron. You don't need to be exact here. These are just used as starting points in the calculation. Then when finished, you can save this camera profile with a camera and objective/ota name.
The next step is to create all 6 panels and use this camera profile for registration.
"choose saved camera profile" witth dynamic distortion correction on selct the profile that you have created
After creation of the panels, you can integrate the mosaic without using distortion correction. Or for further precision, use distortion correction, with
"same camera and optics" off.
This is the result I got. Not perfect, but near perfect now. Only 1 registration flaw on the extreme right where the center-right and bottom-right panels overlap.
I'll write down the exact stept for this workflow in the next couple of days 😉
I have 2 arguments why this 6-panel is actually very hard to get perfect.
1) collimation problems, I noticed that the data was collected during several days. And collimation wasn't constant over these days. Some panels have good stars in all 4 corners, but some have star shapes that are semi-circles instead of circles. This has a clear effect on the optical distortion pattern in your data, which isn't constant, and also on the star lokation precision and the number of stars that are found in the corners particularly.
2) Rather small overlap between the frames. The overlap areas are less than 10% of the panels width/height. This is rather small. I suggest to have at least 10% and preferably 15% overlap. This will help a lot in gettting perfect distortion correction and thus perfect registration. More overlap between the panels will also make the success of the mosaic less dependant on not constant collimation over all imaging sessions.
To make APP more robust for mosaicing when the overlap is really small, I can improve more things in the registration engine. I'll put these on the RFC 😉
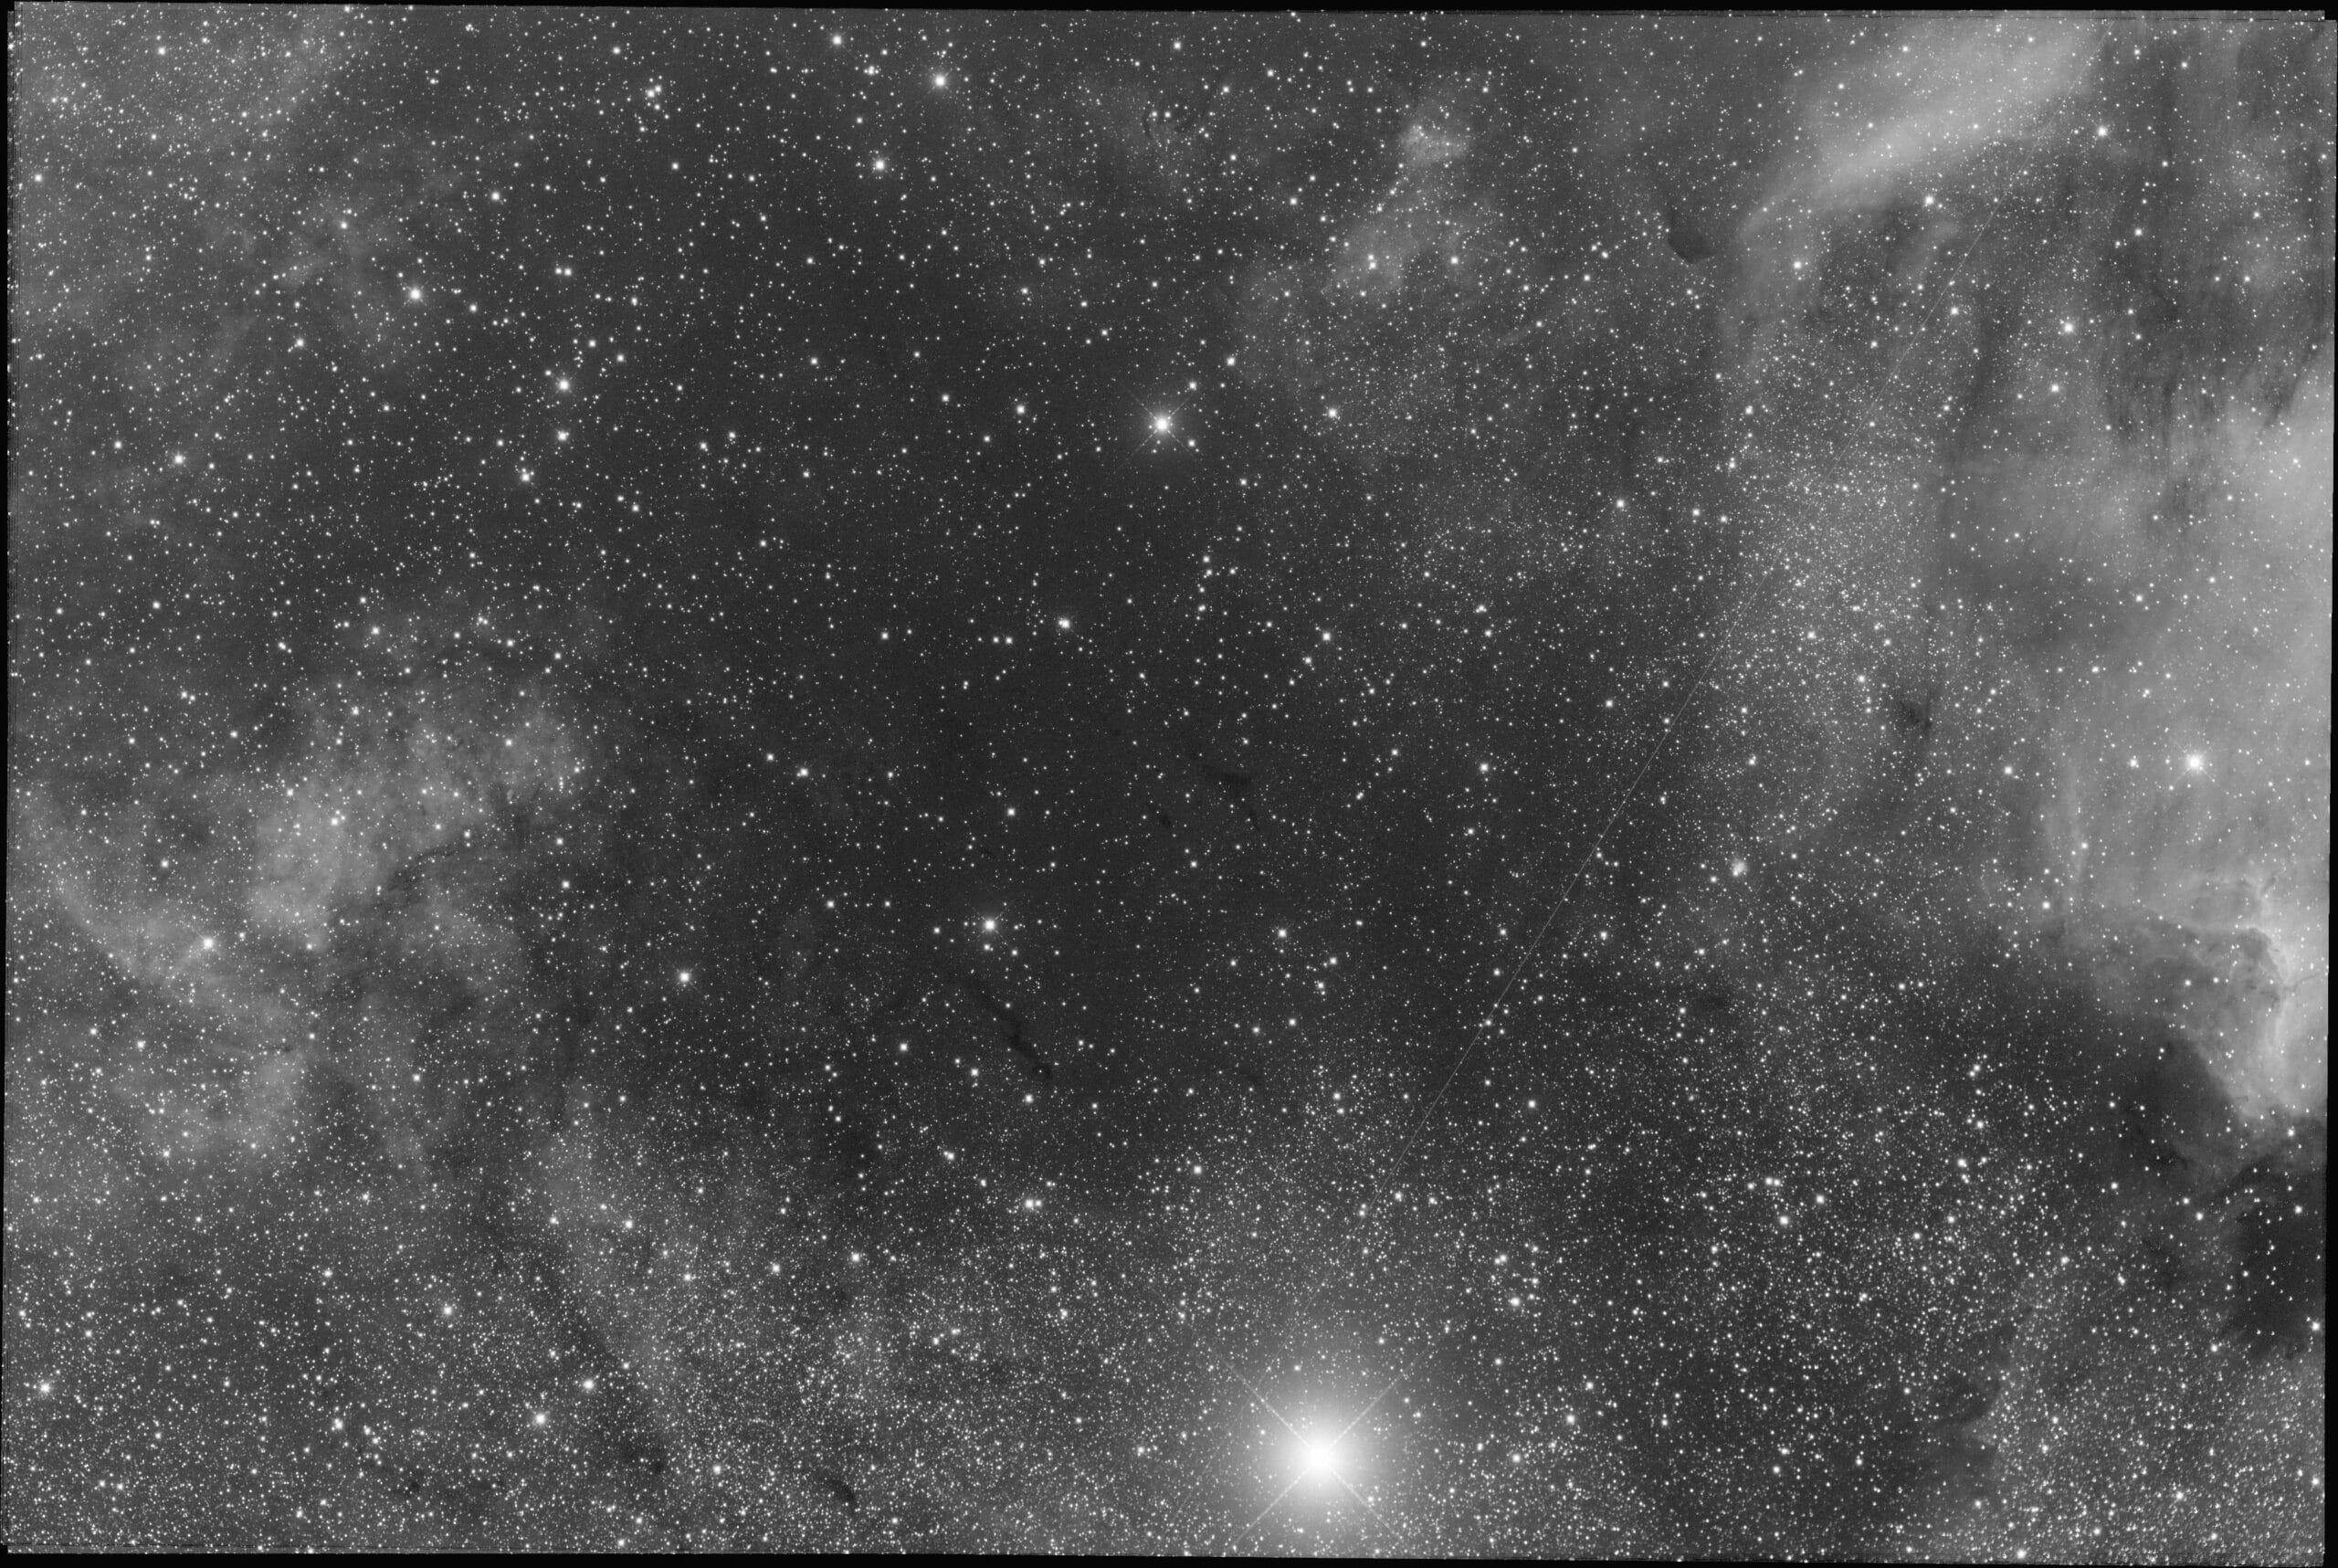
I have also included 2 screenshots, one of a panel with a corner that has bad collimation. And the starmap of the entire panel, which shows that the star detection is this corner is bad (lower-right), which has a clear effect on the registration precision.St-avg-43200.0s-NR-x_1.0_LZ3-NS-full-eq-mult-sc_BWMV_nor-AA-RL-MBB7_4thLNC_it5--0degCW-0.5x-MNC-NS-StBadCollimationBadCollimationStarMap
Haverkamp replied to the topic Oops... a sphere after integrating lights in the forum Astro Pixel Processor Beta
@mauricetoet,
After extensive testing on your data, I have some conclusions now.
First of all, the best workflow would be to make a camera profile using single subs of each panel. To do this we can register with:
3) star analyis
star count limit around 5000
kappa above noise at 3
4) register
"same camera and optics" on
"calibrated projective" registration model
"mosaic" mode
and save distortion model.
During registration, you'll be asked for focal length and pixel size, I used 500mm and 5 micron. You don't need to be exact here. These are just used as starting points in the calculation. Then when finished, you can save this camera profile with a camera and objective/ota name.
The next step is to create all 6 panels and use this camera profile for registration.
"choose saved camera profile" witth dynamic distortion correction on selct the profile that you have created
After creation of the panels, you can integrate the mosaic without using distortion correction. Or for further precision, use distortion correction, with
"same camera and optics" off.
This is the result I got. Not perfect, but near perfect now. Only 1 registration flaw on the extreme right where the center-right and bottom-right panels overlap.
I'll write down the exact stept for this workflow in the next couple of days 😉
I have 2 arguments why this 6-panel is actually very hard to get perfect.
1) collimation problems, I noticed that the data was collected during several days. And collimation wasn't constant over these days. Some panels have good stars in all 4 corners, but some have star shapes that are semi-circles instead of circles. This has a clear effect on the optical distortion pattern in your data, which isn't constant, and also on the star lokation precision and the number of stars that are found in the corners particularly.
2) Rather small overlap between the frames. The overlap areas are less than 10% of the panels width/height. This is rather small. I suggest to have at least 10% and preferably 15% overlap. This will help a lot in gettting perfect distortion correction and thus perfect registration. More overlap between the panels will also make the success of the mosaic less dependant on not constant collimation over all imaging sessions.
To make APP more robust for mosaicing when the overlap is really small, I can improve more things in the registration engine. I'll put these on the RFC 😉
I have also included 2 screenshots, one of a panel with a corner that has bad collimation. And the starmap of the entire panel, which shows that the star detection is this corner is bad (lower-right), which has a clear effect on the registration precision.St-avg-43200.0s-NR-x_1.0_LZ3-NS-full-eq-mult-sc_BWMV_nor-AA-RL-MBB7_4thLNC_it5--0degCW-0.5x-MNC-NS-StBadCollimationBadCollimationStarMap
Haverkamp replied to the topic Error: java.lang.NegativeArraySizeException in the forum Astro Pixel Processor Beta
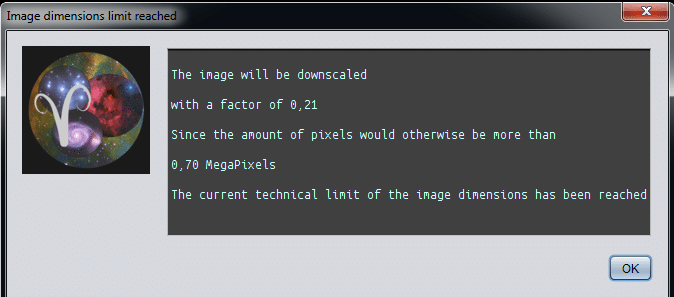
Hi Wei-Hao (@whwang)
I have added several extra checks for memory or technical limits into APP.
A proper message will pop-up, when image dimensions become infinite or negative, like the error that started this thread.
If your image dimensions after registration become bigger than
1) the amount of memory that can be allocated or
2) the technical limit of the image structure in the code
the user will get a warning that the image will be downscaled with a certain factor
and the warning will indicate which limitation was reached.
The downscaling is a measure that although a limit is reached, the image can still be created.
I have been testing this, this afternoon.
With 16GB of memory allocated for APP the limit is a
430MP (MegaPixel) 32bits float RGB image, so a monochrome 32bits image could be 3times this, 1290 MP. This 430MP image has 25000x17000 image dimensions and is 5GBs large.
To make bigger pictures, more memory needs to be allocated to APP.
The technical limit for an image would be triggered when the
- RGB image becomes larger than (2^31) / 3 = 700MP
- monochrome image becomes larger than 2^31 = 2147MP
For 32bits float data, this means that allocating 32GBs of RAM to APP is enough. Allocating 80GBs of RAM won't accomplish more.
To go beyond the 2 billion pixel limit, I would need to completely rebuild the way APP handles images. This would be something to implement once other more pressing matters are solved off course.
I will compile new versions later today and will inform you once they are ready for download.
(The screenshot shows the warning when a limit is reached, I set the technical limit really low for testing purposes.)ImageLimitation
Haverkamp replied to the topic Error: java.lang.NegativeArraySizeException in the forum Astro Pixel Processor Beta
Hi Wei-Hao,
"For the orientation, now I can see why the image in the previous screen shot is tilted. Among all the panels, one is tilted relative to the Galactic plane, and that one happened to be picked by APP as the reference."
Murphy's Law I guess... 😉
"To be clear, after I launch APP, its icon appears immediately, but it takes 2 to 3 minutes for the processing window to show up. "
Okay, i'll put it on the RFC list to investigate, i'll check my server logs as well. Strange behaviour indeed.
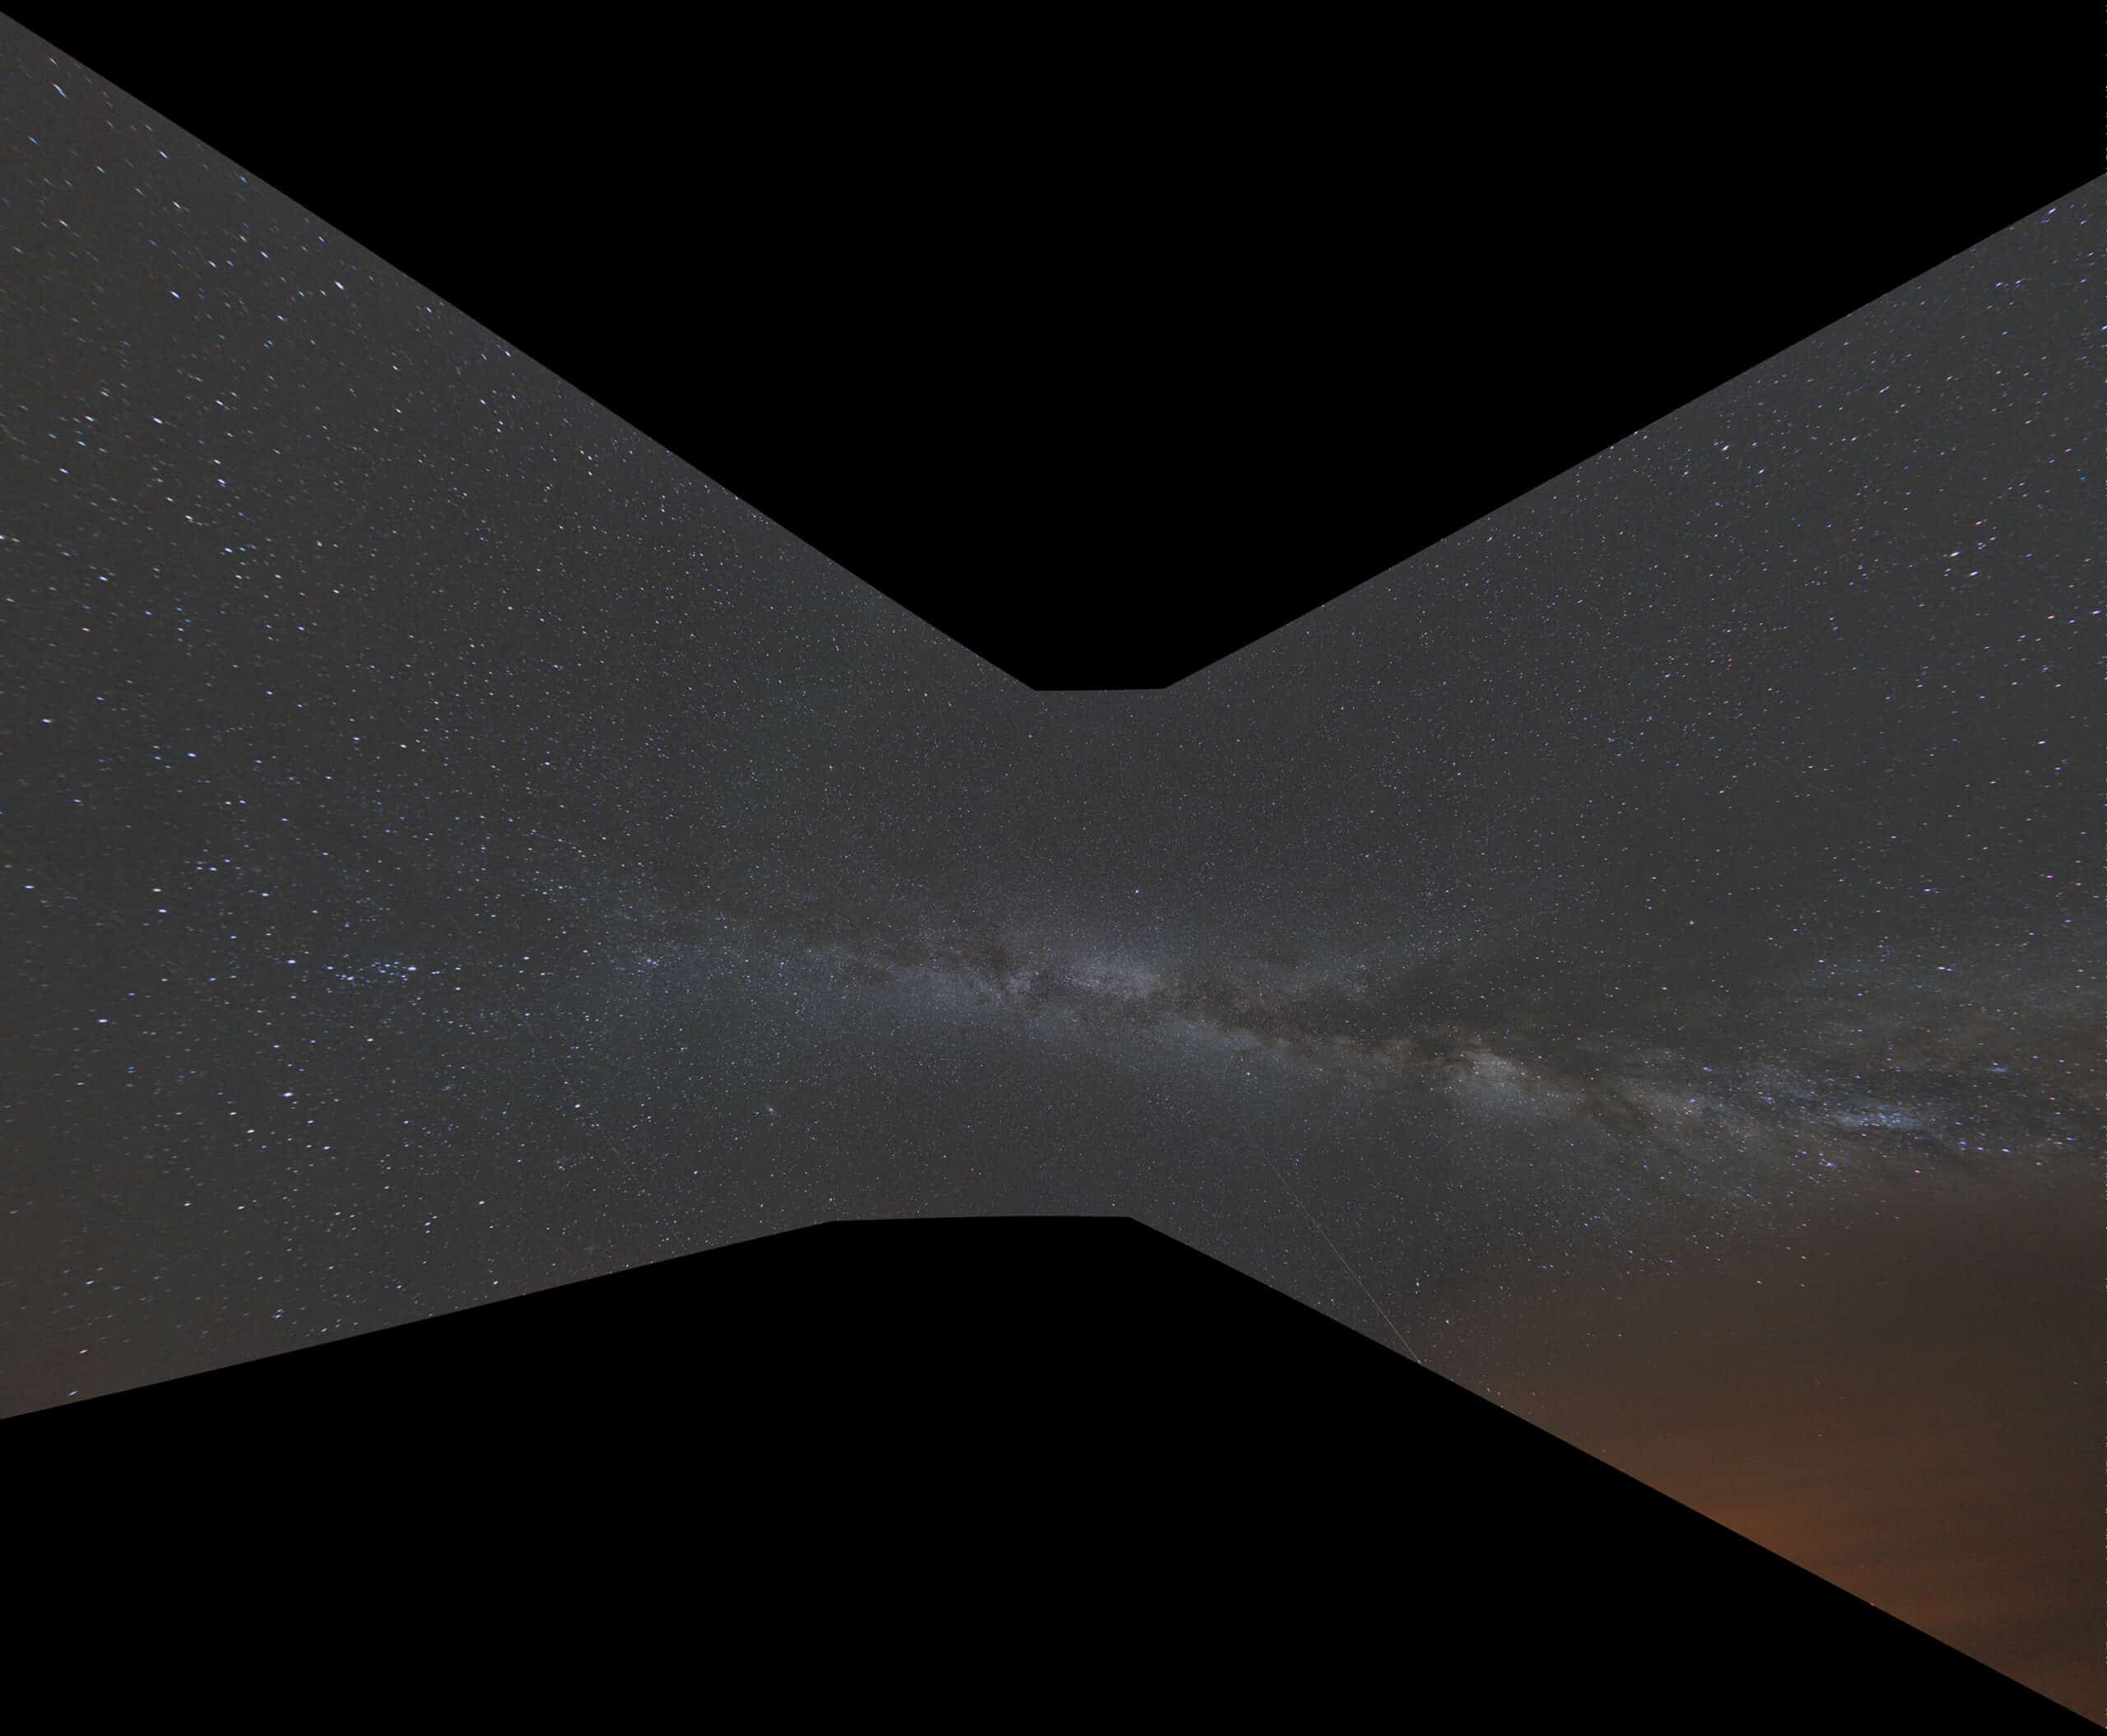
"Finally, will the equirectangular projection project the 2pi sky into a sphere or a rectangle?"
The equirectangular projection maps your data in longitude and latitude. Currently the [0,0] coordinate of the projection is the center of the reference frame. So this has some influence on how the projection actually looks.
How the 2pi sky turns out, depends on several things. Is your data a semi-sphere? Or is it a circle on the sphere? In the latter case, possibly a cylindrical projection would be nice.
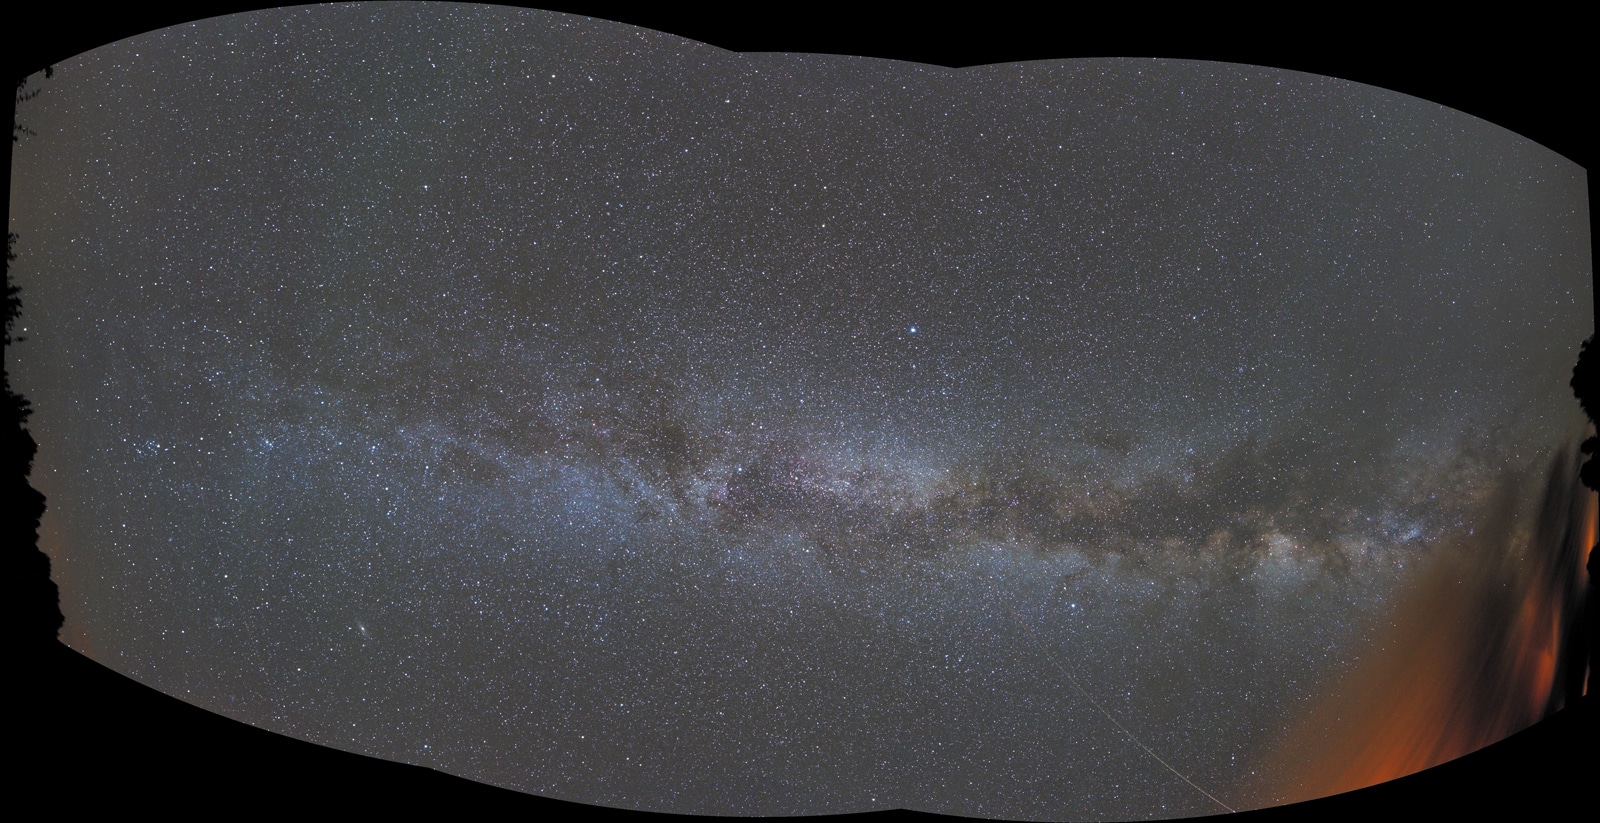
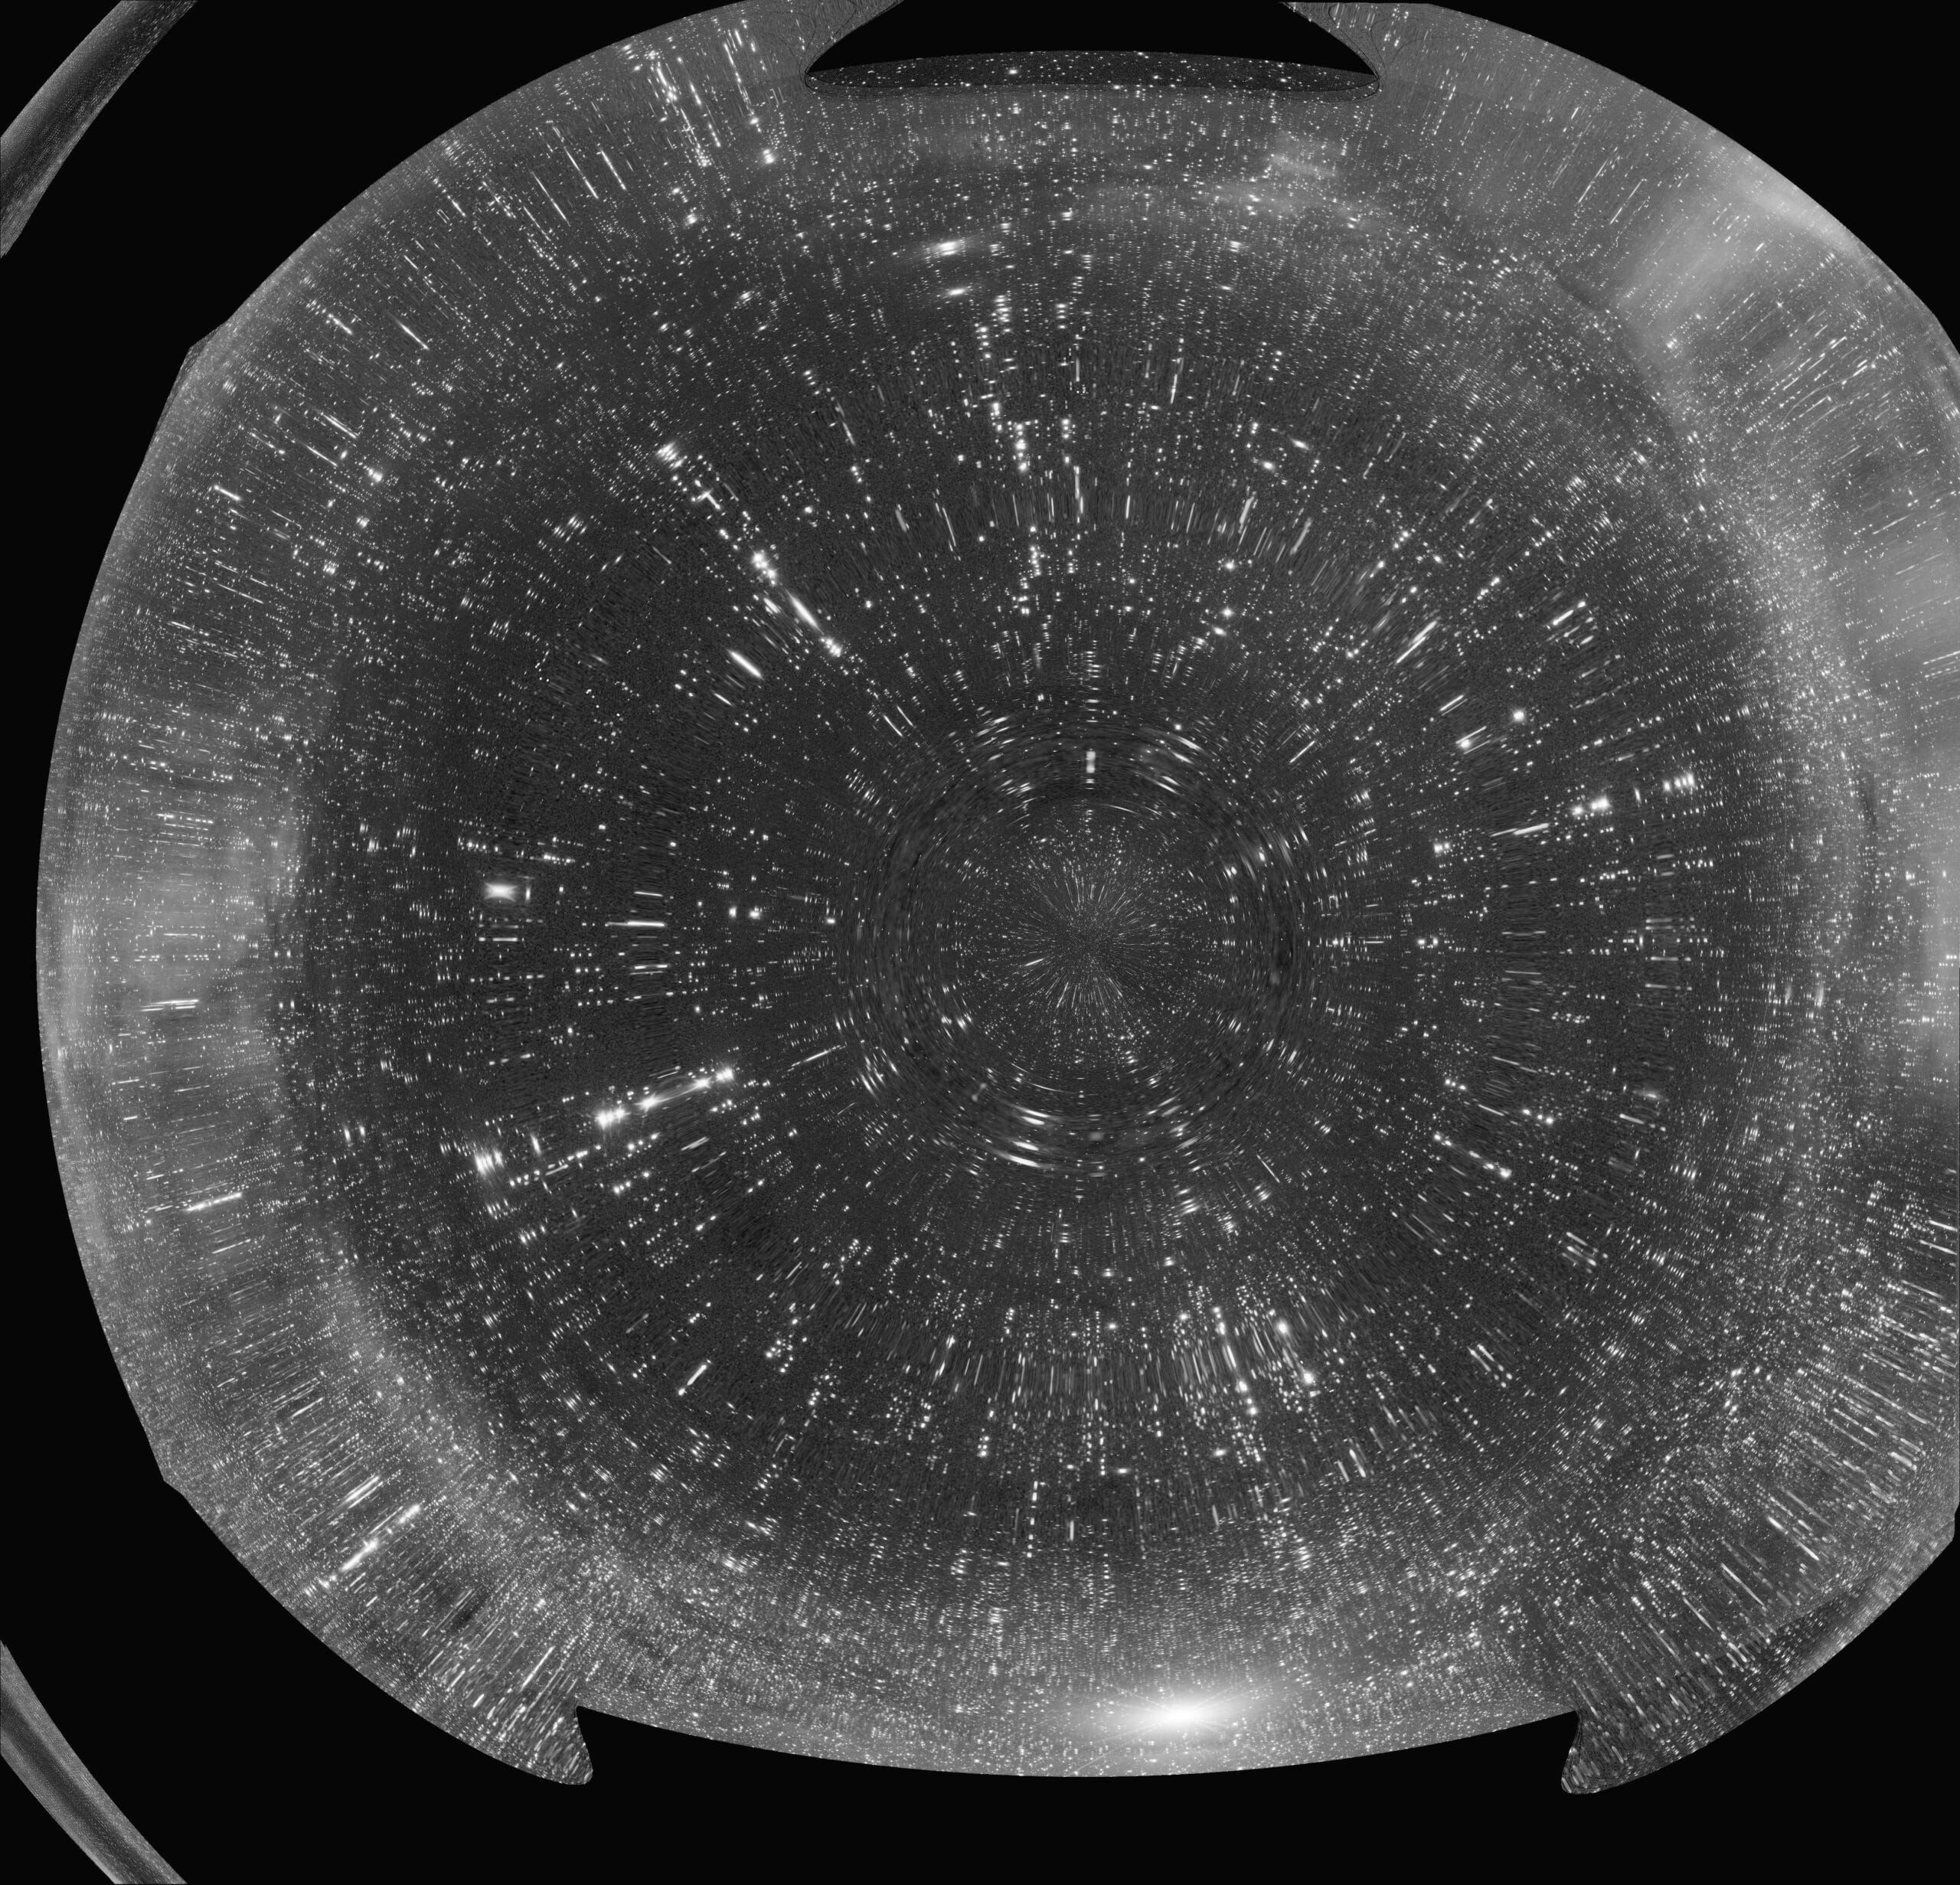
To give you an idea, what will happen with the equirectangular projection versus the rectilinear projection, I show the same image with different projections, field of view is 180 degrees x 60 degrees (give or take) from the northern to southern horizon. Data is courtesy of Ralph Wagter. Canon 6D with a samyang 14mm f/2.8 objective
first image is rectilinear, straight lines stay straight, but perspective distortion is a real problem as you can see.
second image is equirectangular, now the data can easily be projected. A square rectilinear image, becomes more a circle under the equirectangular projection.
Cheers,
MabulaStack-average-452.40000915527344s-no rejection-bilinear-full-equal-rectilinear-RGB-sat2-crop-smallStack-average-452.40000915527344s-no rejection-lanczos-3-full-equal1-RGB-stretch-LRGB3-small
Haverkamp replied to the topic Error: java.lang.NegativeArraySizeException in the forum Astro Pixel Processor Beta
Hi Wei-Hao,
"For the orientation, now I can see why the image in the previous screen shot is tilted. Among all the panels, one is tilted relative to the Galactic plane, and that one happened to be picked by APP as the reference."
Murphy's Law I guess... 😉
"To be clear, after I launch APP, its icon appears immediately, but it takes 2 to 3 minutes for the processing window to show up. "
Okay, i'll put it on the RFC list to investigate, i'll check my server logs as well. Strange behaviour indeed.
"Finally, will the equirectangular projection project the 2pi sky into a sphere or a rectangle?"
The equirectangular projection maps your data in longitude and latitude. Currently the [0,0] coordinate of the projection is the center of the reference frame. So this has some influence on how the projection actually looks.
How the 2pi sky turns out, depends on several things. Is your data a semi-sphere? Or is it a circle on the sphere? In the latter case, possibly a cylindrical projection would be nice.
To give you an idea, what will happen with the equirectangular projection versus the rectilinear projection, I show the same image with different projections, field of view is 180 degrees x 60 degrees (give or take) from the northern to southern horizon. Data is courtesy of Ralph Wagter. Canon 6D with a samyang 14mm f/2.8 objective
first image is rectilinear, straight lines stay straight, but perspective distortion is a real problem as you can see.
second image is equirectangular, now the data can easily be projected. A square rectilinear image, becomes more a circle under the equirectangular projection.
Cheers,
MabulaStack-average-452.40000915527344s-no rejection-bilinear-full-equal-rectilinear-RGB-sat2-crop-smallStack-average-452.40000915527344s-no rejection-lanczos-3-full-equal1-RGB-stretch-LRGB3-small
Ik heb je nieuwe L met de starshape gewichten gebruikt in een nieuwe LRGB.
Ik heb even een crop genomen van enkel M51.
Ik heb eerst de nieuwe L en de R,G,B kanalen met elkaar geregistreerd en genormaliseerd en zodanig weggesaved in 5)normalize.
Daarna ingeladen in de RGB combine tool. De nieuwe L is echt een enorme verbetering qua ruis en scherpte ;-)
plaatjes:
1) screenshot met parameters
2) RGB
3) LRGB met de nieuwe en scherpere LLRGB-crop-parametersM51-RGB-cropM51-LRGB-crop
Hoi @musquetier,
Top, ik zie al dat je daarmee veel winst haalt ;-)
De Lum uit alle data samen heeft een hogere SNR (zoals verwacht) maar is net zo onscherp als de oorspronkelijke lum uit enkel de L-data.
De lum uit alle data samen met weights gezet op "star shape" heeft ook een betere SNR dan je oorsprokelijke L uit alleen de L data en is bovendien een stuk scherper.
De oude Lum uit enkel L-data had een SNR van 1,4 met FWHM min-max 4,93-5,13,
de nieuwe lum uit alle data samen, gemaakt met weights "star shape" heeft een SNR van 1,7 met FWHM min-max 4,27-4,55
Ik zie aan de exposure tijd in de FITS metadata dat je bij de laatste stack wat subs hebt weggelaten, dat had je mogelijk niet eens hoeven doen, want dat haalt de SNR weer iets omlaag. Dus dat zou je ook nog kunnen bekijken. De hele slechte subs die je hebt weggelaten zullen de stervormen maar weinig beinvloeden als je ze meestackt met starshape gewichten, maar zullen nog wel goed bedragen aan verlagen van de ruis.
Verder, als je de nieuwe Lum integreert uit alle data met outlier rejectie aan icm met star shape gewichten, dan wordt het effect van de slechtste frames qua FWHM erg laag omdat de outlier rejectie je sterren ook scherper gaat maker. Welke outlier rejectie settings heb je gebruikt bij de nieuwe L-integratie?
Dit verschil is goed te zien.
Ik heb de 3 verschillende Lums even met elkaar genormaliseerd en geregistreerd. In de nieuwe APP versie, kan je dat direct opslaan bij 5) normalize. Vervolgens even een crop van die 3 genormaliseerde, geregistreerde lums gemaakt via de batch modify crop tool.
En daarop allemaal dezelfde stretch met wat verscherping met ster bescherming in de stretch:
1) je oorspronkelijke L uit enkel de L-data
2) L uit alle data met gelijke gewichten
3) L uit all 2/3 van alle data (gebaseerd op de integratie tijd van de stack) met star shape gewichten
Conclusie: de starshape gewichten verbeteren de stack flink qua resolutie en bovendien kan je prima alle kanalen bij elkaar stacken voor de L. Dit ligt een beetje aan het object of dit goed werkt, maar voor galaxies werk dit vaak prima.OudeL-alleenLdataNieuweL-alleData-gelijkeGewichtenNieuweL-alledata-starshapeGewichten
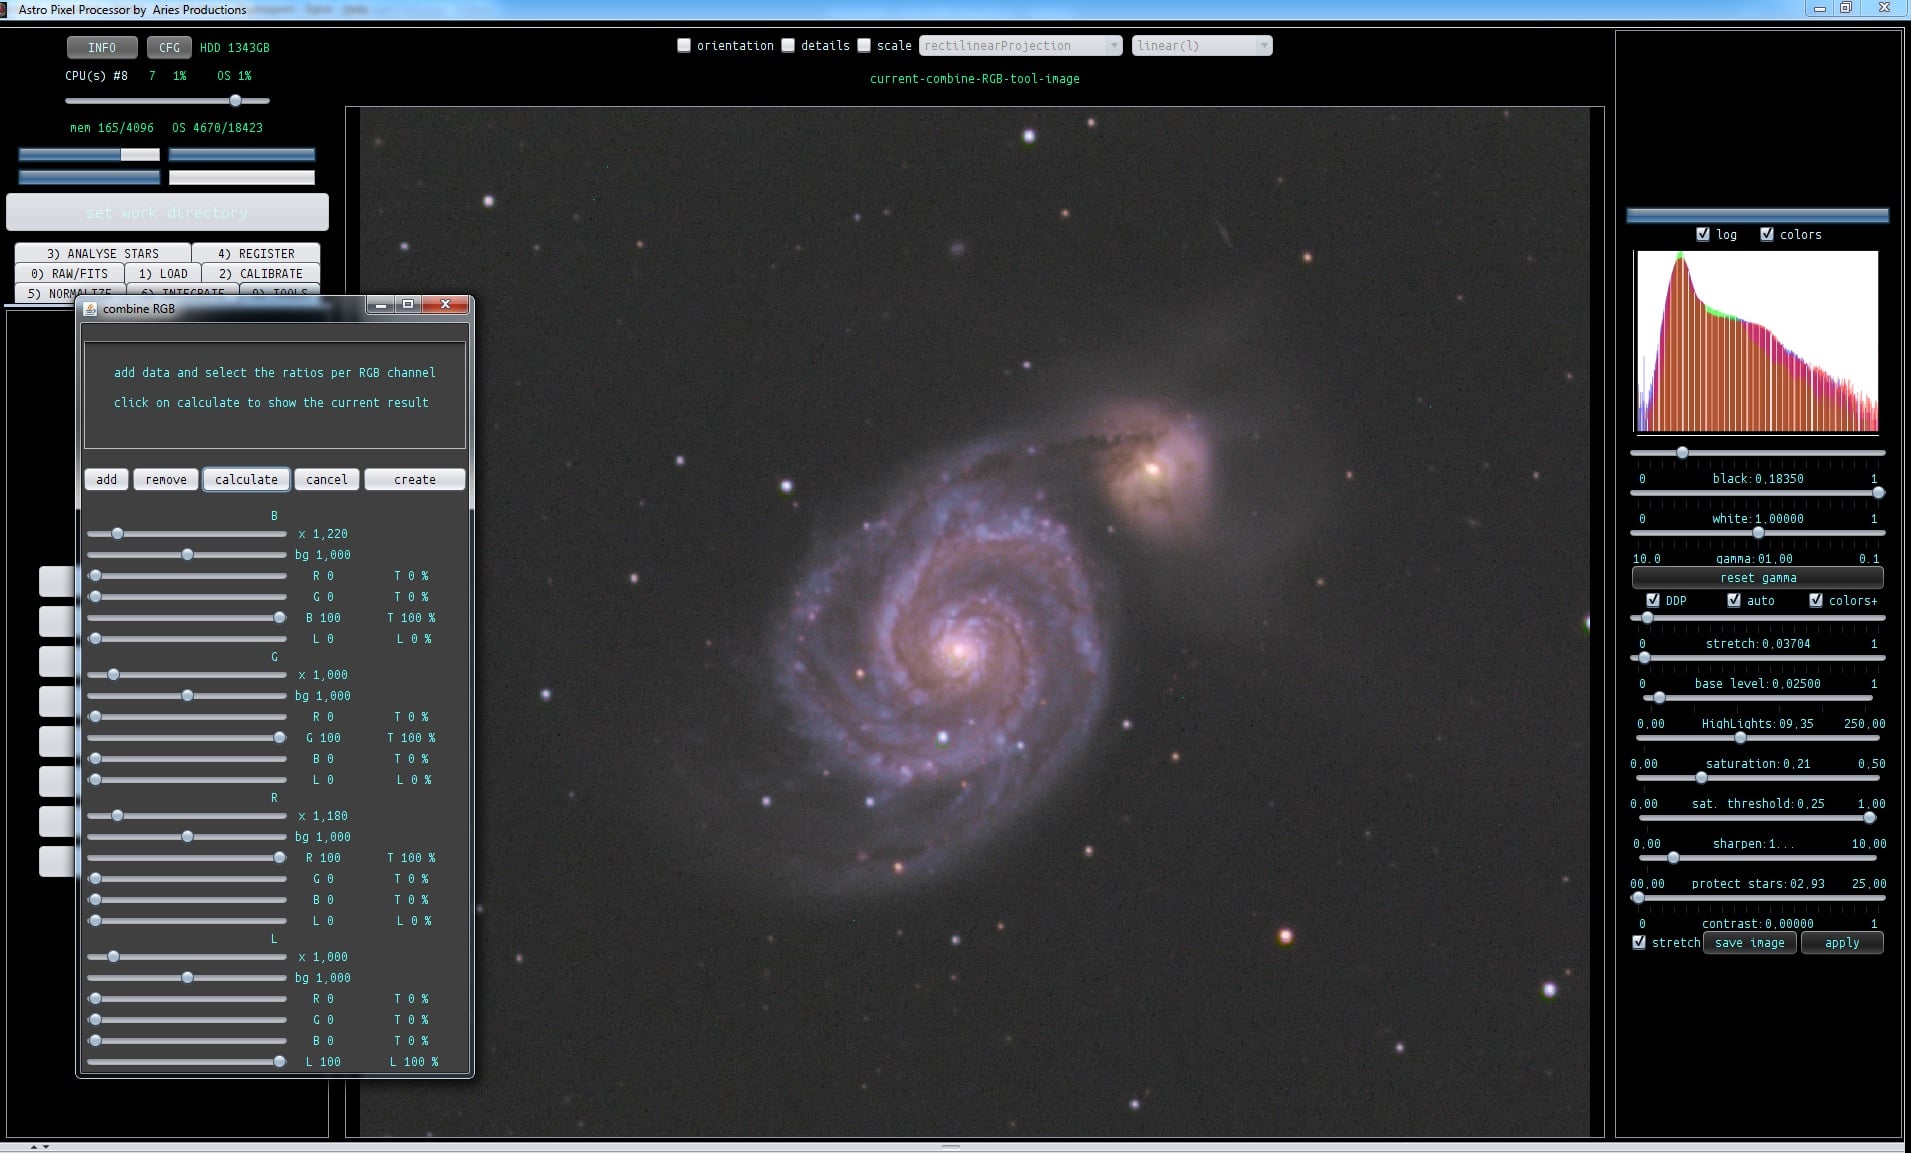
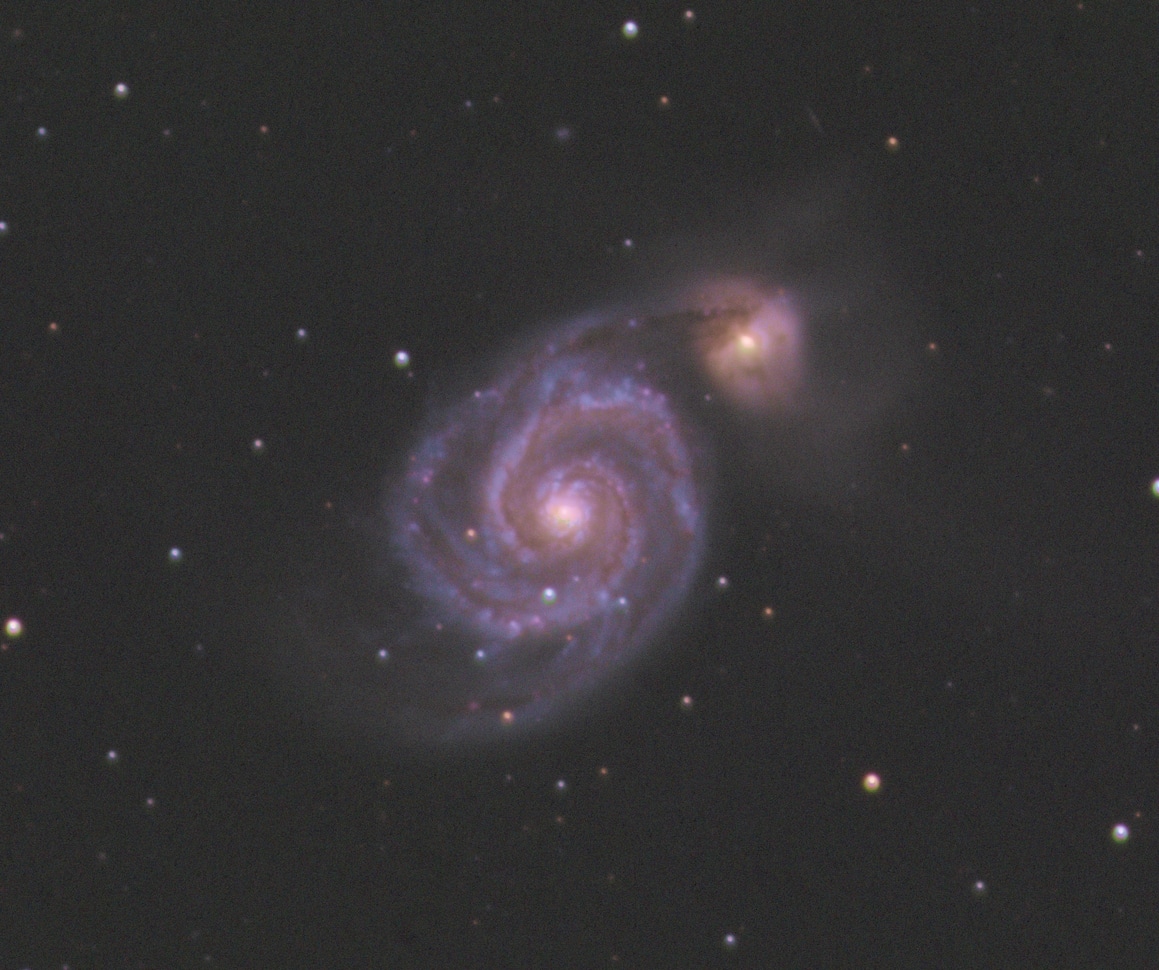
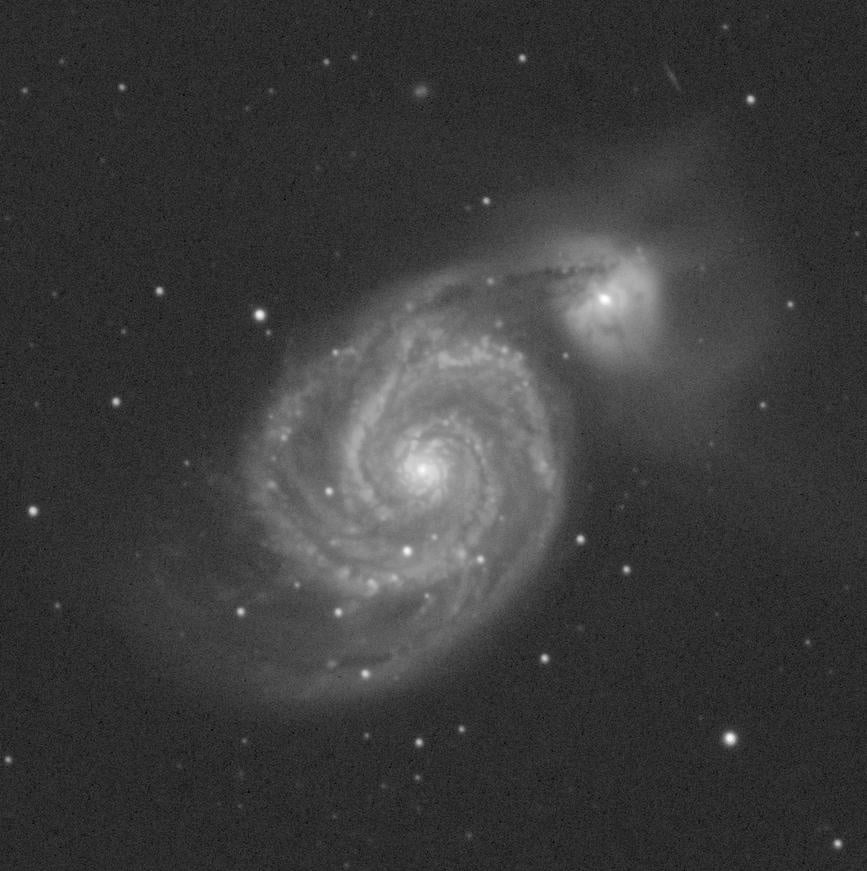
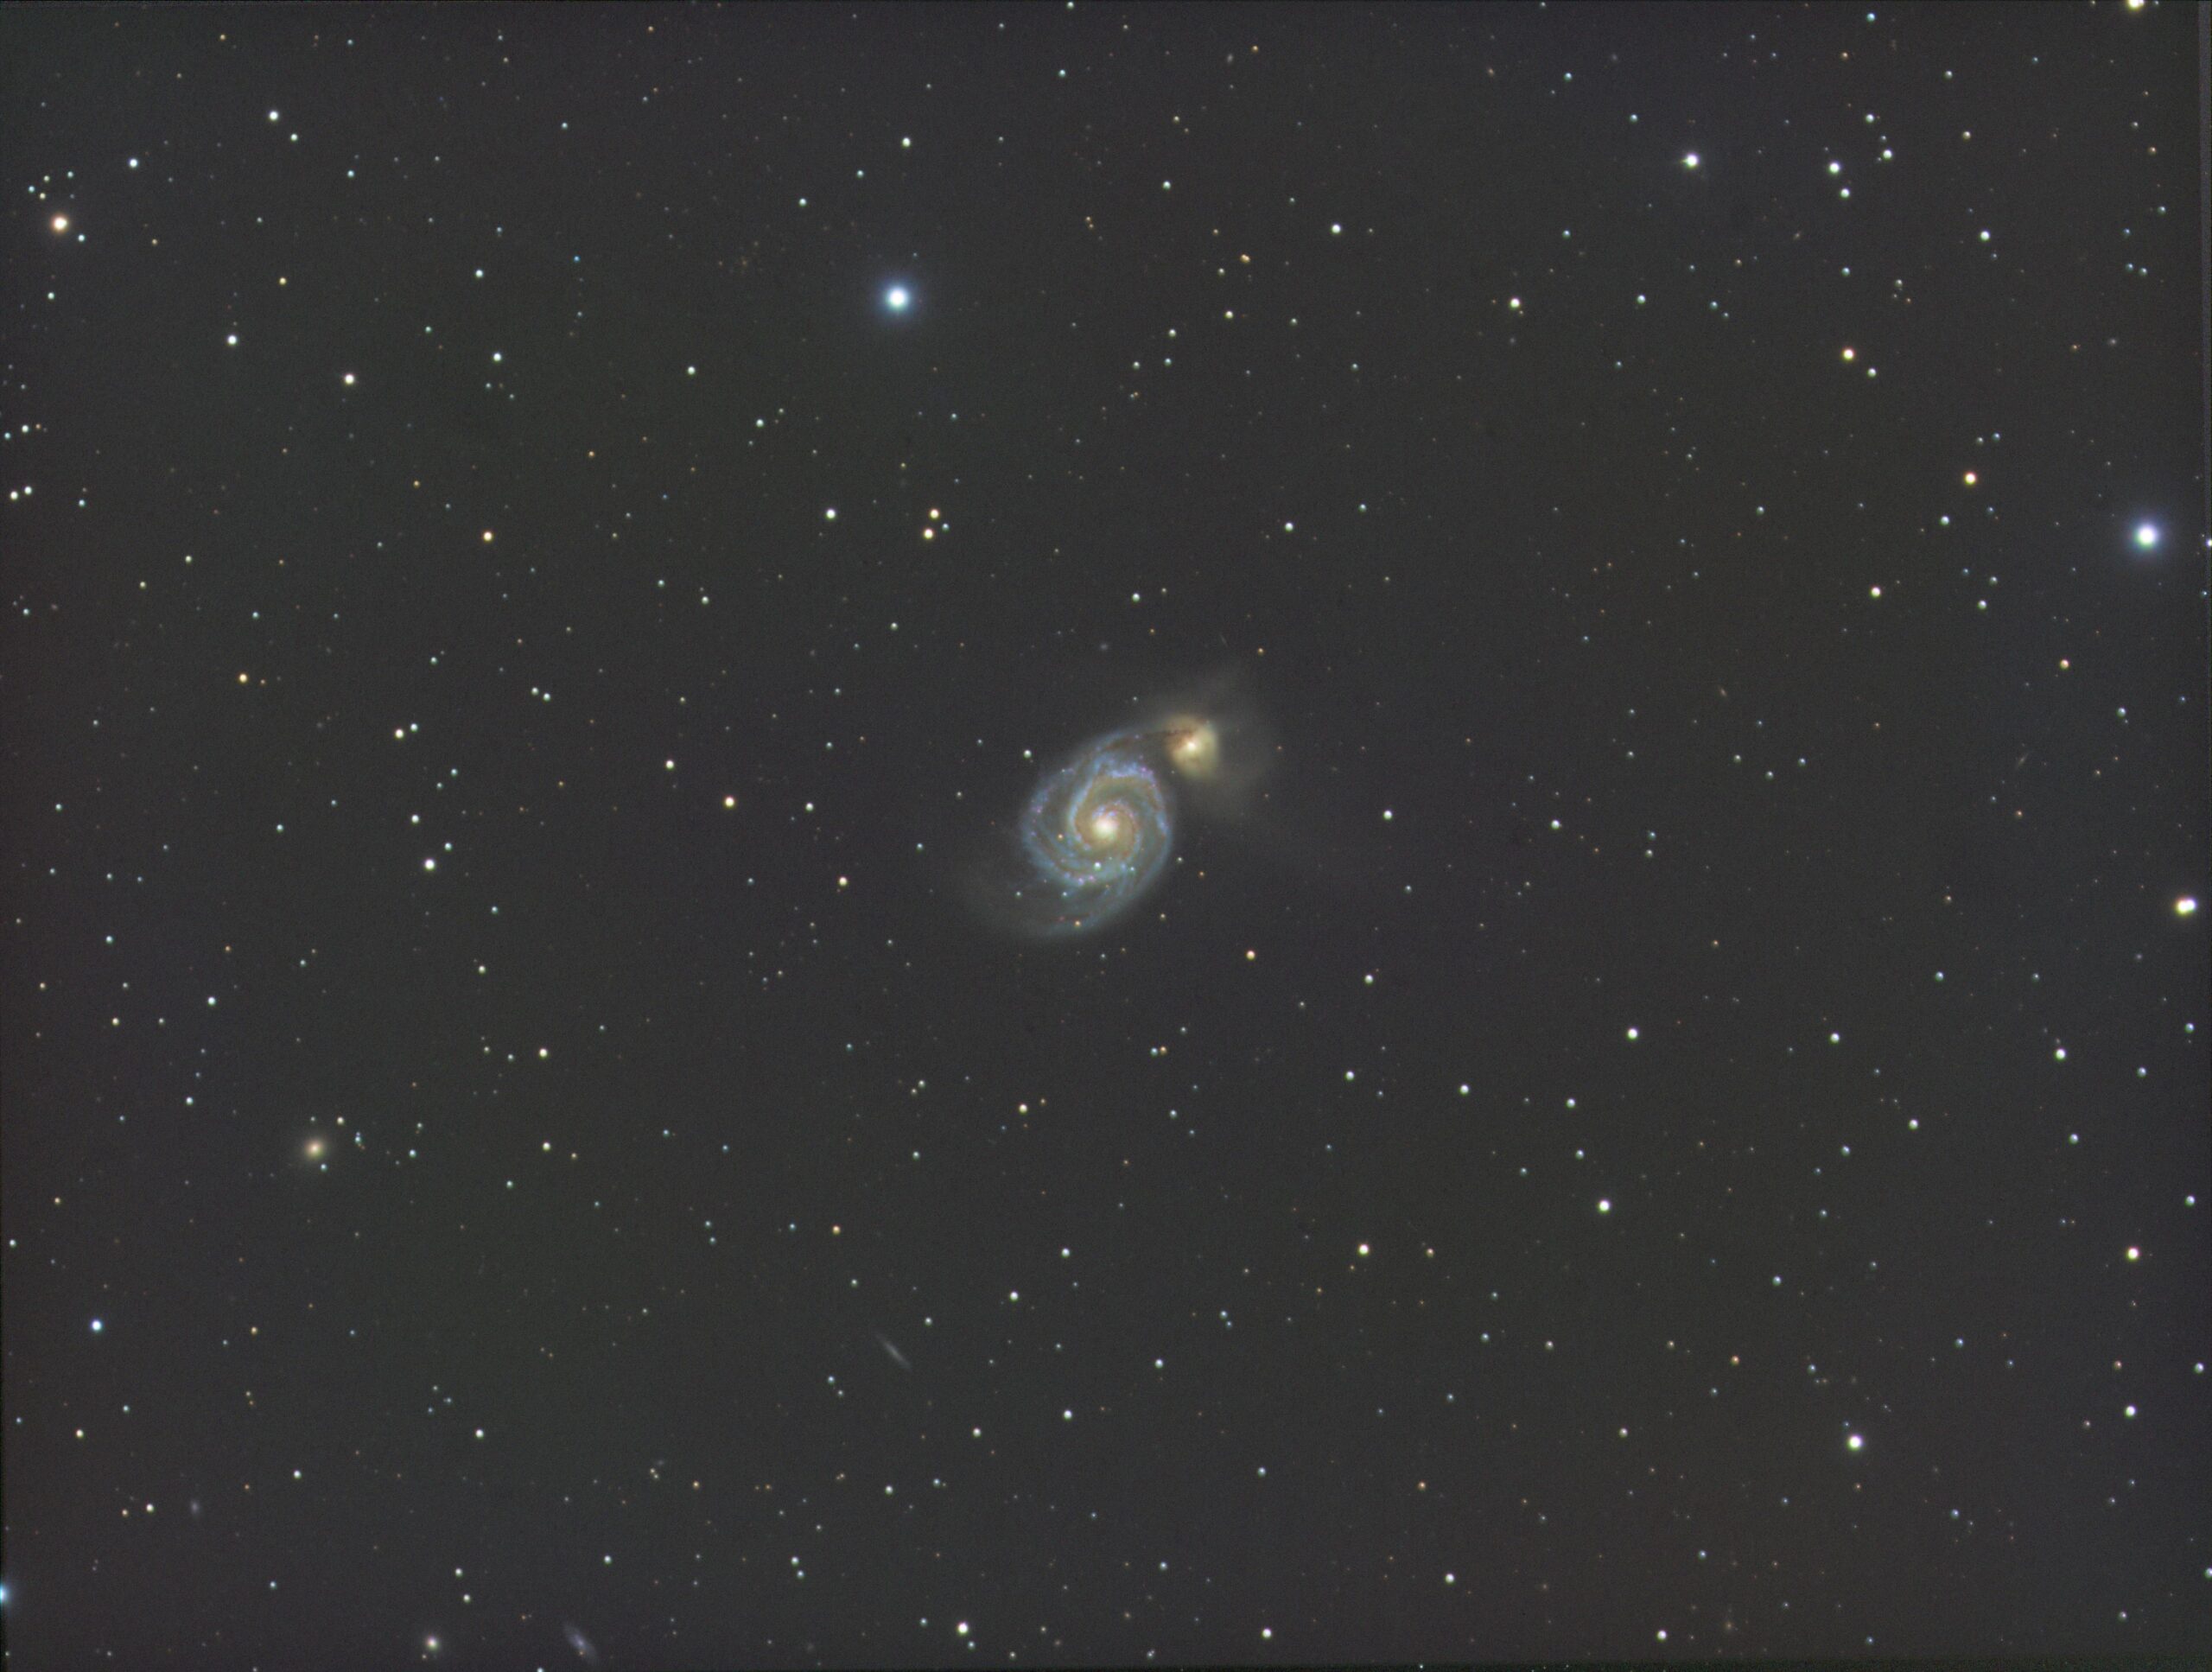
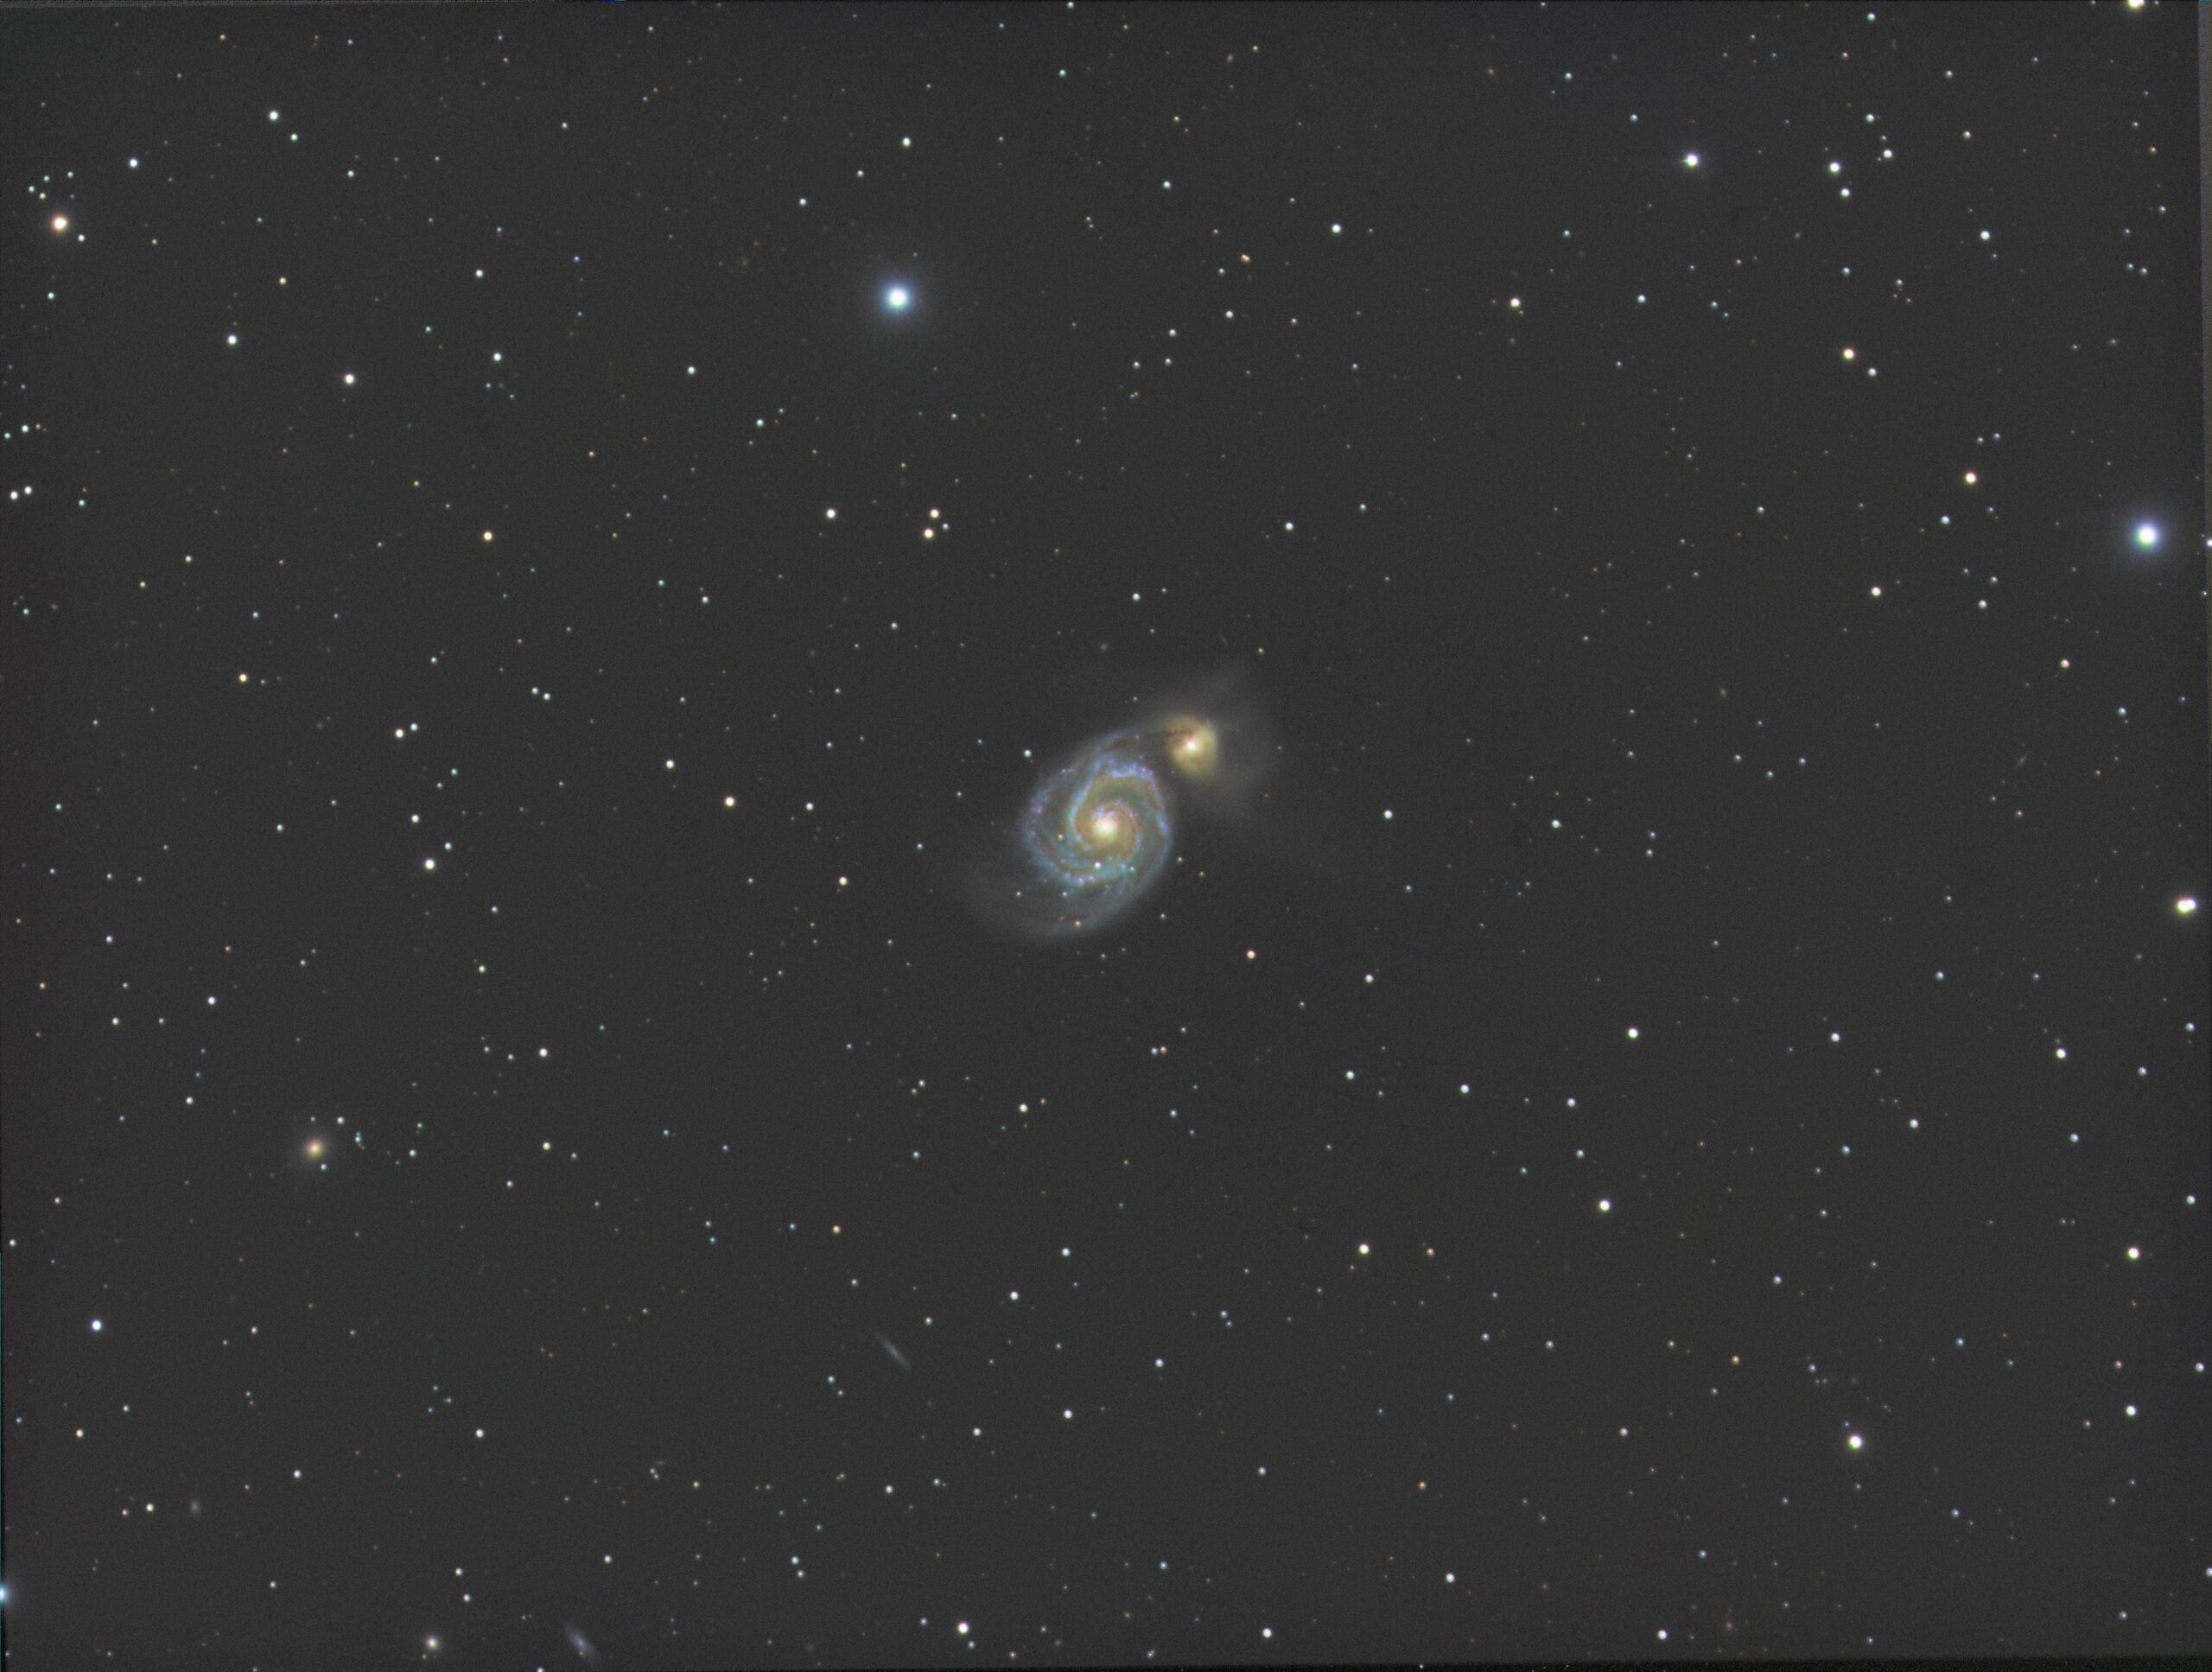
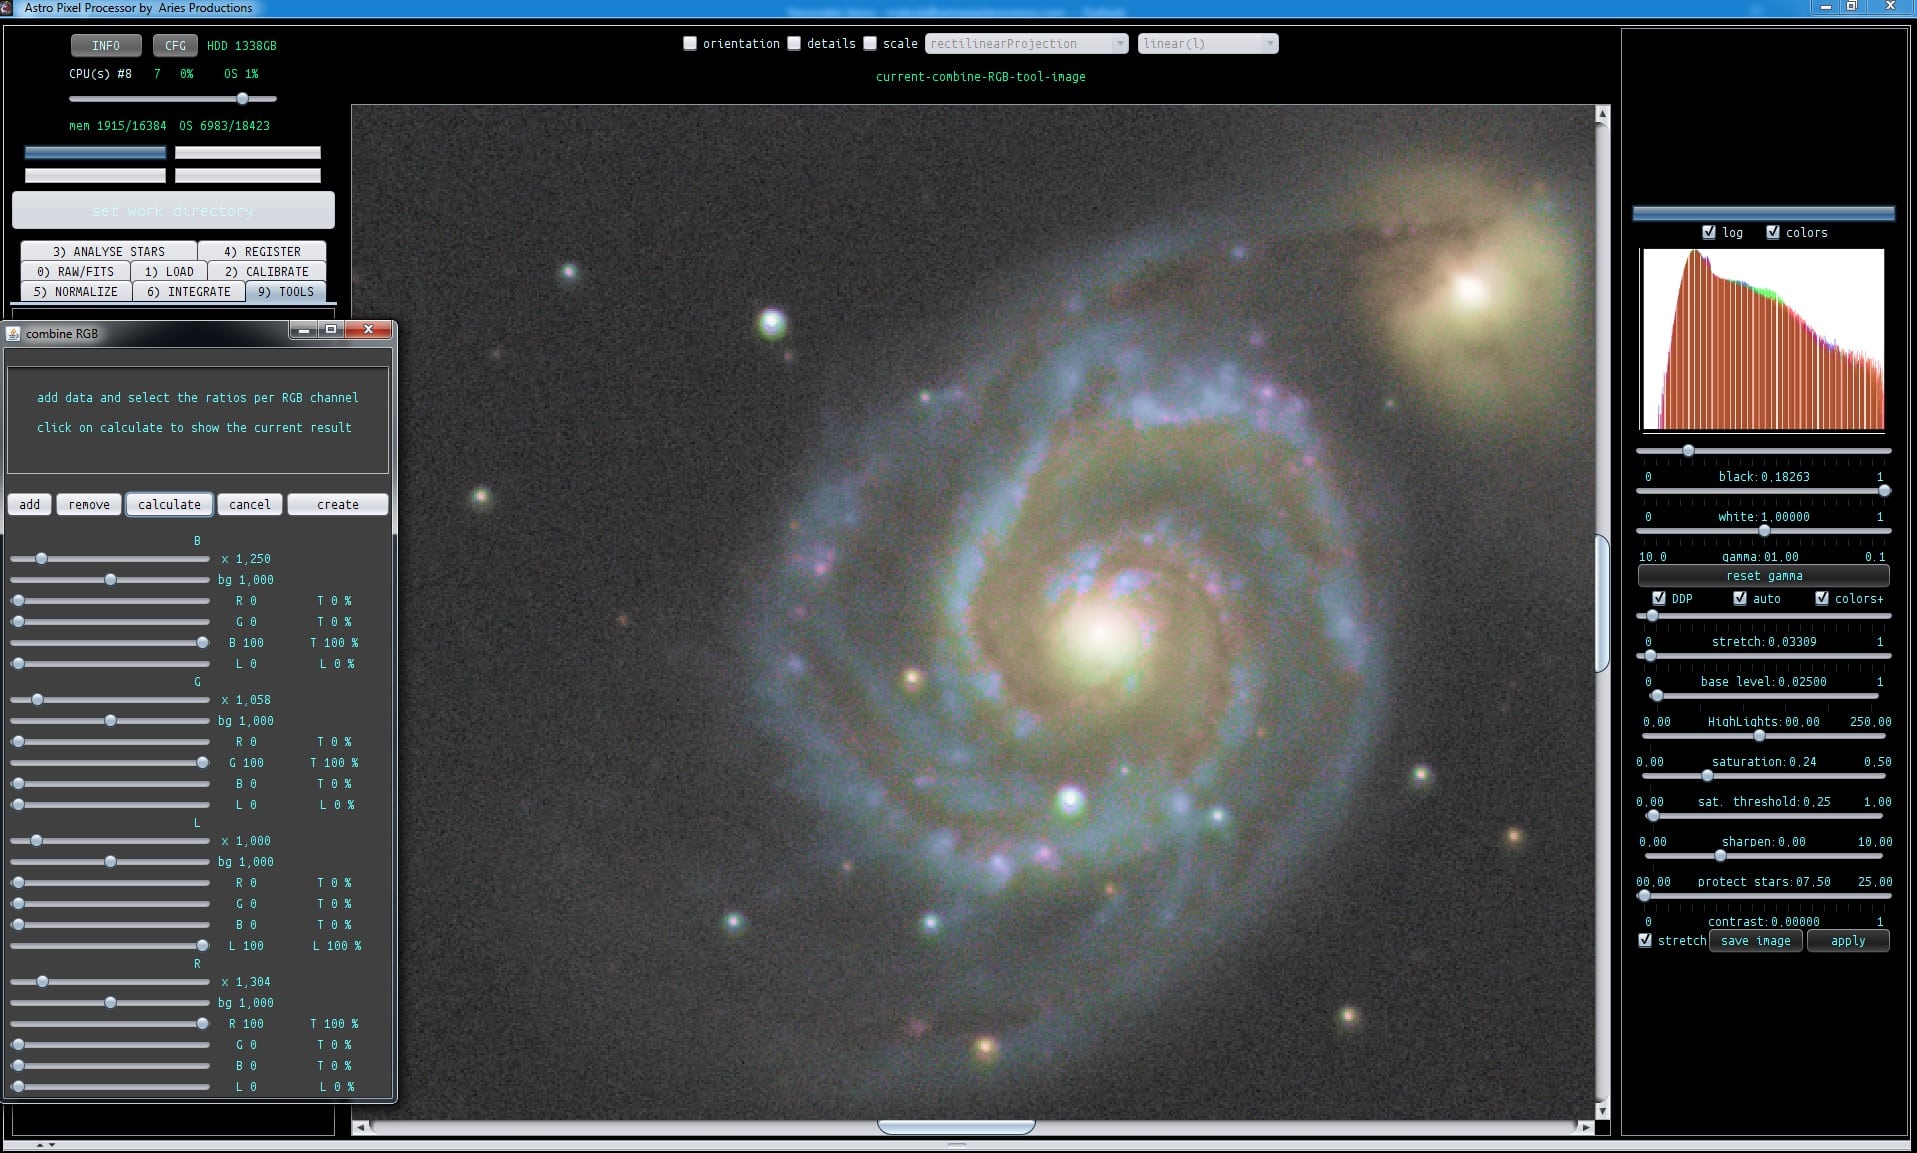
Hoi @musquetier,
Ik heb even in APP gekeken naar je LRGB opnames met de RGB combine tool
eerste plaatje toont RGB met een standaard stretch
tweede plaatje toont de LRGB met een standaard strech
derde plaatje toont screenshot van de tool ingezoomt op M51 en de gebruikte parameters.
Als ik in het derde plaatje naar de sterren kijk, lijkt het alsof je focus was verlopen tijdens het maken van alle 4 de kanalen? Je ziet bij de heldere sterren duidelijk dat ze opgeblazen zijn en dat er een soort van halo omheen zit. Als je dat de volgende keer kan vermijden, moet dit veel scherper kunnen denk ik ;-)
Wat me ook opvalt is dat je Lum data de slechtste Signaal tot Ruis verhouding heeft, iets wat je juist niet verwacht, de L toepassen als lum in een LRGB geeft dan ook eigenlijk geen beter ruis armer resultaat dan de RGB. Het is zeer goed mogelijk dat de L maken uit alle subs, R,G,B + L een beter resultaat geeft in een LRGB in dit geval. Ik zou het proberen.current-combine-RGB-tool-image-RGB-Stcurrent-combine-RGB-tool-image-LRGB-StLRGB-Param-bloatedStars
Haverkamp replied to the topic Oops... a sphere after integrating lights in the forum Astro Pixel Processor Beta
Hi @mauricetoet,
I have found the cause of this regression instability and I have fixed this for both settings (on/off) of "same camera and optics" while using "dynamic distortion correction".St-avg-7200.0s-NR-x_1.0_LZ3-full-eq-add-sc_BWMV_nor-AA-RL-noMBB-St
Haverkamp replied to the topic Oops... a sphere after integrating lights in the forum Astro Pixel Processor Beta
@mauricetoet,
I can replicate the sphere as well, it happens with the following registration settings:
- "same camera and optics" on and "dynamic distortion correction" on
If I turn ""same camera and optics" off, the result is even worse. (first image)
I'll try to isolate the cause to fix this exception. This dataset clearly triggers instability in the dynamic ditortion correction algorithms which I need to catch 😉
If I turn "dynamic distortion correction" off we clearly see that this dataset can be registered without distorton correction (image 2). The RMS registration values for all frames are in the range of 0,2-0,3 pixel.St-avg-7200.0s-NR-x_1.0_LZ3-NS-full-eq-add-sc_BWMV_nor-AA-RL-noMBB-StSt-avg-7200.0s-NR-x_1.0_LZ3-NS-full-eq-add-sc_BWMV_nor-AA-RL-noMBB1-St
Haverkamp replied to the topic Calibration frames with different ISO settings, how to process? in the forum Astro Pixel Processor Beta
@keesscherer, thank you for your explanation and suggestions 😉
Firstly.
" There needs to be a diagnostics step that tells the user what is wrong at this point. And there needs to be a short, clear workflow with just the steps for calibration of DSLR images with flats taken at a different iso setting. "
I totally agree with you, i'll work on that in the manual, instruction videos and I will put warnings in APP in the calibration process, to directly help the user to get optimal calibration.
"My point is that the program has a built in indication next to the lights “B”, “F” but that indication has no meaning when you load all masters and lights. Furthermore there is no check done by APP for this so it just starts to stack."
This assumption is not correct, let me try to explain.
Everywhere in APP where frames are calibrated these checks are done thoroughly, see screenshot 1 for the calibration code of finding and applying the masters (bias, dark, flat, BPM) to a light.
In a previous post, you mention the flat calibration is not done, although the F mark is visible. This assumption is not correct as well. I can assure you that the flat calibration is done, but with a badly prepared master flat. If you put bad master frames into APP it will never automatically adjust it. Nor would pixinsight or nebulosity or any other program. There simply isn't any information present to detect if the master frame is badly prepared and neither is there information present to "know" how to magically correct this.
Therefor your suggestion to create built-in warnings in het calibration engine while preparing the master frames is a very good idea which I'll definitely try to implement.
Lastly,
"A suggestion from me that will save you a lot of headaches in the future is to (And this is as we say in the Netherlands “Cursing in Church”) Add the following checkmark/option: “Calibrate flats with same (ISO/Gain) bias as Lights”
I think that your suggestion is to make something that is fundamentally wrong. Let me try to explain:
If you have
light frames of iso1600 and
a masterbias of iso1600.
and flat frames of iso 200
And you would apply the iso1600 masterbias on the iso200 flats, the read noise patterns in your flats are going to be strongly overcorrected wih a factor of 8, which is clearly something you don't want to do.
(And I really think that you have been doing this consistently in your calibration routine in PI, for which PI didn't issue warnings to you 😉 or did it ?)
( the ADU count of a pixel with iso1600 is roughly 8 times the ADU count of that pixel with iso200 for the some number of electrons, e-, that were freed by the received photons that were captured by the pixel.)
You might think, why not use that factor 8 as a correction factor? Well this could only give robust and reliable results if all camera's behave perfectly linear with respect to change in iso or gain. This is hardly the case, so this correction will never give reliable, robust or optimal results. Therefor, I will not implement this since it is bad practice.
Other applications do let the user do this and this leads to a lot of photographers having sub optimal calibration results without them even knowing it, which really isn't my goal to achieve with APP.calirbationCode
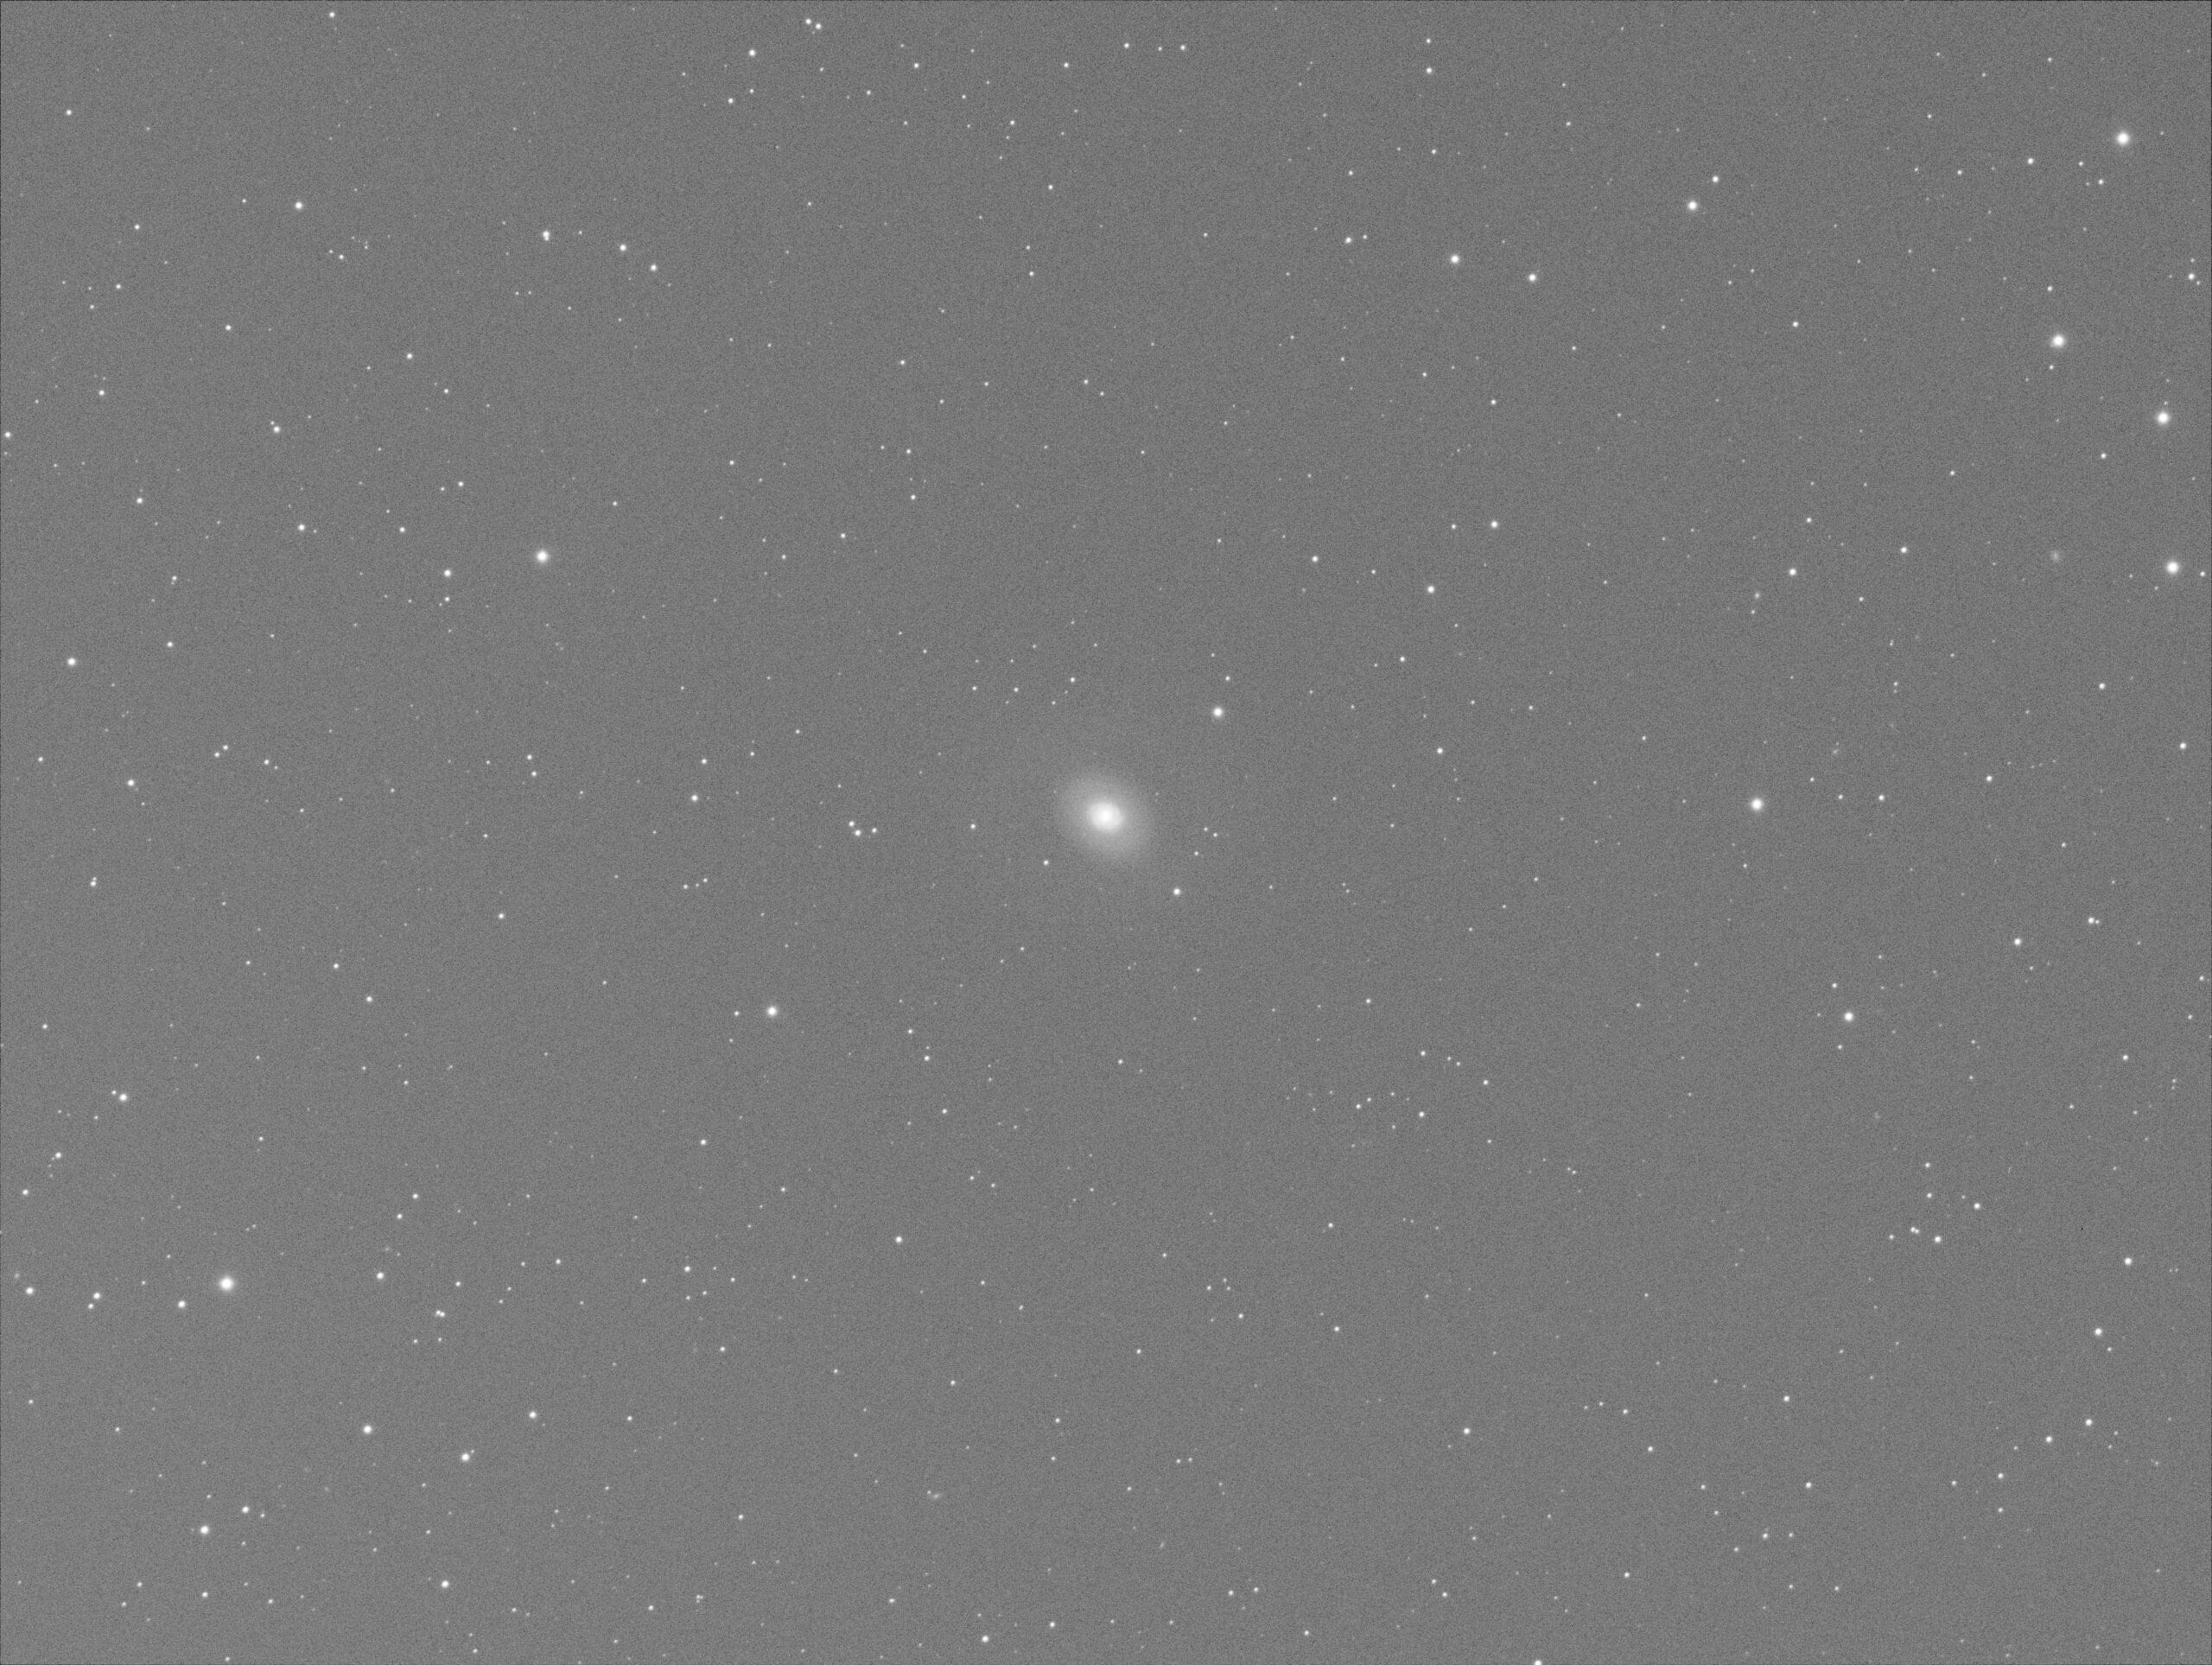
Finally, I strongly stretch the calibrated light frame to check if the bias, flat, bpm calibration is working effectively, I think it is working perfectly 😉Light-calirbated-strong stretchM94_300s_300042017-017L-St
Finally, I strongly stretch the calibrated light frame to check if the bias, flat, bpm calibration is working effectively, I think it is working perfectly 😉Light-calirbated-strong stretchM94_300s_300042017-017L-St
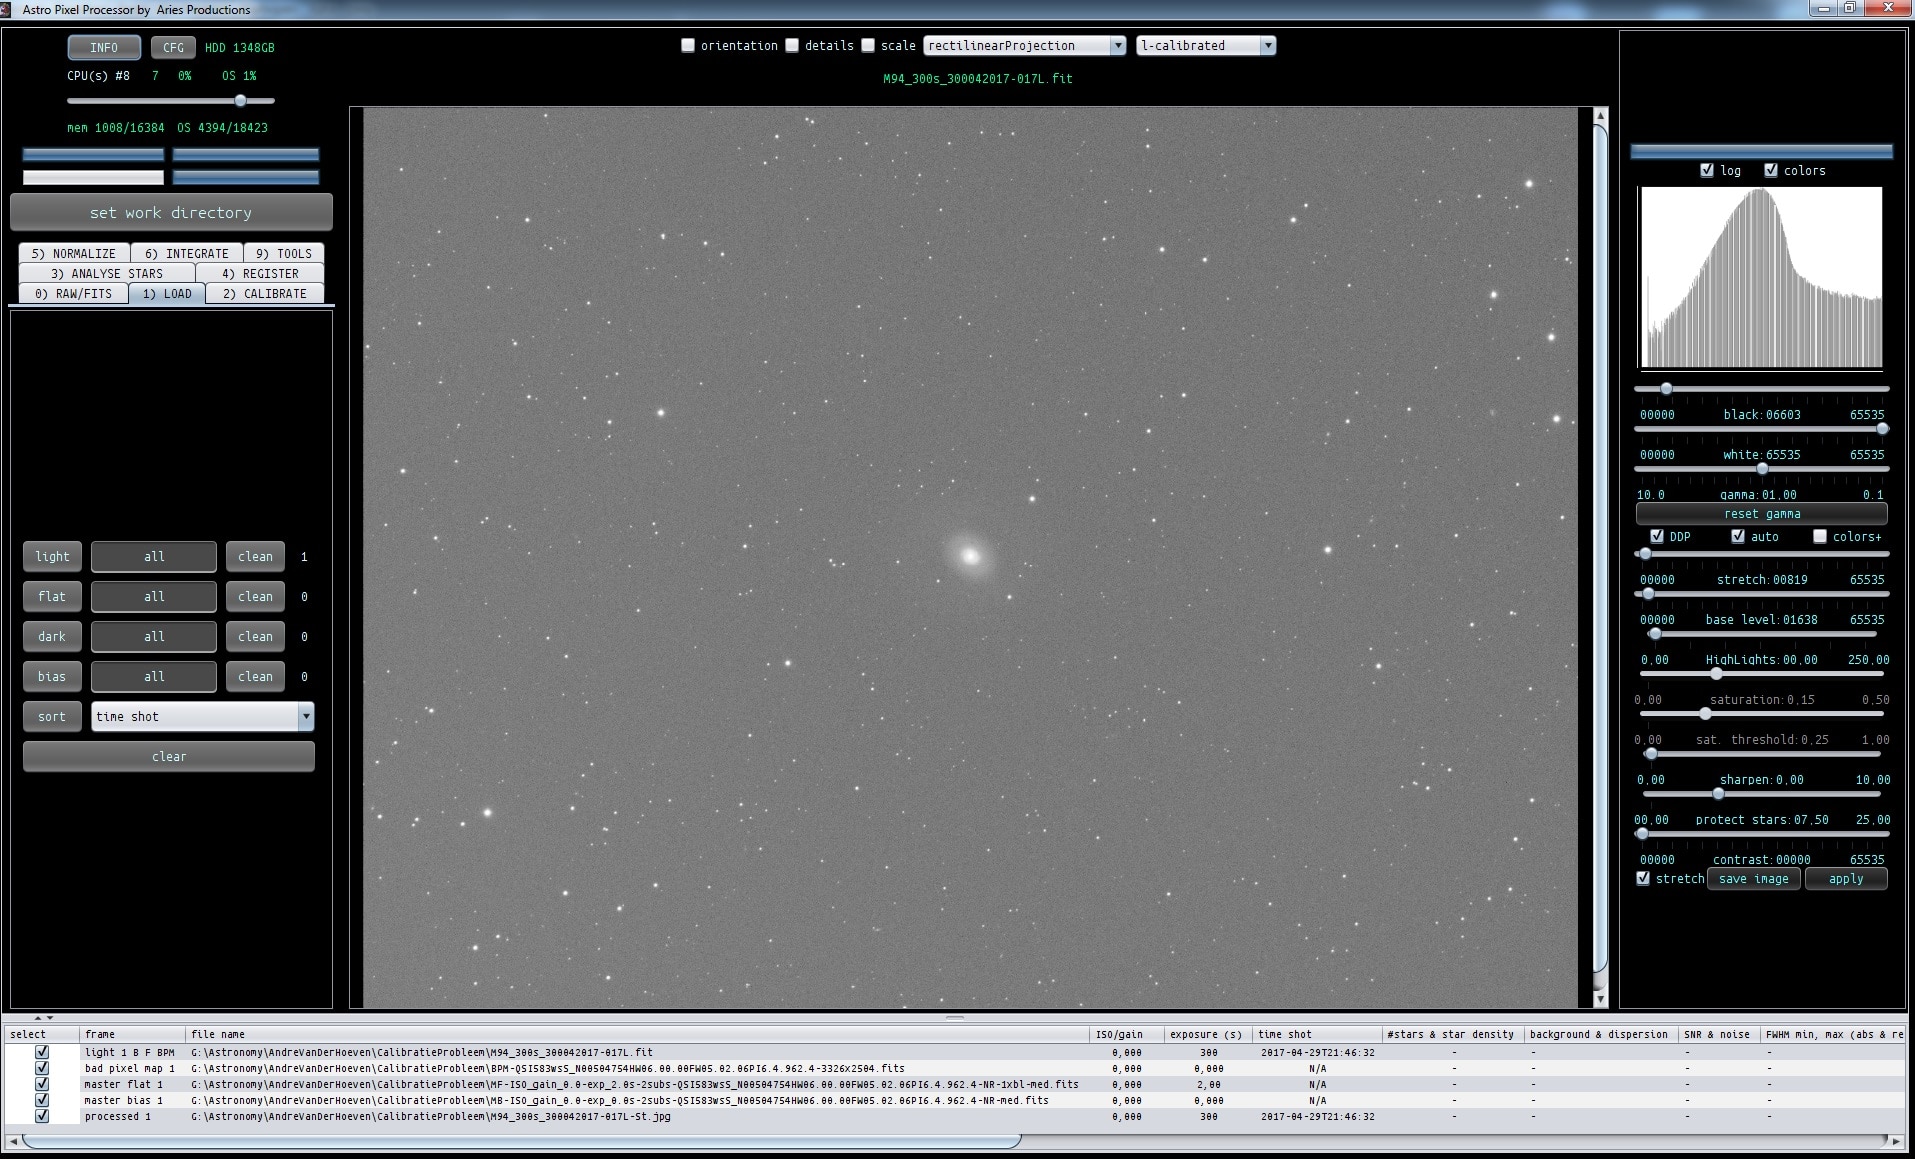
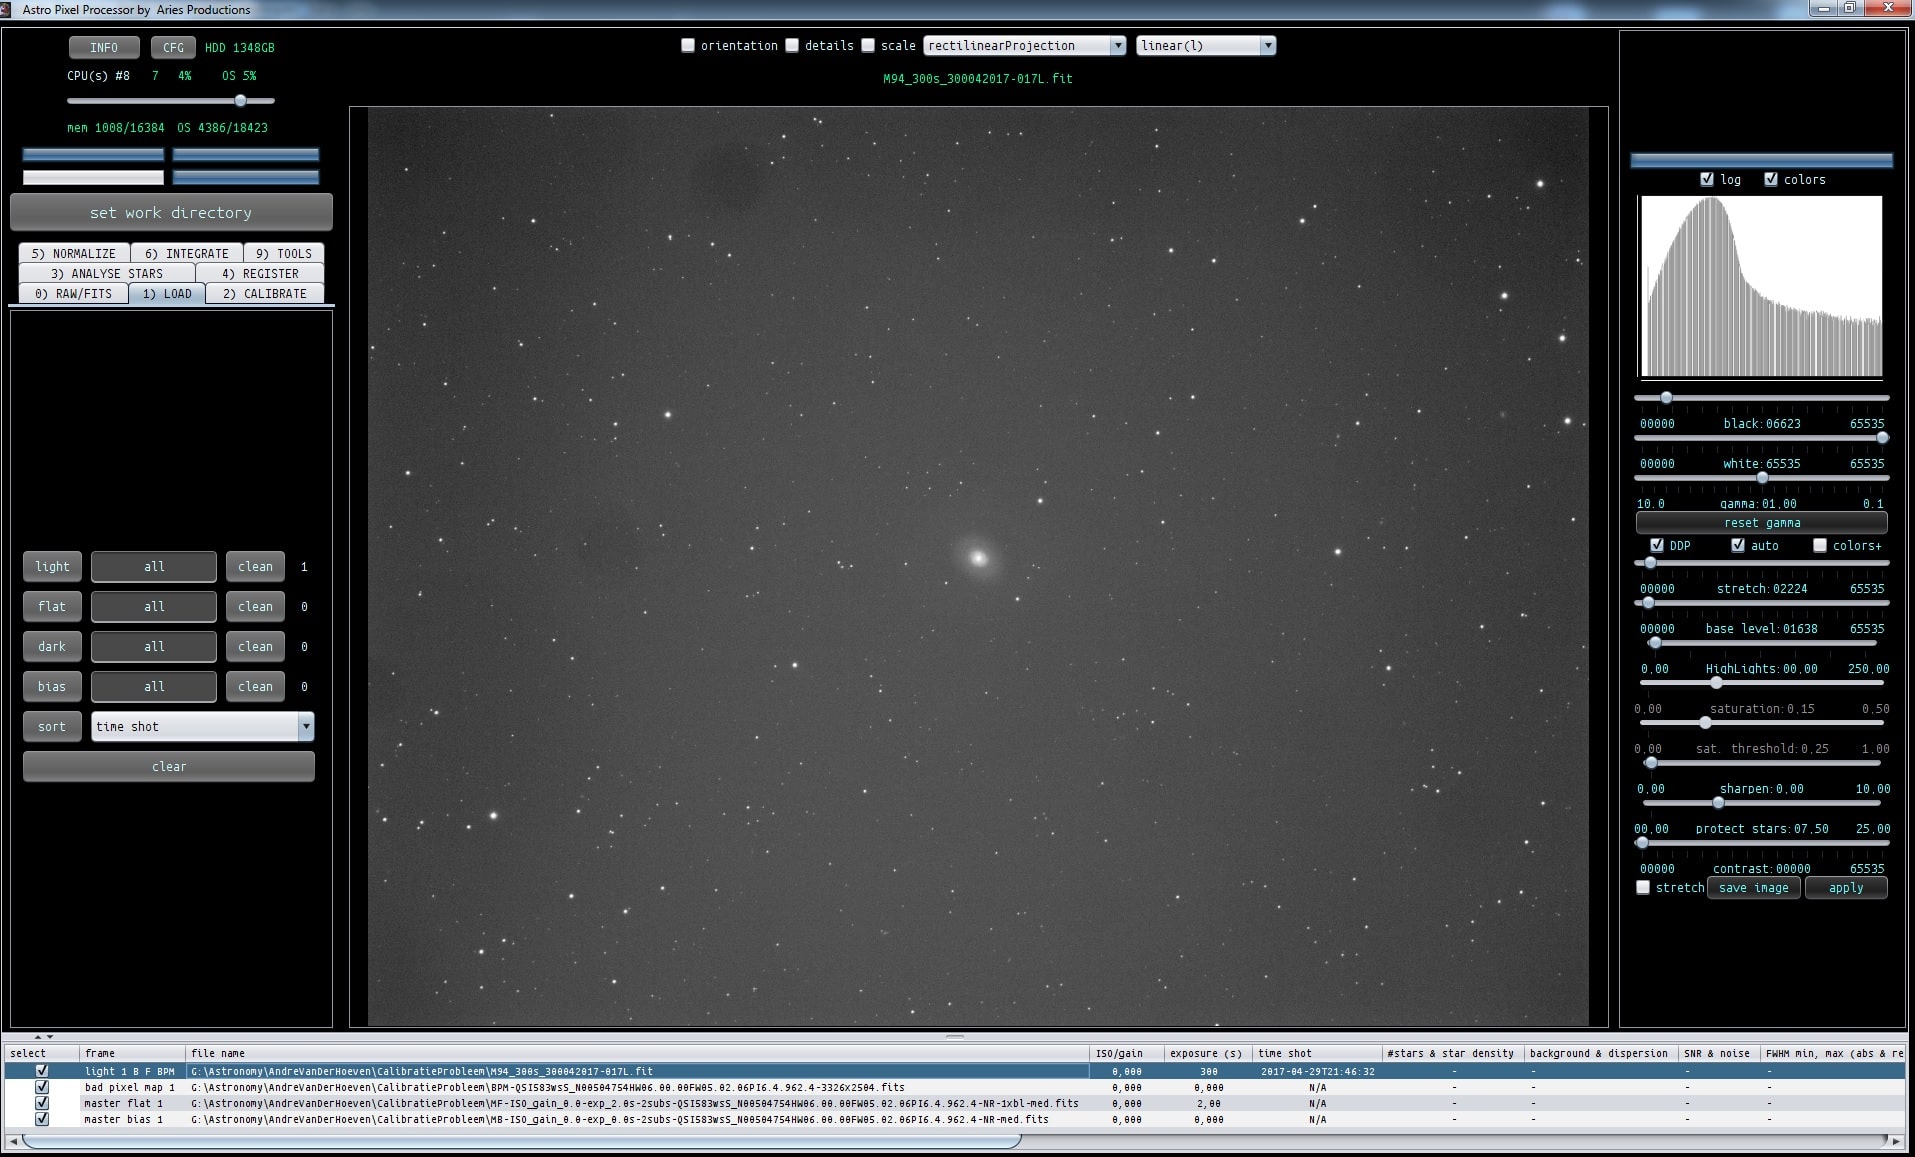
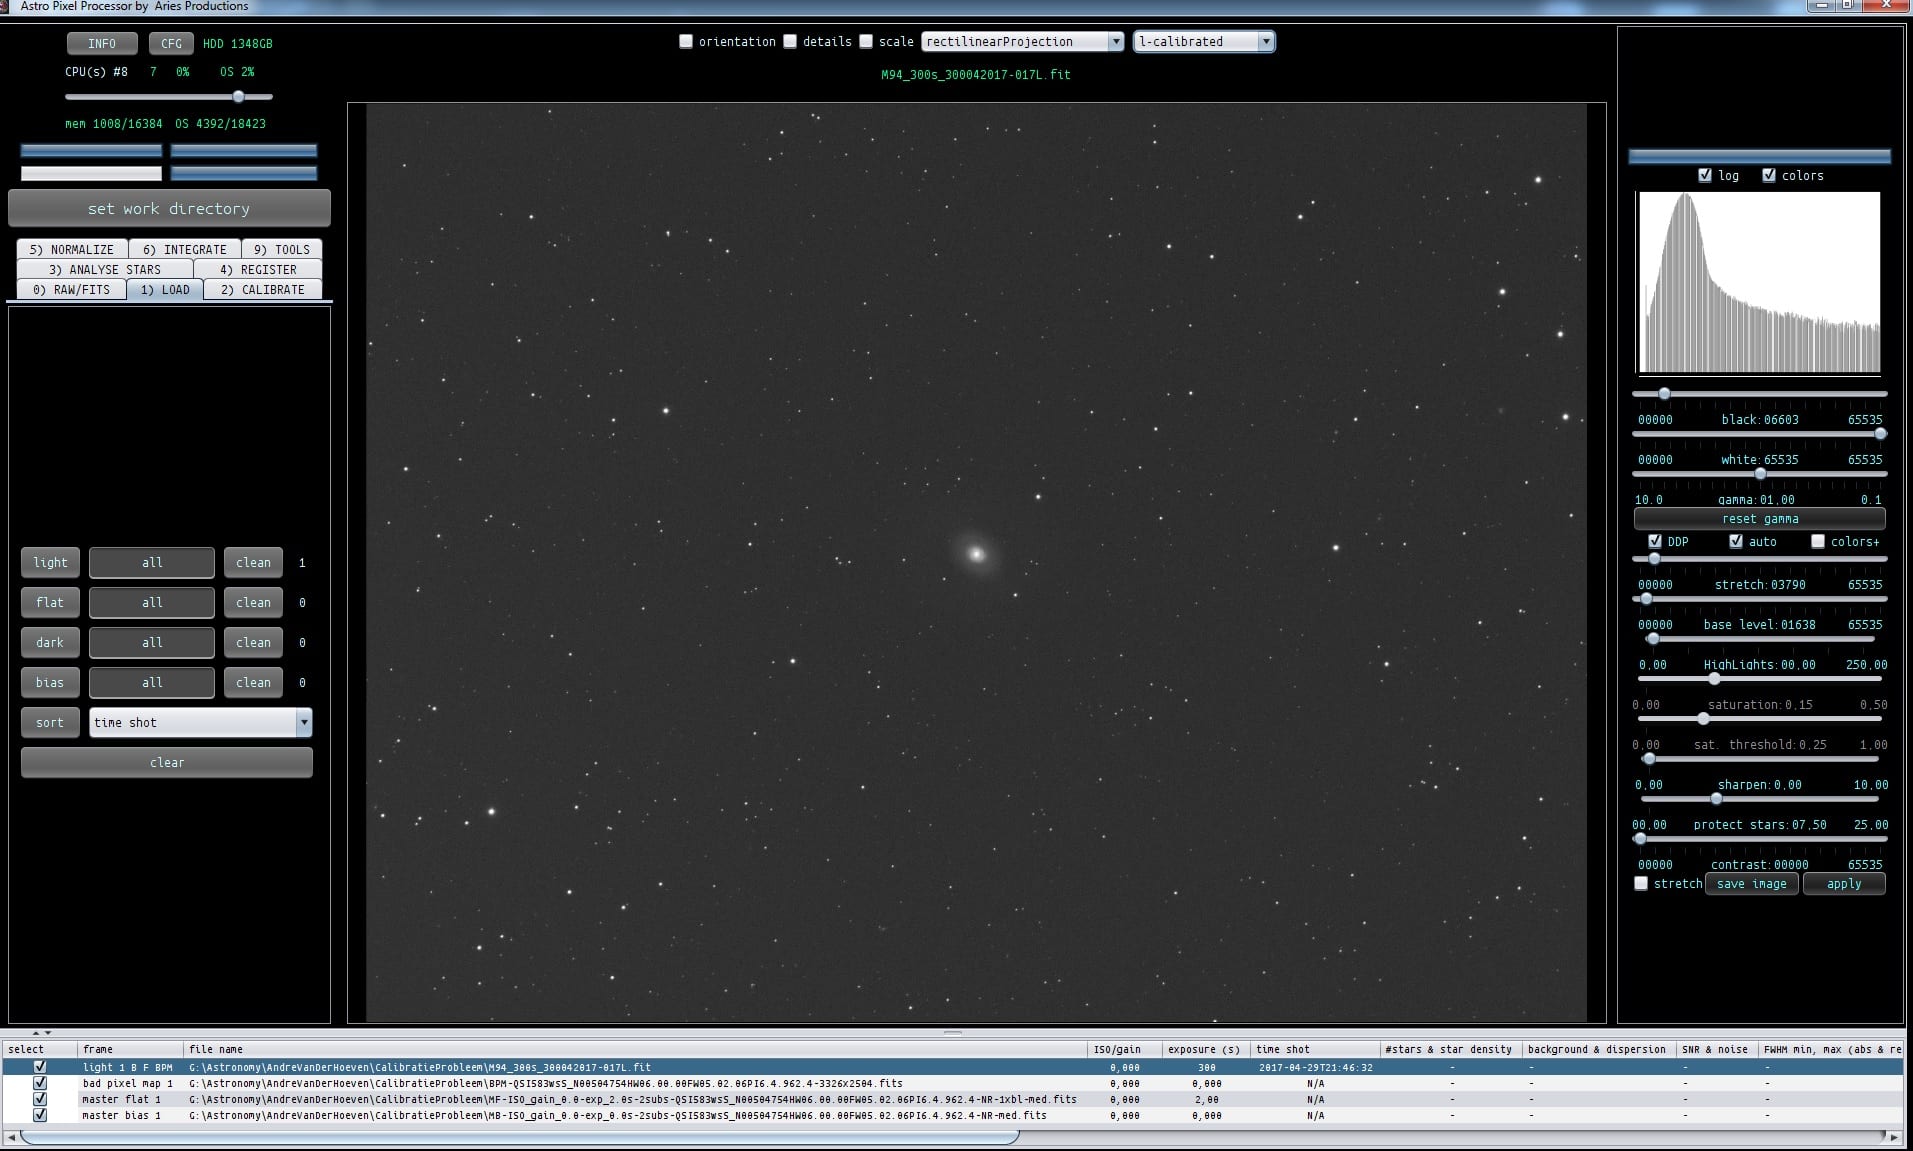
Final step is to check the calirbation of the light.
First I remove the flats and bias from the file list
at 1)LOAD, i click on the "ALL" switchbox to the right of the flat/bias button. This deselects the flats/bias frames. Then I click on "clean" to the right of the swithchbox. All bias and flat frames are now removed from the file list.
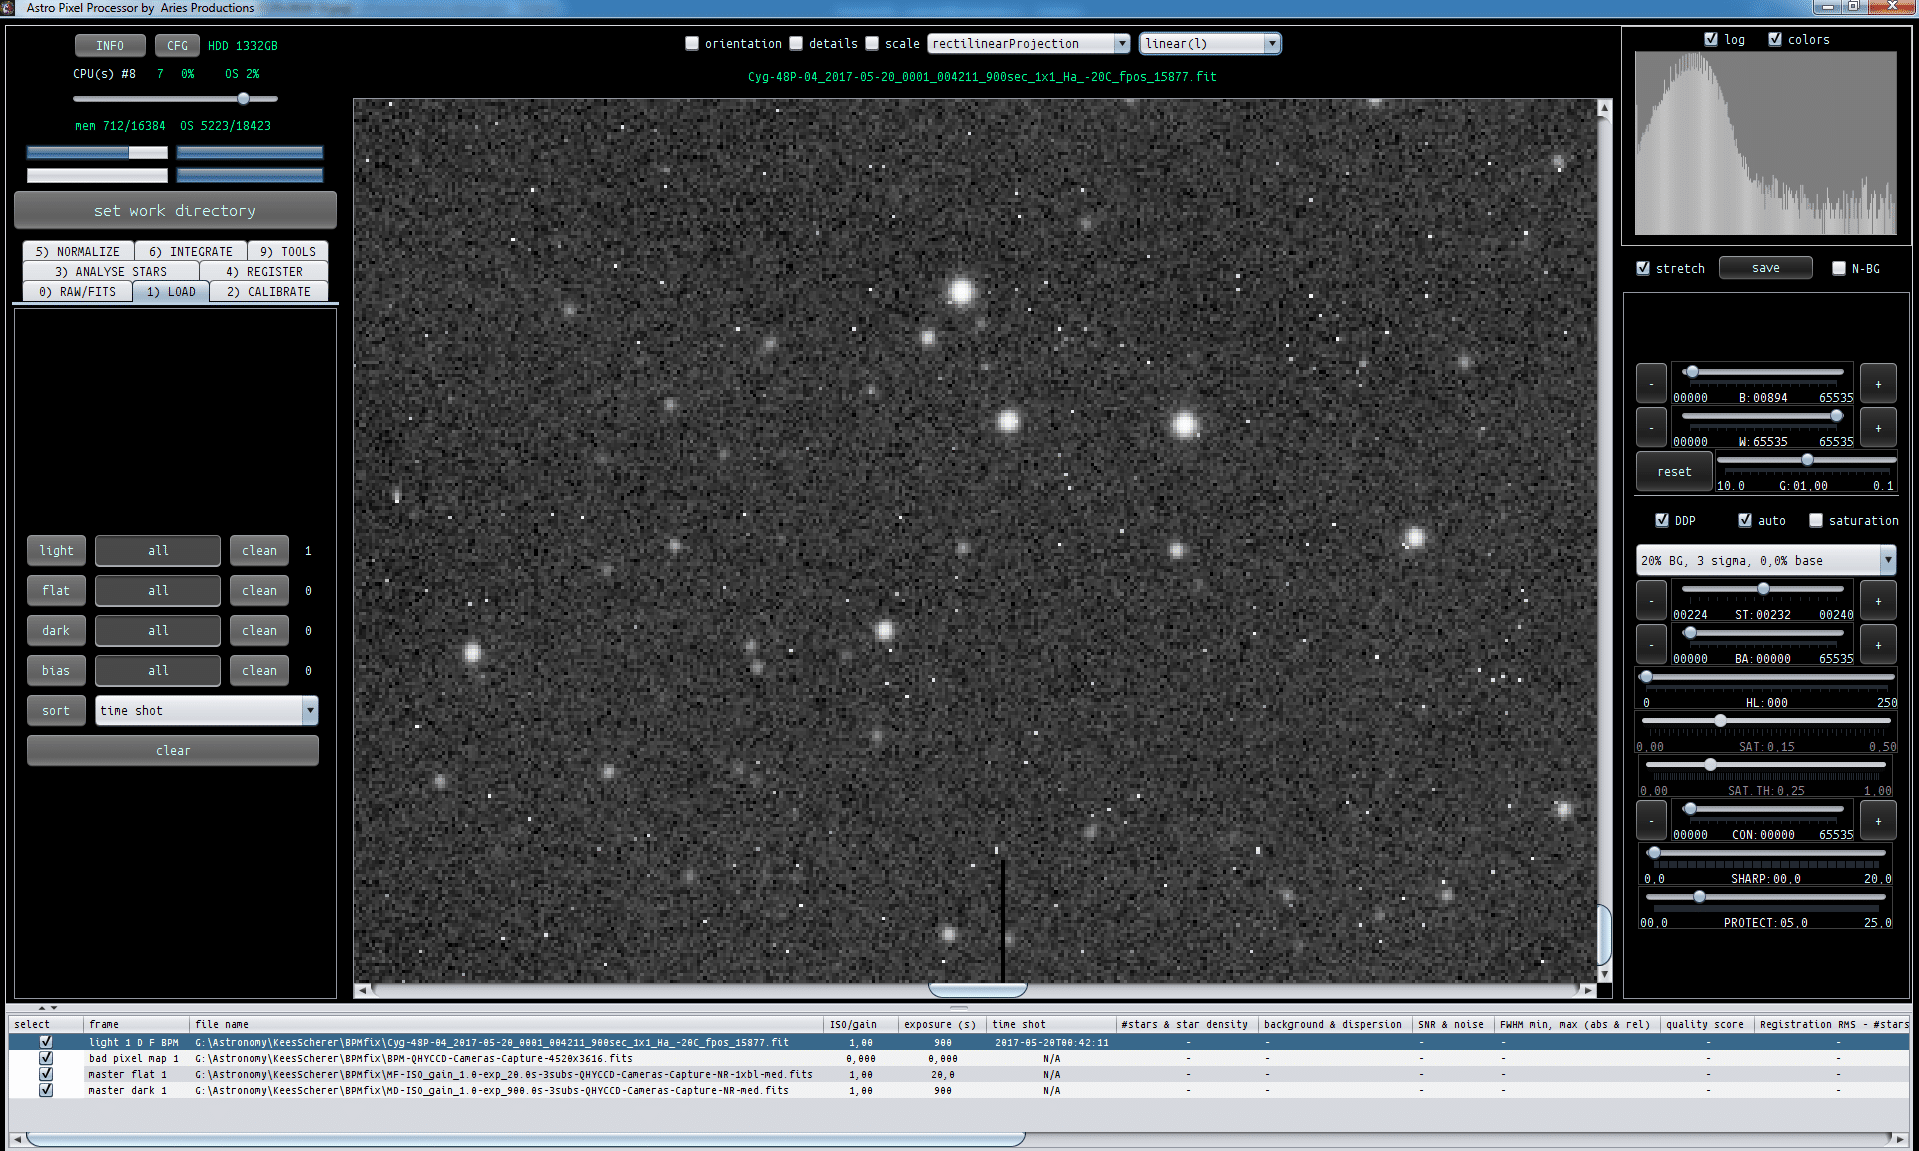
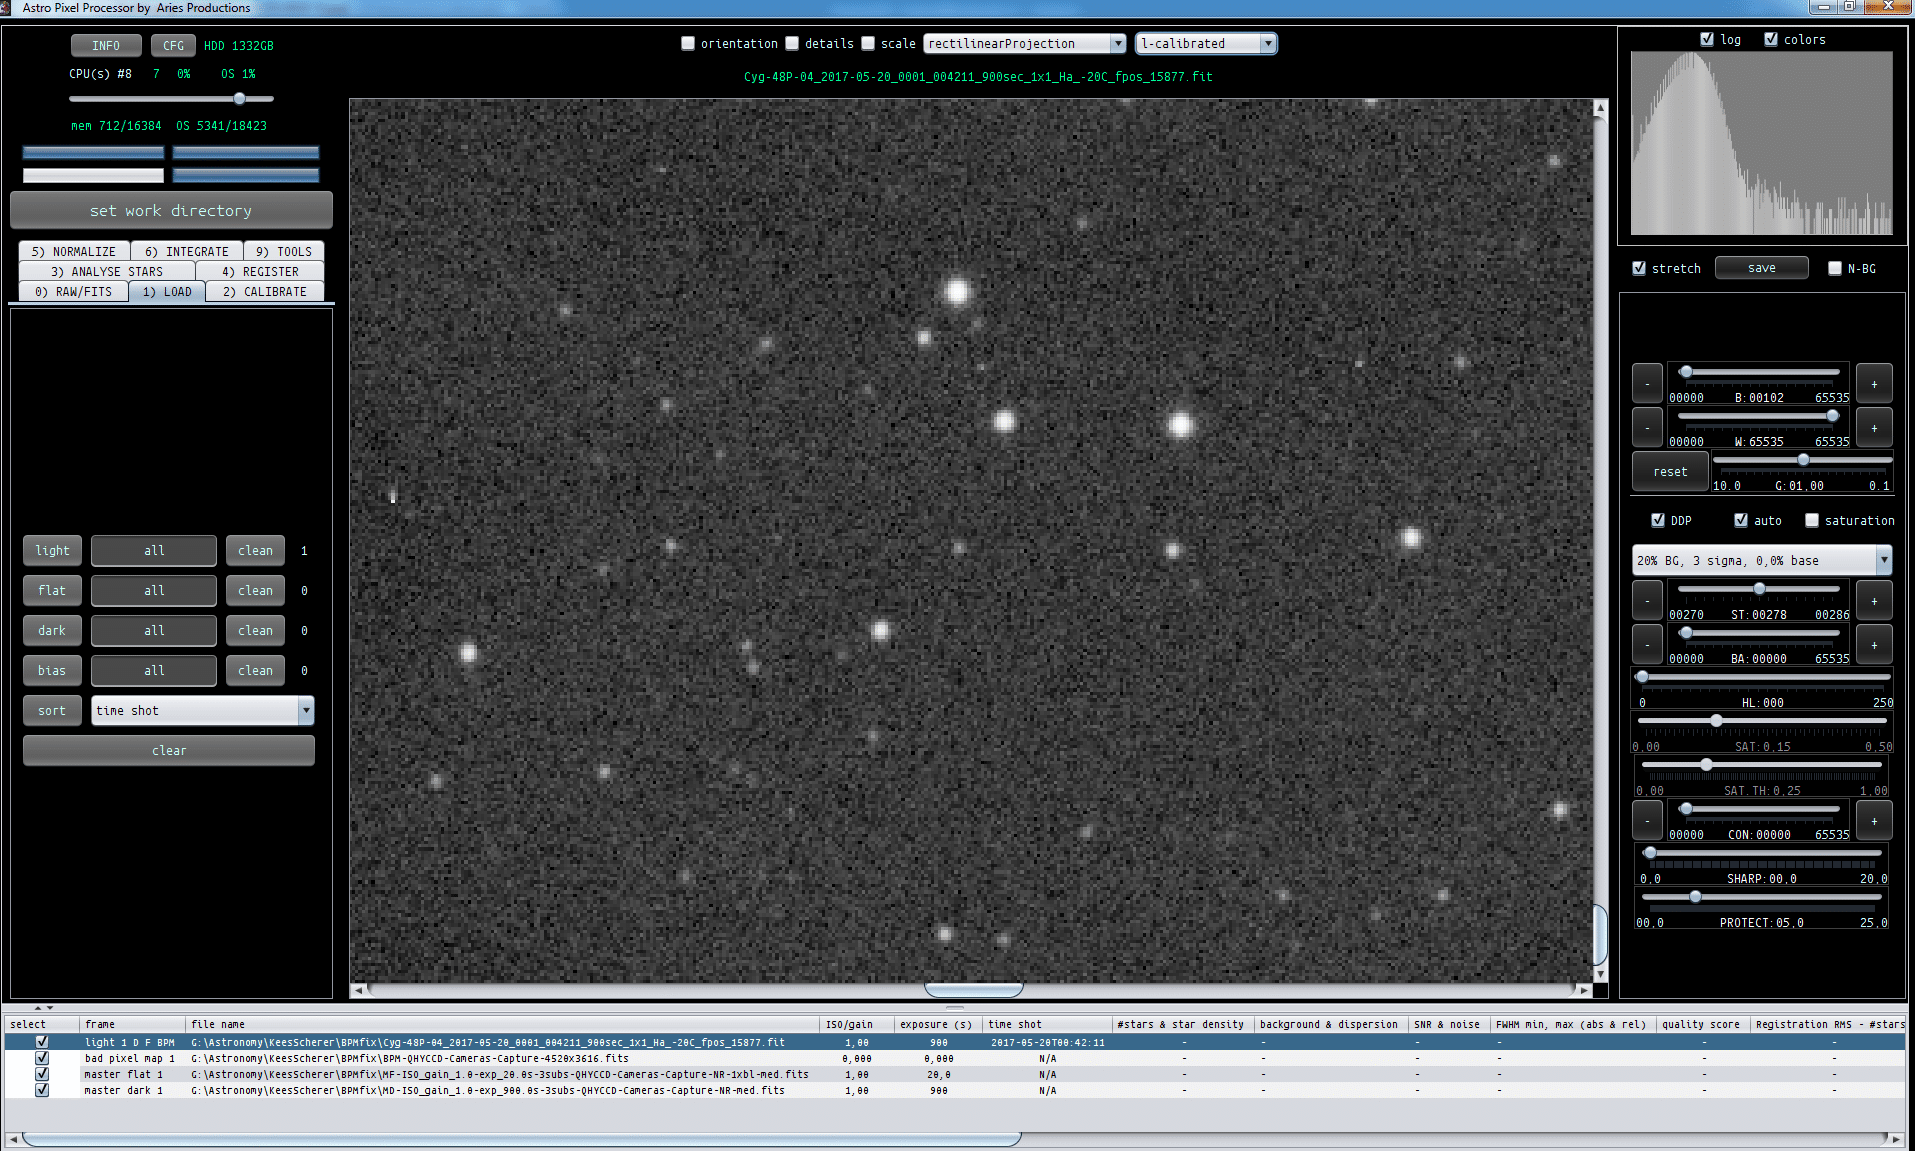
I then add the BPM and the light frame.
I load the light frame linearly which is the first image,
and secondly with l-calibrated to verify calibration. Result looks good to me ;-)
André, possibly, the error in calibration that you had, had to do with the flats not being bias calibrated?lightframelightFrame-calibrated
Final step is to check the calirbation of the light.
First I remove the flats and bias from the file list
at 1)LOAD, i click on the "ALL" switchbox to the right of the flat/bias button. This deselects the flats/bias frames. Then I click on "clean" to the right of the swithchbox. All bias and flat frames are now removed from the file list.
I then add the BPM and the light frame.
I load the light frame linearly which is the first image,
and secondly with l-calibrated to verify calibration. Result looks good to me ;-)
André, possibly, the error in calibration that you had, had to do with the flats not being bias calibrated?lightframelightFrame-calibrated